
Van's Air Force
You are using an out of date browser. It may not display this or other websites correctly.
You should upgrade or use an alternative browser.
You should upgrade or use an alternative browser.
Wing rib rivet advice
- Thread starter twpuls
- Start date

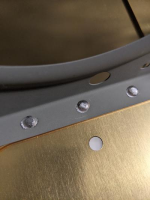
I'd leave as-is. You just got a little off of vertical and smooshed the edge of the rivet. There are standards for what constitutes a compromised rivet in terms of cutting into the manufactured head (sorry, not at a place where I can look up the reference), but at least from my recollection, these don't come anywhere close to that.
")
Are you using and offset rivet set? I couldn't get one to work very well. I ended up using a long (12") rivet set at a bit of an angle so the rivet gun cleared the rib. Also used Snap Soc's to keep from wandering off the rivet head. Make sure you are using the right rivet set for AN470AD4 rivets.

 www.aircraftspruce.com
Snap Soc Rivet Set Caps 1/8" Green (Pk Of 10) | Aircraft Spruce ®
Snap Soc Rivet Set Caps 1/8" Green (Pk Of 10) Insert these caps onto the ends of your rivet sets to provide a protective zone between the rivet set and the rivet.
I used both the offset and straight (short) set. I turned down the air pressure as well. I thought maybe I was overdriving them a bit, but no matter what I did, I had some that were perfectly fine and then I'd get a couple like these. I had two that I thought were terrible so I drilled those out and put new ones in. I don't know, it was frustrating and maybe I'm just being too picky. I tried looking in 43.13 and couldn't find what I was looking for regarding this since everything was referencing shop head imperfections. Maybe I just need to take a break and look again tomorrow.Are you using and offset rivet set? I couldn't get one to work very well. I ended up using a long (12") rivet set at a bit of an angle so the rivet gun cleared the rib. Also used Snap Soc's to keep from wandering off the rivet head. Make sure you are using the right rivet set for AN470AD4 rivets.
Snap Soc Rivet Set Caps 1/8" Green (Pk Of 10) | Aircraft Spruce ®
Snap Soc Rivet Set Caps 1/8" Green (Pk Of 10) Insert these caps onto the ends of your rivet sets to provide a protective zone between the rivet set and the rivet.
If it were me, I’d leave them alone. Those are not that bad and frankly, you’ll likely do more damage drilling them out. Like someone else said, get a 12” rivet set and gently flex the rib slightly to get straight on the rivet head. Look up the experiment that vans did where they used a sawzall and cut through ALL the wing ribs completely while having the wing loaded up with sand bags. The consensus was that the plane would still fly as the ribs were only needed to give the wing the shape needed to generate lift.I just riveted the ribs to the left and right main spar. Had a few rivets where this happened. Should I drill out and redo?
Not quite sure what you are doing there…looks like back bucking. Meaning driving the shop head with the gun and bucking bar on manufactured head??
I don’t like that method for many things…sometimes you have to…but most of the time, you get better rivets with gun on manufactured head and bar on shop head.
If you’re back bucking with a universal set and your set is hitting the rib…I would stop.
Pic is not clear enough to fully diagnose.
I don’t like that method for many things…sometimes you have to…but most of the time, you get better rivets with gun on manufactured head and bar on shop head.
If you’re back bucking with a universal set and your set is hitting the rib…I would stop.
Pic is not clear enough to fully diagnose.
Yeah, I think I'll leave them alone as several of you had said.If it were me, I’d leave them alone. Those are not that bad and frankly, you’ll likely do more damage drilling them out. Like someone else said, get a 12” rivet set and gently flex the rib slightly to get straight on the rivet head. Look up the experiment that vans did where they used a sawzall and cut through ALL the wing ribs completely while having the wing loaded up with sand bags. The consensus was that the plane would still fly as the ribs were only needed to give the wing the shape needed to generate lift.
No, I'm not not doing that and I'm bucking with the correct method. It might just look like it from the picture.Not quite sure what you are doing there…looks like back bucking. Meaning driving the shop head with the gun and bucking bar on manufactured head??
I don’t like that method for many things…sometimes you have to…but most of the time, you get better rivets with gun on manufactured head and bar on shop head.
If you’re back bucking with a universal set and your set is hitting the rib…I would stop.
Pic is not clear enough to fully diagnose.
If those are how they look from normal bucked rivets, then it looks like you maybe are just over-bucking slightly.
If you’re running a 2x gun with a regulator, you really don’t need a lot of pressure and a good tease-able trigger helps. The first few impacts can be slow, then ramping up to maybe 25psi full trigger burst.
Many people hold too much finger pressure on the bucking bar and you want the bar to dance slightly in your fingers…not a death grip on it.
Check your diameter and height as you do a few and adjust accordingly.
The rings I’m seeing in your pictures, look like maybe just witness marks from your dimpling dies…I’d experiment with softening up the pressure at the bottom of your dimple stroke to keep the witness lines minimal.
Other than that…BUCK ON!! just adjust your technique till they look how you’d like.
I had the same issue when I first started riveting universal rivets. It's from allowing the set to move a bit and fret the factory head. I found a few things that help: 1. push harder and don't let the rivet gun wobble at all 2) tape the set to the gun so it can't rotate and (most effective) 3) place a piece of masking tape on the face of the set 4) try higher pressure/shorter set times. Generally I try for somewhere around 1s to set a single rivet. The tape helps keep the set from rotating and also keeps it in contact with the rivet head. Shorter set times mean less fretting.No, I'm not not doing that and I'm bucking with the correct method. It might just look like it from the picture.
This is my guess. If you don't let the bar bounce on and off the shop, by applying too much pressure, the driving tool can slightly bounce on and off the mfr head and cause this. Riveting is hammering. In order to compress the stem, one side must come on and off the rivet, just like pounding in a nail. The trick is to hold the rivet gun firmly against the head and the bar loosely against the stem. This forces the bar to do the hammering.Many people hold too much finger pressure on the bucking bar and you want the bar to dance slightly in your fingers…not a death grip on it.
If the gun side is doing the bouncing, it is very easy for it to come back down slightly off center and squeeze the rivet edge like you are seeing. You don't need to hold the bar really loose, so don't over compensate. Just don't get to agressive on bar pressure. You don't really feel the bar coming on and off the stem, but you should be able to feel it kind of floating. Important that you correct this, as later you will need that gun pressure to insure that you are keeping the rivet pressure firmly down to take out gaps between parts you are fastening.
Last edited:
This is correct. On 3 and 4 rivets…I put probably 30 pound of load on the gun..and I hold the bar between my thumb and ring finger and rest my thumb and pinky on the work piece and let the bar float with just my first fingertip for pressure on the back end of the bar…about a one second burst that starts with a tap-tap-tap and ramps up to full pressure is all it takes.This is my guess. If you don't let the bar bounce on and off the shop, by applying too much pressure, the driving tool can slightly bounce on and off the mfr head and cause this. Riveting is hammering. In order to compress the stem, one side must come on and off the rivet, just like pounding in a nail. The trick is to hold the rivet gun firmly against the head and the bar loosely against the stem. This forces the bar to do the hammering.
If the gun side is doing the bouncing, it is very easy for it to come back down slightly off center and squeeze the rivet edge like you are seeing. You don't need to hold the bar really loose, so don't over compensate. Just don't get to agressive on bar pressure. You don't really feel the bar coming on and off the stem, but you should be able to feel it kind of floating. Important that you correct this, as later you will need that gun pressure to insure that you are keeping the rivet pressure firmly down to take out gaps between parts you are fastening.
If you were taught the old way…to buck a rivet with a solid bar on the manufactured head and ball peen hammer on the shop head..you realize it only takes about a dozen taps with the ball peen to produce a very nice rivet…the rivet gun just expedites the process.
Yes. I have a death grip on the bucking barIf those are how they look from normal bucked rivets, then it looks like you maybe are just over-bucking slightly.
If you’re running a 2x gun with a regulator, you really don’t need a lot of pressure and a good tease-able trigger helps. The first few impacts can be slow, then ramping up to maybe 25psi full trigger burst.
Many people hold too much finger pressure on the bucking bar and you want the bar to dance slightly in your fingers…not a death grip on it.
Check your diameter and height as you do a few and adjust accordingly.
The rings I’m seeing in your pictures, look like maybe just witness marks from your dimpling dies…I’d experiment with softening up the pressure at the bottom of your dimple stroke to keep the witness lines minimal.
Other than that…BUCK ON!! just adjust your technique till they look how you’d like.
") To the point my hand hurts.
To the point my hand hurts.Relax and smile at the rivets, little Obi Wan….
Yep. What Jacob ^ said.I had the same issue when I first started riveting universal rivets. It's from allowing the set to move a bit and fret the factory head. I found a few things that help: 1. push harder and don't let the rivet gun wobble at all 2) tape the set to the gun so it can't rotate and (most effective) 3) place a piece of masking tape on the face of the set 4) try higher pressure/shorter set times. Generally I try for somewhere around 1s to set a single rivet. The tape helps keep the set from rotating and also keeps it in contact with the rivet head. Shorter set times mean less fretting.
I prefer Gorilla Tape on the rivet factory head. Rarely get a smiley. Secure the set to the gun with tape so it can't rotate.
I set mine on a jig. Lay the spar on a bench. Prop up either end with blocks just enough so a tungsten bar will fit under the rivet shop side. Slip a piece of foam under each end so the spar can flex a tiny bit. Set the bar under the first rivet. Drive the rivet. Perfect shop heads.
There are certain rivet sets that aren’t perfectly shaped same as the rivet head. I cap mine with 3 layers of masking tape to avoid the factory head edge ‘smiley’ shape.
As wireJock mentioned, use a sturdy duct tape to prevent the set rotating in the rivet gun, especially with offset sets.
Finally, your pictures suggest your gun may be slightly tilted on some of your rivets, illustrated by getting ‘smilies’ on only one side of your rivet head.
As wireJock mentioned, use a sturdy duct tape to prevent the set rotating in the rivet gun, especially with offset sets.
Finally, your pictures suggest your gun may be slightly tilted on some of your rivets, illustrated by getting ‘smilies’ on only one side of your rivet head.
Flyin'Bryan
Well Known Member
Excellent tips in here, but there is one additional that I do not think I have seen yet that helped me fix this problem - carefully grind down the tip of the cupped rivet set and then re-sand or file the tip smooth again. Then do the tape to keep the set from spinning, tape the inside of the cup, extra hand (not air) pressure pushing on the gun/rivet set, less hand pressure on the bucking bar, but still able to able to float on the rivet shank, and as a last resort try coming down on the air pressure a small amount. But above all, make sure that the work is clamped down to prevent it from moving as much as possible.
I adopted all of these tips and it made a huge difference. It has been stated in many historical posts that after they are manufactured the cups on AN470 rivet sets can be manufactured a tiny bit too deep. If you are prone to cock the rivet set to the side a little because you have a real hard time determining what straight up and down is supposed to look like (Like me), filing away a small amount of the tip of the rivet set will prevent most of those smileys and still allow it sit on top of the factory head just fine without slipping. One last tip for AN470 rivets is to make sure that the rivet length is correct. If the shaft is too long it can also cause various setting problems. My 2 cents.
I adopted all of these tips and it made a huge difference. It has been stated in many historical posts that after they are manufactured the cups on AN470 rivet sets can be manufactured a tiny bit too deep. If you are prone to cock the rivet set to the side a little because you have a real hard time determining what straight up and down is supposed to look like (Like me), filing away a small amount of the tip of the rivet set will prevent most of those smileys and still allow it sit on top of the factory head just fine without slipping. One last tip for AN470 rivets is to make sure that the rivet length is correct. If the shaft is too long it can also cause various setting problems. My 2 cents.
Last edited:
First I hope you are using a tungsten bar (5/8" x 1" x 4"), much better than the obsolete cast iron ones and worth the $$$. I found it helpful to cut a piece of bicycle tube and stretch it over the tungsten bar. Then I also used a light leather glove on the bucking bar hand. The rubber bicycle tube and glove helped isolate the vibration.Yes. I have a death grip on the bucking bar
Smiles and /or smears on the manufactured head of an AN470 rivet are typically caused by not pushing the gun hard enough to hold the set tightly against the rivet.
A lot of the other tips previously mentioned are good to follow, and can help mitigate the issue, but not enough push is the core issue.
A lot of the other tips previously mentioned are good to follow, and can help mitigate the issue, but not enough push is the core issue.
Flyin'Bryan
Well Known Member
To your point, and from my own experience I would also add that you may "start out" with enough pressure, but it loosens up when you start pounding - in my case this is mostly due to leaning over to check the bucking bar. I think that the most common problem is probably when you subconsciously start to relax a little too soon just before the gun stops pounding. I had to mentally force myself to keep the same pressure on the rivet from start to finish, keeping it there for a second or so after you stop the rivet gun. That also definitely helped me a lot. Since I am about to re-engage in my build for millionth time, this is a great - and very timely- review.Smiles and /or smears on the manufactured head of an AN470 rivet are typically caused by not pushing the gun hard enough to hold the set tightly against the rivet.
A lot of the other tips previously mentioned are good to follow, and can help mitigate the issue, but not enough push is the core issue.
Yes, the lack of pressure can happen because of a number of reasons.To your point, and from my own experience I would also add that you may "start out" with enough pressure, but it loosens up when you start pounding - in my case this is mostly due to leaning over to check the bucking bar. I think that the most common problem is probably when you subconsciously start to relax a little too soon just before the gun stops pounding. I had to mentally force myself to keep the same pressure on the rivet from start to finish, keeping it there for a second or so after you stop the rivet gun. That also definitely helped me a lot. Since I am about to re-engage in my build for millionth time, this is a great - and very timely- review.
A common cause of a smile in the head of the rivet is removing pressure on the gun at the same moment that the trigger is being released.
