Van's Air Force
You are using an out of date browser. It may not display this or other websites correctly.
You should upgrade or use an alternative browser.
You should upgrade or use an alternative browser.
Wing Leading edge rivets
- Thread starter Jaypratt
- Start date

Has any engineer type figured if there is a counter sink pull rivet that we can use on the leading edge D cells?
It sure would make wiping bugs easer. We build once,,, but we clean as long as we own and fly…
Attachments
Jay, see this thread: https://www.vansairforce.net/threads/rv-15-flush-rivet-leading-edges.240993/
Thank, I hadn’t read that, now I have read,,,
I intend to use 426-4 rivets on those ribs and skins. My D cell ribs are already attached to the front spar per the instructions. If you look at the rivets used to attach the D cell ribs to the forward spar, you will see they are using 470-4 rivets to attach the D cell ribs to the spar AND to the main wing ribs. I won’t say it is impossible to build the forward D cell ribs and skins off of the wing and then install them onto the spar/wing ribs, but I think it would be very difficult for sure.Has anyone completed leading edge D cells with AN 4264- * rivets? Is it possible? Reaching through the inspection holes.
Could the D Cell be riveted in a cradle like RV7/8//14 ?
Doesn’t look possible to me, but there are creative people here,
johnvanbladeren
Member
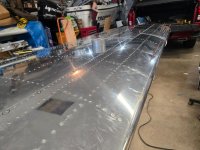
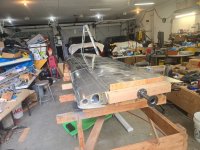
Thanks for sharing! Any surprises? Did you run the wiring before or after riveting?Here is an example of a completed left wing using AN426AD4-4.
johnvanbladeren
Member
There are two locations where the wiring harness was a problem. They are where the double column of rivets join the three leading edge skins together. We had to remove the wiring harness and plastic standoffs in order to get our hands past one rib to get to the inner column of rivets.Thanks for sharing! Any surprises? Did you run the wiring before or after riveting?
Because of the difficulty of reaching these two double columns of rivets, we decided to try something different First we clecoed all main and leading edge skins to the wing structure. Then installed the pull rivets on all main skins top and bottom only. Then, with the wing leading edge hanging out over the table edge we removed all of the clecos on the bottom of the three leading edge skins. This provided a large amount of access to the inside of the nose skins. No problems reaching the double columns. Then we back riveted all of the top skins to their ribs and the stringer.
We had to use a couple of 1" cargo straps to pull the bottom skins back in place and clecoed it to the spar and ribs. Most of the riveting was pretty easy due to the access panels but we still had a challenge reaching the inner column of rivets at the skin splices.
If you have relatively small hands, you may be able to reach the inner columns without needing to back rivet.
Otherwise, the process went fairly smoothly. We reinstalled the wiring standoffs and harness when all the riveting was done>
Z32MadMan
Member
Could you post a few more photos of the wing?There are two locations where the wiring harness was a problem. They are where the double column of rivets join the three leading edge skins together. We had to remove the wiring harness and plastic standoffs in order to get our hands past one rib to get to the inner column of rivets.
Because of the difficulty of reaching these two double columns of rivets, we decided to try something different First we clecoed all main and leading edge skins to the wing structure. Then installed the pull rivets on all main skins top and bottom only. Then, with the wing leading edge hanging out over the table edge we removed all of the clecos on the bottom of the three leading edge skins. This provided a large amount of access to the inside of the nose skins. No problems reaching the double columns. Then we back riveted all of the top skins to their ribs and the stringer.
We had to use a couple of 1" cargo straps to pull the bottom skins back in place and clecoed it to the spar and ribs. Most of the riveting was pretty easy due to the access panels but we still had a challenge reaching the inner column of rivets at the skin splices.
If you have relatively small hands, you may be able to reach the inner columns without needing to back rivet.
Otherwise, the process went fairly smoothly. We reinstalled the wiring standoffs and harness when all the riveting was done>
I assume you kept the LP4-3’s on the factory fuel tanks?
johnvanbladeren
Member