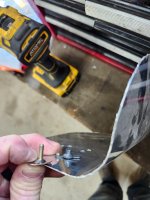
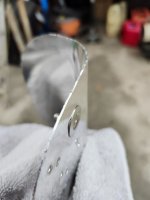
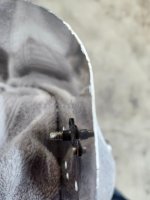
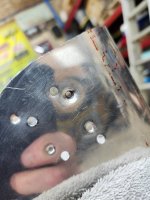
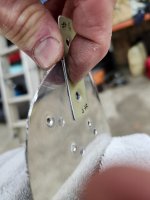
Working on page 20-5 dimpling for the k1100-08 nut plate that will go on the bottom aft and inboard most location of the wing. I've got a rivet tail in the way from lining up the female die to the hole center and the male die would be fine except the squeezer interferes with the flap hinge bracket. I could solve for the bracket interference but not for that rivet tail. And I cant seem to find a good alternative tool for #8 screw like the vice grips or pop rivet set.

Van's Air Force
You are using an out of date browser. It may not display this or other websites correctly.
You should upgrade or use an alternative browser.
You should upgrade or use an alternative browser.
What tool do you use to dimple extra tight tolerance on inboard aft most #8 nut plate on wing rib
- Thread starter RVFan671
- Start date

Hard to tell if it will be enough, but grab a smaller female die from here: https://cleavelandtool.com/collecti...die-set-for-3_32-rivet?variant=31450439057470 (they have a Small Dia. one for 1/8 and 3/32).
If that's not enough, I would grind down about 1/4 of that smaller female dimple die so instead of being a full circle when looking from the top it will look more like a crescent moon shape.
I think I made a dimple die like this for a situation similar to this but I also use it all the time for dimpling nut plates.
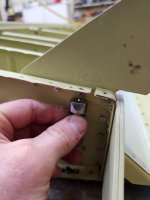
What should I use to dimple with said die after grinding it further? Im happy to grind this one down as much as I need but my squeezer interferes no matter which way I hold it due to the bottom lip of the rib and the flap bracket. The style where you use a rivet gun with dies in it doesnt seem like a good option due the same interference and the bucking bar side is pretty big.
Attachments
I’d drill the offending rivet out. Access is good.
Dimple the flange then reinstall the rivet.
Dimple the flange then reinstall the rivet.
Maybe:
- Use a flat-head screw as the male die and a nut-plate as the female die. Lube under the screw head and tighten the screw to dimple the rib flange. Could add thin sheetmetal under the screw head, a 100 deg countersunk washer if you have it or make your own, to prevent scoring the rib flange.
This worked extremely well and is the OP's first-and-only-tried and preferred solution, cheap and good, no special tools, ref post #20.
One can ignore my further brainstorming below.
or
- Use the male portion of Aircraft Tool Supply AE1026 as the male die and a nut-plate as the female die. Press the male die into the rib flange by tightening a screw into the nut-plate. https://www.aircraft-tool.com/Detail?id=AE1026
or
- Rivet the nut-plate to the rib flange.
Use the nut-plate as the female die and press a shop-made male die into the rib flange with a squeezer or a rivet gun and bucking bar.
The guide diameter of the male dies we normally use will interfere with the threaded portion of the nut-plate so that won’t work.
The shop-made male die can be a flat-head screw cut down, no threaded portion. Or cut the guide diameter off a store-bought male die.
or
- Use a K1000-08 nut-plate and a panhead screw and don't dimple that hole in the lower skin and wing root fairing.
Last edited:
I like these options! Ill be testing out the first suggestion next work session then consider how to accomplish the second option.Maybe:
- Use a flat-head screw as the male die and a nut-plate as the female die. Lube under the screw head and tighten the screw to dimple the rib flange. Could add thin sheetmetal under the screw head to prevent scoring the rib flange.
or
- Use a nut-plate as the female die and press the male die into the rib flange with a squeezer or rivet gun and bucking bar. The male die could be the head of a flat-head screw cut down if that helps.
Could test on scrap.I like these options! Ill be testing out the first suggestion next work session then consider how to accomplish the second option.
Actually it looks like this would work:


But it's only offered for 3/32 and 1/8 rivets, no option for #8 screw.Actually it looks like this would work:
Post #6 edited, hope this helps.
Norman CYYJ
Well Known Member
Don't dimple, use oops rivets and just use a counter sink bit very gently also you won't have to dimple the nut plates.Post #6 edited, hope this helps.
OP is wanting to dimple for a #8 flathead screw.Don't dimple, use oops rivets and just use a counter sink bit very gently also you won't have to dimple the nut plates.
I would like to add this to the wiki -- to dimple this at an earlier stage so that others don't run into this issue. I'm unusual in that I'm doing my wing kit last so I'm not up to that part of my build yet. If somebody can give me the part number and which section this is in I'd be happy to add this to the wiki (if only because I'd love to avoid this issue when I get there shortly).
Norman CYYJ
Well Known Member
Misunderstood.OP is wanting to dimple for a #8 flathead screw.
Chapter 20 page 5 is where youre doing this work. Im also doing wings last and would prefer to prep this inboard rib completely much earlier in the build, say during the ribs chapter...I would like to add this to the wiki -- to dimple this at an earlier stage so that others don't run into this issue. I'm unusual in that I'm doing my wing kit last so I'm not up to that part of my build yet. If somebody can give me the part number and which section this is in I'd be happy to add this to the wiki (if only because I'd love to avoid this issue when I get there shortly).
So the problem I see is that you are final-drilling for this nutplate on 20-5 step 6, then doing the dimple on step 9. But you are using the bottom skin to do the match-drilling, right? So the rib doesn't have the correct sized hole nor the nutplate attach holes back when you are doing the rib section.
If it is just this one nutplate then probably the best you can do is, before installing that rib (W-1010-R) you could temporarily cleco it to the bottom skin, match drill this one nutplate, then dimple ahead of time (before the W-1025A flap hinge bracket is installed in section 14).
Does that sound like the best option to avoid this?
That is the minimum you'd need to do to overcome this particular predicament but id suggest match drilling the 19s and 40s for nut plates on all call outs in section 20 before installing the rib. Just cleco to the skin and drill then do your dimpling on rib before installing that rib, or at least before installing that flap bracket.So the problem I see is that you are final-drilling for this nutplate on 20-5 step 6, then doing the dimple on step 9. But you are using the bottom skin to do the match-drilling, right? So the rib doesn't have the correct sized hole nor the nutplate attach holes back when you are doing the rib section.
If it is just this one nutplate then probably the best you can do is, before installing that rib (W-1010-R) you could temporarily cleco it to the bottom skin, match drill this one nutplate, then dimple ahead of time (before the W-1025A flap hinge bracket is installed in section 14).
Does that sound like the best option to avoid this?
This is a winning combo. You can only put 1 rivet into the rib (it calls for it by counter sinking the other nut plate hole, in the wing skin). I dimpled my .032 scrap and the one side of the k1100-08 nut plate and I used a 04-01989 (ACS part per my little baggie) countersink washer and a AN509 8R8 screw. The screw could be any aircraft countersink head though with enough threads to bottom out in the nut plate. Just used my screw driver to tighten it down and it was one shot, wasn't very hard to screw it in and it immediately formed it perfectly. I checked with my little scrap dimple checker and its flush. I prepped my scrap with 4 sets in case I needed some redos but it looks ready for prime time with no scratching or damaging of the skin or even the countersink washer.Maybe:
- Use a flat-head screw as the male die and a nut-plate as the female die. Lube under the screw head and tighten the screw to dimple the rib flange. Could add thin sheetmetal under the screw head, a 100 deg countersunk washer if you have it or make your own to prevent scoring the rib flange.
Attachments