

Van's Air Force

The definitive Van's Aircraft support community! Buying, building or flying an RV? Join our exclusive family of mentors and enthusiasts!

What to use for high temp epoxy for cowling?

reconaviator

Member
Patron
High all,

I am redoing a cowling and started to use Aeropoxy (Glass temperate transition point of 194 F) and am second guessing it ability to stand up to the heat. What are you all using as a high temperate epoxy for a cowling?

Thanks,
Scott
 
Hi,

We have not found the need for high-temp epoxy for cowlings, as long as you maintain some clearance between the cowl and exhaust pipes. 3/4" or more is good. Apparently there is enough cooling flow through the cowl to keep it well below T_g.

That said, painting the cowl a dark color, like black or deep red, can cause temperatures close to T_g and a higher temperature resin would be a good idea.

In applications where we need a higher T_g, we use PTM&W 2080 epoxy. To achieve good properties, it does require a post-cure at elevated temperature. After room-temperature cure, it is quite brittle and requires very careful handling. De-molding parts without damaging them is a little bit tricky. We then post-cure it at 150F for 3 hrs to get good properties, including a T_g of about 260F.

I think you will find all epoxies with higher T_g will require some kind of high-temperature cure cycle. You can make a make-shift curing oven from a sheet of 2" foil-backed foam insulation board. We make a box from the insulation board, connecting the panels with wood BBQ skewers and sealing the edges with aluminum tape. An electric hot-plate or electric skillet from a thrift-store provides the heat, and we stick a meat thermometer through the foam to the inside so we can monitor temperature.
 
I know that this may be polarizing, but I used West Systems epoxies on every fiberglass or carbon fiber layup throughout the build. No problems. Nothing has cracked, chipped, melted, burned or fallen off. I did use the self-adhesive foil from Van's on the cowling anywhere that got within a few inches of the exhaust.
 
I know that this may be polarizing, but I used West Systems epoxies on every fiberglass or carbon fiber layup throughout the build. No problems. Nothing has cracked, chipped, melted, burned or fallen off. I did use the self-adhesive foil from Van's on the cowling anywhere that got within a few inches of the exhaust.
Yep - three builds over 25 years with West Systems.

I do however:
- Prime and paint the inside of the cowl white.
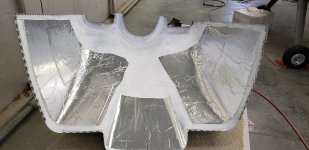
- I add the Van’s self-adhesive foil, but add a layer of FiberFrax between the foil and cowl on any areas anywhere near the exhaust.
- I also add radiant heat reflectors on the one or two pipes closest to the cowl.

Using the above approach I fixed an RV-14 cowl that was already showing signs of heat damage after ~100 hours (the inside of the cowl was bare fiberglass).

Carl
 
I know that this may be polarizing, but I used West Systems epoxies on every fiberglass or carbon fiber layup throughout the build. No problems. Nothing has cracked, chipped, melted, burned or fallen off. I did use the self-adhesive foil from Van's on the cowling anywhere that got within a few inches of the exhaust.
Yes, the aluminum tape on the inside of the cowl is a very good idea.
 
Steve, DW & Carl

Thanks for the information! I will push ahead with what I got, prepping the inside and installing heat shield where needed.

Cheers,
Scott
 
I used MGS L285/H286 extensively for cowling modifications and repairs. I do use motor racing heat mat - a thick version of Vans aluminium foil - near the exhaust. In my view no need to use special resin for the cowl. Heat protection is needed to avoid localised burning.
 
Old discussion.

I continue to like West for surface finishing, like blended tips and windshield fairing, and I don't hesitate to use it for non-structural parts. However, its heat deflection temperature (HDT) is quite low at 126F, and Tg is similar. Some time back Steve suggested Jeffco 1307 for higher HDT (185F with medium hardener), and better physical properties. It is readily available from Spruce.

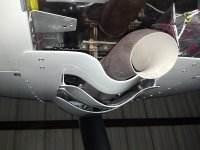
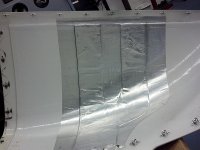
Practical application? Practically everything I do with micro is based on West. Like Carl, my cowl interior is skim sealed with West, painted white (epoxy primer and single stage two-part), and covered with fiberfrax and aluminum foil to shadow the pipes. Doing great. However, the variable exit parts are all Jeffco 1307, as they run very close to the pipes and are heavily loaded by internal pressure when closed.

Variable Exit Open.jpg

Cowl Insulation1.jpg
 
Yep - three builds over 25 years with West Systems.

I do however:
- Prime and paint the inside of the cowl white.
- I add the Van’s self-adhesive foil, but add a layer of FiberFrax between the foil and cowl on any areas anywhere near the exhaust.
- I also add radiant heat reflectors on the one or two pipes closest to the cowl.

Using the above approach I fixed an RV-14 cowl that was already showing signs of heat damage after ~100 hours (the inside of the cowl was bare fiberglass).

Carl

Old discussion.

I continue to like West for surface finishing, like blended tips and windshield fairing, and I don't hesitate to use it for non-structural parts. However, its heat deflection temperature (HDT) is quite low at 126F, and Tg is similar. Some time back Steve suggested Jeffco 1307 for higher HDT (185F with medium hardener), and better physical properties. It is readily available from Spruce.

Practical application? Practically everything I do with micro is based on West. Like Carl, my cowl interior is skim sealed with West, painted white (epoxy primer and single stage two-part), and covered with fiberfrax and aluminum foil to shadow the pipes. Doing great. However, the variable exit parts are all Jeffco 1307, as they run very close to the pipes and are heavily loaded by internal pressure when closed.

View attachment 81931

View attachment 81932
Did you guys use any type of adhesive on the fiberfrax? If so what?
 
Did you guys use any type of adhesive on the fiberfrax? If so what?
No adhesive other than aluminum tape. Depending on the size you may need to cut the FiberFrax a little small so you can tape the side. Have the adjacent patch of FiberFrax cover the tape joint, butting up to the first patch. Add more tape.

I cover this all with the self adhesive stuff from Vans as mechanical protection. If you look closely at the photo you can see the area where there is FiberFrax under the aluminum foil.

Carl
 

Attachments

  • 20200403_123613.jpeg
    20200403_123613.jpeg
    1.9 MB · Views: 26
Back
Top