What's new
Van's Air Force

Don't miss anything! Register now for full access to the definitive RV support community.

What did you do with your RV this weekend? (February 24 and 25th, 2024)

Restarted my emp build, lcp free! After not building since March of 2023 and having already done through chapter 10 with lots of lcp, I've restarted from scratch with non lcp parts. It was good to get building again! I made my choice to restart after getting news that my QB fuse and wings were going to be lcp free (mine were in OR in July and August 2023, but I guess were scrapped or are being redone without lcp). So for a small ish $2400, I got all new emp parts. I did save my steel parts, wiring, fiberglass etc, so really just aluminum parts were reordered. Happy building!

IMG_6072.jpeg
 
Restarted my emp build, lcp free! After not building since March of 2023 and having already done through chapter 10 with lots of lcp, I've restarted from scratch with non lcp parts. It was good to get building again! I made my choice to restart after getting news that my QB fuse and wings were going to be lcp free (mine were in OR in July and August 2023, but I guess were scrapped or are being redone without lcp). So for a small ish $2400, I got all new emp parts. I did save my steel parts, wiring, fiberglass etc, so really just aluminum parts were reordered. Happy building!

View attachment 56835
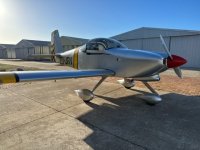
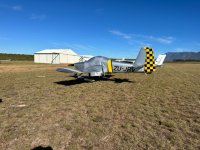
Love to build RV vertical stabilizer and rudders. A bit of advice, spend lots of time on the counterbalance/ front fairing clearance and avoid a horrible scraping noise when you move the rudder back and forth. A friend told me about that.....
 
Finally finished my instrument rating this morning, a few weeks after my first attempt. Missed it the first time around on the very last task - the partial panel circling. Forgot to arm the approach. One button missed. I was just drained at that point, and Brian the DPE was just as apologetic. Oh well, only takes one mistake, one mental slip-up. So this morning, despite another day of 20kt winds, it was hop up, swing back around on a nonprecision RNAV, and circle to land. All of half an hour, and I'm done, paper in hand. It's a rating that I've been wanting to pursue for years, and finally got serious about last year. I built my 9A to be my instrument training and flying platform, and finally the plane can live into its full purpose.

Also pictured is illustrious Cincinnati-area CFII, and fellow 7A driver, Billy Bie, my instructor for most of the training last year. He's our EAA Chapter's VMC Club coordinator, runs a fun little 15 minute ground school for Young Eagles for me while I coordinate flight assignments, and is also hoping to become a DPE soon (we need it!). We certainly had fun last year flying around, training, both of us learning more nuances of our G3X Touch systems than we both knew, and comparing 7A vs 9A handling notes in instrument conditions.

Fun little tidbit - I was originally going to take my checkride on January 12... but it was cancelled due to weather (irony). It would've marked 12 years since I started building my 9A, on January 12 of 2012 (hence the tail number, N112SB). That would've been a nice milestone if it had worked out.
 

Attachments

  • TempCert.jpg
    TempCert.jpg
    186.6 KB · Views: 51
  • PXL_20240225_184638239.jpg
    PXL_20240225_184638239.jpg
    3.1 MB · Views: 49
  • PXL_20240225_170815097.jpg
    PXL_20240225_170815097.jpg
    1.5 MB · Views: 56
On Saturday, I installed most of my new replacement hoses. Tom at Aircraft Specialty Flightlines hooked me up with some beautiful Teflon hoses. Thank you Tom!!! My original Aeroquip 601/701 hoses that I fabricated myself when I built the airplane were loooooong overdue. At that time, I ordered and installed Teflon hoses with integral fire sleeve for the fuel lines only. I couldn't stomach the cost of Teflon hoses for everything else. I have an inverted oil system that incorporates several large hoses. I also wasn't looking forward to the labor and mess involved. It really wasn't all that bad. It took me about 4 hours to remove all of hoses. I replaced four inverted oil system hoses, two oil cooler hoses, and the three pressure sensor hoses (fuel, oil, and manifold pressure). I also replaced the three breather hose segments associated with the 803 separator with new MIL 6000 hoses. I thought about changing the vacuum hoses too, but I'm hoping to not have a vacuum system soon.

So what started off as an oil change almost three weeks, morphed into a a super oil change. I also included new spark plugs, compression check, borescope, and cleaning of the inverted oil system components. I also need to rebuild a brake master cylinder while I have the forward baggage floor out. I hope to have the airplane back in service by Wednesday or Thursday. My son is coming back from college over the weekend and he's chomping at the bit to fly the RV.

Here's a pic of all of the hoses I replaced except the three breather hoses.

IMG_1281.jpeg
 
Saturday morning was crisp and clear here on the southern tip of Africa at Mossel Bay airfield. Had a 10-15 kts westerly wind blowing but not much turbulence. Took a friend with me for a breakfast barbecue at Swellendam about 80 nm west of us. After a nice breakfast and chatting to a few friends we set off again. This time following the coastline back home. About 30 aircraft attended but only about dour RVs. Will gave to do something about that.
 

Attachments

  • IMG_5646.jpg
    IMG_5646.jpg
    66 KB · Views: 71
  • IMG_5594.jpeg
    IMG_5594.jpeg
    103.3 KB · Views: 62
  • IMG_5599.jpeg
    IMG_5599.jpeg
    91.9 KB · Views: 64
  • IMG_5603.jpeg
    IMG_5603.jpeg
    135.9 KB · Views: 56
  • IMG_5606.jpeg
    IMG_5606.jpeg
    130 KB · Views: 62
  • IMG_5620.jpeg
    IMG_5620.jpeg
    87.9 KB · Views: 62
  • IMG_5608.jpeg
    IMG_5608.jpeg
    138.9 KB · Views: 70
  • IMG_5613.jpeg
    IMG_5613.jpeg
    158 KB · Views: 66
  • IMG_5611.jpeg
    IMG_5611.jpeg
    134.7 KB · Views: 72
Weekend project: Generator

Upgraded the ol' RV-6A to a Monkworkz generator. It was a straightforward install and came online on the first test run.
I didn't have time to run both the alternator and the generator (The generator remains dormant if set as the secondary until a voltage drop which automatically enables it) but the difference between the generator being used as primary vs secondary is the removal (or just cut) of one small wire connected to the regulator. I'll gladly give a shameless plug to Bill Judge (owner of Monkworkz) for the quick shipping and weekend text to make sure the install was going smoothly.
 

Attachments

  • MW generator pic.jpg
    MW generator pic.jpg
    121 KB · Views: 51
  • MW Voltage gauge charging.jpg
    MW Voltage gauge charging.jpg
    80.8 KB · Views: 53
I took a wonderful young lady for her first sunset flight that transitioned into a full moon flight (not her first flight with me). She said she loved it and was chatting the entire time (which is always a good sign from a passenger).

For some reason, all of the photos came out really dark... :unsure:;)
 
Flew to Carbondale(kmdh) with a friend Saturday.
Flew to fuel up at kvla
Cleaned and Waxed the front cowl!
 
Have always wanted to do an almond bloom video since we moved to central CA. It’s a site to see! 2024 was the year to share and gave a multiple rides this weekend. Enjoy!

 
"$100 BBQ" run to Idabel, Ok. Phat Tabs and smoked pork cracklings. MmmmView attachment 56908View attachment 56909
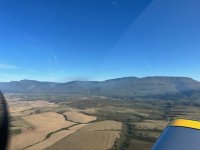
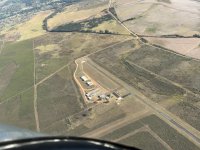
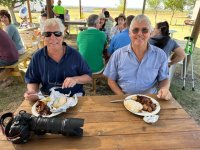
Man that BBQ looks amazing! I didn’t do the “$100 hamburger” run but I spent last weekend checking the low pitch blade stop on my MT 3 blade. I wasn’t having any issues but after watching Vic Syracuse’s you tube video I decided I should probably check it. Also read some articles about overspeeding the engine from what I assumed to be governor failures. Not something I wanted to ops check on a new engine. And yes I am now a subscriber to Vic’s YouTube channel, he has some good stuff on there.

Before starting I looked in the MT manual (page 34-35), called MT and they assured me that the low pitch blade stop was set at the factory for my plane/engine/prop combination so it should be OK. Decided to check anyway and no offense to MT but it was a bit off. Started by backing out the governor set screw and ran up the engine to full throttle (yes tied down, flaps up, stick full aft). My static prop rpm was too high so I adjusted the big 1 1/4” prop nut and retorqued the lock nut per the MT manual and re safety wired. New static runup was good so I set the governor back where it was and went flying. Prop stayed at 2670 so I backed out the governor set screw, flew again and rpm showed 2680 and rock solid. Going in the right direction so did one more set screw adjustment and I’ll fly again to recheck.

As Vic is fond of saying, “Check your nuts”!
 
Last edited:
Back
Top