s10sakota
Well Known Member
I'm looking for pics and info on how you installed the Vans electric primer kit. I'm installing it on a Carburated O-360.
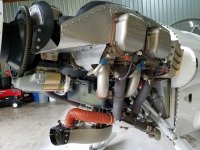
I'd like to see how/where you mounted the the electronic valve and how you routed the small brass fuel tube.
When I ordered the kit, I thought it consisted of a small electric fuel pump that pumped the fuel to the cylinders. But it is not a pump, it is a valve. So I'm thinking that to prime the engine, I would need to turn on the aux electric fuel pump to actually move the fuel, and then open the primer valve for a second or two to prime the engine. There are no instructions with the Vans kit.
Thanks for any info/pics!!
Mark