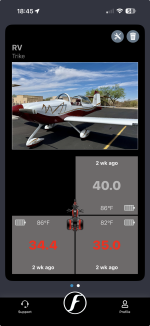
Scott is probably the most knowledgeable person for the -12, he helped design it. This is what he said when the tire pressure topic came up a while back. The numbers are in the POH also. I use those numbers and have had no problems with tubes or abnormal tire wear. I typically get 450-500 hours on Desser retread elite premium 2-groove 6-ply. Double that time on the nose wheel.
Scott’s response;
“Regarding RV-12 recommended tire pressures….
A lot of people do not know that the tire and its internal pressure is part of the energy absorbing design of a landing gear system .
In an ideal world, the landing gear system would be capable of absorbing all of the energy from a worst case vertical drop, while reducing the vertical descent rate to zero.
Doing so keeps the load induced into the landing gear attachment structure to a minimum.
If the tire pressure is too high, more of the total energy gets transferred to the landing gear leg ( for an example think of a solid steel tire. It would have virtually zero compressibility so all of the vertical load would have to be absorbed by the landing gear leg.).
If the tire pressure is too low, it can be much more easily compressed. If during a particular load event it becomes fully compressed, it from that point acts like a solid steel wheel as in the previous example and transfers all remaining load to the landing gear leg.
This is why using the proper tire pressure on the RV 12 is important.
The lower specified pressures are not an issue for the RV 12 because the gross weight is about the same as the empty weight of all of the other two seat RV models, so the amount of tire compression and resultant tube movement is about the same as for other models“.