

jeffw@sc47
Well Known Member
After studying and discussing the fuel tank assembly methodology options and getting past the reluctance to get started, I began with the ProSeal.
Method (Wet or Dry): I opted for the WET faying surfaces, and WET rivet set, one rib at a time.
Used the larger tank dimple dies on the skins and the sub-structure dimple dies on the tank ribs.
Set up tank cradle to raise tank about 8” above cradle base and tilted towards the bottom skin side about 10 degrees, this helped in setting wing leading edge top-side first couple of rivets that would otherwise be in awkward position for rivet gun and holding bucking bar (rectangular tungsten bar).
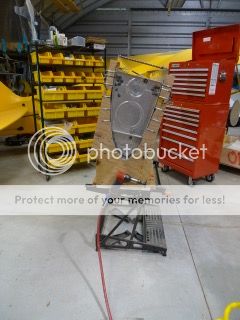
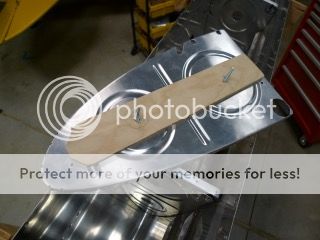
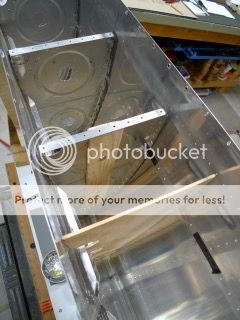
Fabricated a ¼” plywood spreader rib, with reliefs to span over the stiffeners, to spread the skin surfaces apart a bit to ease installation of rib with ProSeal spread on rib flanges. The line along the edge of the spreader rib is the outline of a tank rib (not a perfect representation), there is about 1/4" total added to the rib width for the width of the spreader at the trailing edge and it tapers down to zero at the leading edge. Start with the spreader outline a hair large and test it and adjust to where you feel comfortable with the amount of spread.

To stiffen fuel tank ribs for installation into tank, because they are a bit floppy, I fabricated two 3/8” plywood stiffener strips with through bolts and wing nuts placed through the rib lightening holes. I found that these stiffeners strips made handling the rib a little easier while applying ProSeal to the rib flanges and made setting the rib into the tank immensely easier. After the rib is clecoed in, the strips can be removed
When inserting the rib into the tank, with the stiffeners strips on the rib and the plywood spreader rib between the rib being installed and the next outboard rib, it is easy to keep the rib aligned with the skin rivet holes and to set the rib almost all the way into the leading edge of the tank. I then tapped lightly on the rear baffle flange bend of the rib with a dead-blow shot-filled plastic hammer, the rib set into the tank so that the trailing edge rib flange rivet holes top side and bottom side aligned to within a 1/32” of their corresponding dimpled skin rivet holes. It was easy then to insert a cleco into the two trailing edge rivet holes, and then alternating top to bottom skin insert all the clecos down to the leading edge rivet holes. Trying to start the clecos from the leading edge was much harder to get them started.
Applied ProSeal on faying surfaces of rib and surface of skin so there was a modest amount of PS squeezed out around flange edges. Mixed about 35g of PS to do one rib and skin faying surfaces, providing enough extra to set all rivets of a rib with about 3-4g left over. I was able to adjust down to 32g of mix. Good point Jerry F, I applied the PS to the rib flanges with the side of a popsicle stick first and then to the skin rivet line, then spreading the rivet line PS with a trimmed acid brush. A little less PS on the rivet line than the rib flange. I trim off the rounded end of the popsicle stick with the clippers of a large pliers so that the end is cut at about a 20 degree cutoff.
Ran a strip of clear packaging tape along outside surface of skin, inserted clecos through tape, skin and into rib; rolled tape up on itself as I set rivets. Started riveting at the leading edge, removed two clecos above each rivet being set, this gives good clearance for mushroom rivet set. Started at wing leading edge, alternating one rivet at a time for the first 4 or 5 rivets each side (top and bottom), then set two rivets one side then alternate side (cuts down on time spent moving from side to side. Also placed a 12” long piece of cardboard box material curved into the leading edge on both sides of rib to protect the skin in case I dropped the bucking bar.
I used a Q-Tip to fill rivet dimple; the mix cup held to work table surface with Velcro pad strip under cup (holds ProSeal cup down while pulling away Q-tip from the sticky stuff), a one-hand operation vs. holding the cup with other hand.
Only cleaned the bucking bar and the 1 7/8” diameter mushroom rivet set three or four times while doing one rib; small buildup of ProSeal residue on rivet set and bar not a problem.
Waited about 30 minutes after finishing riveting before wiping skin at rivet manufacture heads with acetone, and smoothing rib flange fillets with soapy watered finger.
Waited a day to cap rivet shop heads and add filet bead where needed along rib edges to previous installed rib, then installed next rib through to finishing riveting that rib and clean up again.
Capped each rivet shop head with small amount of ‘B’ type ProSeal, then when all the ribs are installed will cap each rivet and apply good fillets with an application of ‘A’ type ProSeal.
After three rib installs, a single person team, from start - one rib’s faying surfaces/rivets, a ProSeal mix of 35g total mix weight - to finish setting one rib’s rivets and then cleaning up the clecos > right at 2 hours (capping rivets and adding filleting is extra). Finally around 25g PS for one rib's faying surface, skin faying surface, skin rivet dimple seat, and thin spread of PS on shop heads and fillet edges. First full rib was 2 hours 30 minutes; second was 2 hours 15 minutes; third rib 2 hours 5 minutes. Then the rhythm set in at 2 hours per rib. Finally by the last two ribs, 1 hour 15 minutes for typical rib and the outboard rib 1 our 25 minutes (more rivets).
So much has been published about assembling the tanks and using ProSeal that it gave me too much to consider and there is an equal amount of opinions across the spectrum. ProSealing and riveting-in the fuel tank ribs is not nearly as bad or as difficult as I was imagining it was going to be. What happened with me was that it caused me to procrastinate too long with starting this task. The best part about this set of steps in the build process is that when it is done it feels like you’ve reached a significant plateau in the project and you’re so much closer to completion.
Method (Wet or Dry): I opted for the WET faying surfaces, and WET rivet set, one rib at a time.
Used the larger tank dimple dies on the skins and the sub-structure dimple dies on the tank ribs.
Set up tank cradle to raise tank about 8” above cradle base and tilted towards the bottom skin side about 10 degrees, this helped in setting wing leading edge top-side first couple of rivets that would otherwise be in awkward position for rivet gun and holding bucking bar (rectangular tungsten bar).

Fabricated a ¼” plywood spreader rib, with reliefs to span over the stiffeners, to spread the skin surfaces apart a bit to ease installation of rib with ProSeal spread on rib flanges. The line along the edge of the spreader rib is the outline of a tank rib (not a perfect representation), there is about 1/4" total added to the rib width for the width of the spreader at the trailing edge and it tapers down to zero at the leading edge. Start with the spreader outline a hair large and test it and adjust to where you feel comfortable with the amount of spread.

To stiffen fuel tank ribs for installation into tank, because they are a bit floppy, I fabricated two 3/8” plywood stiffener strips with through bolts and wing nuts placed through the rib lightening holes. I found that these stiffeners strips made handling the rib a little easier while applying ProSeal to the rib flanges and made setting the rib into the tank immensely easier. After the rib is clecoed in, the strips can be removed

When inserting the rib into the tank, with the stiffeners strips on the rib and the plywood spreader rib between the rib being installed and the next outboard rib, it is easy to keep the rib aligned with the skin rivet holes and to set the rib almost all the way into the leading edge of the tank. I then tapped lightly on the rear baffle flange bend of the rib with a dead-blow shot-filled plastic hammer, the rib set into the tank so that the trailing edge rib flange rivet holes top side and bottom side aligned to within a 1/32” of their corresponding dimpled skin rivet holes. It was easy then to insert a cleco into the two trailing edge rivet holes, and then alternating top to bottom skin insert all the clecos down to the leading edge rivet holes. Trying to start the clecos from the leading edge was much harder to get them started.

Applied ProSeal on faying surfaces of rib and surface of skin so there was a modest amount of PS squeezed out around flange edges. Mixed about 35g of PS to do one rib and skin faying surfaces, providing enough extra to set all rivets of a rib with about 3-4g left over. I was able to adjust down to 32g of mix. Good point Jerry F, I applied the PS to the rib flanges with the side of a popsicle stick first and then to the skin rivet line, then spreading the rivet line PS with a trimmed acid brush. A little less PS on the rivet line than the rib flange. I trim off the rounded end of the popsicle stick with the clippers of a large pliers so that the end is cut at about a 20 degree cutoff.
Ran a strip of clear packaging tape along outside surface of skin, inserted clecos through tape, skin and into rib; rolled tape up on itself as I set rivets. Started riveting at the leading edge, removed two clecos above each rivet being set, this gives good clearance for mushroom rivet set. Started at wing leading edge, alternating one rivet at a time for the first 4 or 5 rivets each side (top and bottom), then set two rivets one side then alternate side (cuts down on time spent moving from side to side. Also placed a 12” long piece of cardboard box material curved into the leading edge on both sides of rib to protect the skin in case I dropped the bucking bar.
I used a Q-Tip to fill rivet dimple; the mix cup held to work table surface with Velcro pad strip under cup (holds ProSeal cup down while pulling away Q-tip from the sticky stuff), a one-hand operation vs. holding the cup with other hand.
Only cleaned the bucking bar and the 1 7/8” diameter mushroom rivet set three or four times while doing one rib; small buildup of ProSeal residue on rivet set and bar not a problem.
Waited about 30 minutes after finishing riveting before wiping skin at rivet manufacture heads with acetone, and smoothing rib flange fillets with soapy watered finger.
Waited a day to cap rivet shop heads and add filet bead where needed along rib edges to previous installed rib, then installed next rib through to finishing riveting that rib and clean up again.
Capped each rivet shop head with small amount of ‘B’ type ProSeal, then when all the ribs are installed will cap each rivet and apply good fillets with an application of ‘A’ type ProSeal.
After three rib installs, a single person team, from start - one rib’s faying surfaces/rivets, a ProSeal mix of 35g total mix weight - to finish setting one rib’s rivets and then cleaning up the clecos > right at 2 hours (capping rivets and adding filleting is extra). Finally around 25g PS for one rib's faying surface, skin faying surface, skin rivet dimple seat, and thin spread of PS on shop heads and fillet edges. First full rib was 2 hours 30 minutes; second was 2 hours 15 minutes; third rib 2 hours 5 minutes. Then the rhythm set in at 2 hours per rib. Finally by the last two ribs, 1 hour 15 minutes for typical rib and the outboard rib 1 our 25 minutes (more rivets).
So much has been published about assembling the tanks and using ProSeal that it gave me too much to consider and there is an equal amount of opinions across the spectrum. ProSealing and riveting-in the fuel tank ribs is not nearly as bad or as difficult as I was imagining it was going to be. What happened with me was that it caused me to procrastinate too long with starting this task. The best part about this set of steps in the build process is that when it is done it feels like you’ve reached a significant plateau in the project and you’re so much closer to completion.
Last edited:
")

