What's new
Van's Air Force

Don't miss anything! Register now for full access to the definitive RV support community.

SL-00092 and SL-00100

jcbarker

Well Known Member
Hello all,
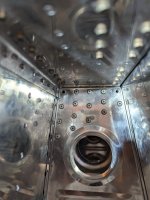
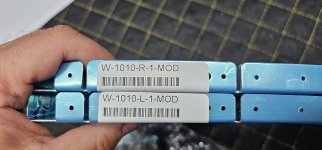
Picked up the kits for the SL-00092 and SL-00100 on July 19, 2024. I was told I was the first one. I started on the 100 first as that is what's in the shop right now. My completed QB wings are in storage. I started working on it in earnest 7/27. The labor required estimate stated in the Service Letter is 8 hours if, and this is a BIG IF, you are starting with an as delivered QB fuse. My fuse is done so there is a lot of drilling out of rivets for the baggage and floor boards. Plus disassembly of flap actuation. Anyway, here's the time I've spent so far:
Steps 1-10 8.5 hrs
Steps 11-16 2.0 hrs
Steps 18-19 4.0 hrs this is tough. access is limited. You'll need a compact right angle air drill for this.
Steps 20-24 2.0 hrs
Steps 25-30 6.0 hrs
Steps 33-34 8.0 hrs
Steps 35-38 5.0 hrs This is for the left side only
TOTAL: 35.5 hrs

I probably have another 8 to 10 hours to go.

As an aside, determining if I have LCP or not is nearly impossible on a factory assembled fuse. Van's informed me I "probably" had Laser Cut Parts in my fuse so rather than wonder I decided to install the remediation. The structure will be stronger than original and removes any concerns when it comes to resale.

Until next time,
 
I just started 00092 on my completed wings. one wing's disassembly was 6.5 hours, it wasn't too bad but sure was heart breaking tearing open completed wings... I'm about 2-3 hours into re-assembly at the moment, and think it'll be another 3 until finished so likely 24 hours total for wings that are closed up... doesn't count re-painting the outside tho :(

Here's my tear-down video to give anybody a little more confidence in the process:
This is great. Look forward to the next (install) video...THANKS
 
Thoughts on setting / pulling cherrymax in the corners here? can't grind down a cheap puller any more than I have already.. the stem breaks before the mandrel engages when pulled because of the really tight angle of these.
 

Attachments

  • PXL_20240806_023350583.jpg
    PXL_20240806_023350583.jpg
    2.8 MB · Views: 35
Thoughts on setting / pulling cherrymax in the corners here? can't grind down a cheap puller any more than I have already.. the stem breaks before the mandrel engages when pulled because of the really tight angle of these.
This Pulling Wedge with a POP PRP26A puller should get you there. (Us RV 12 guys fight pulling rivets in weird places vs the rivet bangers of the rest of the RV gang)...Ask around I bet you can borrow both for 4 rivets. Also would make that whole top row easier to pull. FWIW.
 
Last edited:
Van's specifically recommends against using a wedge to pull CherryMax rivets. The stem is heat treated steel which is to say hard and brittle. It will likely break before being fully set. Having not tried it I'm curious what other's success has been.
 
Van's specifically recommends against using a wedge to pull CherryMax rivets. The stem is heat treated steel which is to say hard and brittle. It will likely break before being fully set. Having not tried it I'm curious what other's success has been.
Not recommended yes, necessary occasionally/rarely, either use it or never get the rivet in. When pulled can feel the double pop of set and mandrel break. Be sure and lubricate rivet. In all honesty my experience is 4 Cherry max rivets with wedge.
 
Not recommended yes, necessary occasionally/rarely, either use it or never get the rivet in. When pulled can feel the double pop of set and mandrel break. Be sure and lubricate rivet. In all honesty my experience is 4 Cherry max rivets with wedge.
Thanks Cape, good to know.
 
This Pulling Wedge with a POP PRP26A puller should get you there. (Us RV 12 guys fight pulling rivets in weird places vs the rivet bangers of the rest of the RV gang)...Ask around I bet you can borrow both for 4 rivets. Also would make that whole top row easier to pull. FWIW.
Bought the tool, but the prp26a doesn't have the grip to pull these cherry max rivets, it just slides off the stem.

Going to have to go the direction of an a&p friend who said just drill them up to #19, put a #8 structural screw and steel nut on there.
 
Last edited:
Bought the tool, but the prp26a doesn't have the grip to pull these cherry max rivets, it just slides off the stem.

Going to have to go the direction of an a&p friend who said just drill them up to #19, put a #8 structural screw and steel nut on there.
Sorry to hear that. I haven't had that issue with the prp26a. They do require a drop of Boelube periodically and they are a 2 step, tighten, open, slide down on mandrel and second pull. Mine pulls the little CCR264-SS-3-02 flush rivets for nut plates which has the smallest diameter mandrel I've run across. - JJR
 
Thanks for the tips.. I tried but I think the issue is just that these are 5/32 cherrymax.. stems are a bit big for that tool oh well.

I've got a shipment coming soon with the last bits needed to complete the job, so I'll get another video out on that... so far the install is quite a bit easier than the removal.
 
I just started 00092 on my completed wings. one wing's disassembly was 6.5 hours, it wasn't too bad but sure was heart breaking tearing open completed wings... I'm about 2-3 hours into re-assembly at the moment, and think it'll be another 3 until finished so likely 24 hours total for wings that are closed up... doesn't count re-painting the outside tho :(

Here's my tear-down video to give anybody a little more confidence in the process:
man I almost feel sick for you having to do this....keep going man you are getting there.
 
I'm working on SL-00092 and my quick build wings. I'm passing along an issue I discovered in hopes that others may trap it sooner than I did.

My SL-00092 KIT was shipped 7/19/24.

On the packing list, were two ribs, the inboard rib for each wing.
W-1010-L-1-14MOD and W-1010-R-1-14MOD
The ribs I received were:
W-1010-L-1-MOD and W1010-R-1-MOD
Notice the subtle difference?

I missed it when doing the inventory.
The person packing the kit missed it too.

The issue is this, at the spar. The bolt holes are half a hole off.

IMG_0340.jpeg


I've spoke to Support at Vans and they are sending me new ribs. Apparently, I'm the second call in two days with this issue.

The only damage here is a chink in my pride and a slight delay in getting this done. Vans is making it right and I'm not upset at all.

I hesitated posting this as I don't want to start WWIII but I do want to share it so others can check their part numbers and perhaps get them replaced before they start, if they have the incorrect ones.
 
Last edited:
The only damage here is a chink in my pride and a slight delay in getting this done. Vans is making it right and I'm not upset at all.
You have such a great attitude Phil. I hope I have the same positive outlook if I ever need to tear apart something already completed.
 
Back
Top