What's new
Van's Air Force

Don't miss anything! Register now for full access to the definitive RV support community.

seeking opinions on canopy skirt

Desert Rat

Well Known Member
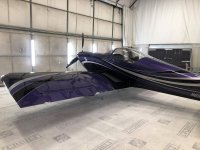
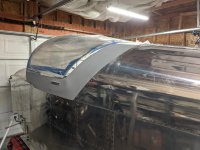
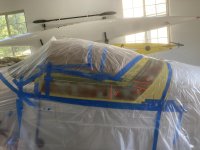
Hey guys- I just finished the layup and rough cut of a fiberglass one piece skirt for my slider canopy. I can go a couple of different ways aesthetically here and am curious what others have done in a couple of areas;

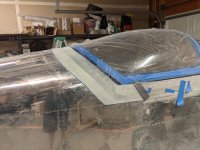
The side skirts are 5" tall. As rough cut, the aft side where it intersects with the tailcone skin is 6". It currently overlaps the aft edge of the canopy by about 2" So from a structural standpoint I can leave it as is or shave up to probably another 1" off the fwd edge back there, which would make it a more symmetrical width all the way around.

I talked to Larry Larson last week and he said that his was approx the same dimension everywhere, but I'm wondering if it would look more visually "balanced" if it was a bid fatter fore/aft back there.

What do most people do back there from a dimensional standpoint and would anybody care to provide pictures of how theirs turned out?

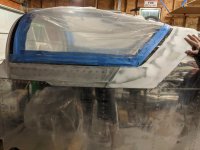
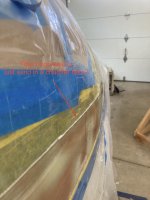
Also, this layup ended up being about 3/32" thick. On the edge that intersects with the canopy plexiglass is it more advantageous to try to sand a chamfer into that edge or would it be better to leave it pretty meaty and then run a nice fillet of B-sealer after the fact?

I'm including a couple of pictures with notes in case it's not clear what I'm asking

I'm planning to sika this on, if that makes a difference in the way anybody would answer

All opinions are welcome, except those that suggest I should just suck it up and learn how to use an English wheel so I don't have to save myself with fiberglass.
 

Attachments

  • IMG_8781.jpg
    IMG_8781.jpg
    234.6 KB · Views: 103
  • IMG_8782.jpg
    IMG_8782.jpg
    208.1 KB · Views: 82
I'm in favor of "adding lightness" and would therefore make the back narrower and thereby eliminate an inch of weight to carry around unnecessarily.

I'm a bit behind you and don't have any pictures of my own but mburch has a very well documented project at https://www.rv7blog.com/category/fuselage/canopy/page/3/
His aft skirt is fibreglass and the rest are aluminum.

Is your windscreen installed yet? It's hard to tell in the pictures. I've been working on the assumption that the windscreen needs to be attached before the slider is finalised and that the fairings and skirts would be done kind of in unison.
 
Last edited:
Hey Paul. The windscreen isn’t in yet. Frankly, it seemed advantageous to give myself a way to squirm inside in case I accidentally got the canopy epoxied shut.

The windscreen doesn’t have to be in before laying up the canopy skirts. But, I do think that the canopy skirts should be permanently installed before laying up the windscreen fairing because at the aft corners of the windscreen that fairing overlaps the fwd end of the canopy skirts so the only way to get a really good fit there is to lay up those corners over the top with canopy closed.

My plan is to finish this skirt and permanently install, then glue in the windscreen, then lay up a one piece windscreen frame, pop it off and finish it off the plane, then sika it back on permanently.
 
Skirts

Hey Paul. The windscreen isn’t in yet. Frankly, it seemed advantageous to give myself a way to squirm inside in case I accidentally got the canopy epoxied shut.

The windscreen doesn’t have to be in before laying up the canopy skirts. But, I do think that the canopy skirts should be permanently installed before laying up the windscreen fairing because at the aft corners of the windscreen that fairing overlaps the fwd end of the canopy skirts so the only way to get a really good fit there is to lay up those corners over the top with canopy closed.

My plan is to finish this skirt and permanently install, then glue in the windscreen, then lay up a one piece windscreen frame, pop it off and finish it off the plane, then sika it back on permanently.

Windshield after actually has an advantage. It allows cutting and fitting the windshield to match the canopy. It need not match perfectly because the windshield trim overlaps but it does help get a nice fit.

That's how I did it. For those who may be planning the same, make sure you put tape on the parts you dont want stuck.
When I bonded the windshield trim, the canopy wouldn't open. Somehow I glued it shut. I had to wrap a rope around the latch handle and brace myself behind the fuse and pull. It took what seems like an hour but in reality is was minutes. It finally came loose. Scared me.
 
Last edited:
Windshield after actually has an advantage. It allows cutting and fitting the windshield to match the canopy. It need not match perfectly because the windshield trim overlaps but it does help get a nice fit.

That's how I did it. For those who may be planning the same, make sure you put tape on the parts you dont want stuck.
When I bonded the windshield trim, the canopy wouldn't open. Somehow I glued it shut. I had to wrap a rope around the latch handle and brace myself behind the fuse and pull. It took what seems like an hour but in reality is was minutes. It finally came loose. Scared me.

I have cut and fit the canopy plexi to the slider frame but will probably only drill the bolt holes for the side rollers once the windscreen has been trial fitted. This is to try and get the slider front hoop trimmed to the right length and not need to shim too much between the roll bar and the windscreen. That's the theory anyway!
 
I'm doing the same thing, and am at the point where the sliding skirt is attached and "just" needs some filling for fastener heads (I went belt and suspenders there). Windscreen frame is laid up and "just" needs final filling and sanding. My skirt is long on the aft end (it goes all the way back to the rivet line of the stiffener) because I had a large step to fair down.

It did bridge my shimming goof-ups nicely and it looks ok in the end--but there is a step, it's not the perfect blended look that so many folks like.

I would say from an appearance point, taper the front edge some if you are able to and have enough left to keep it attached. It's what I tried to do too. I figure a small sika or proseal fillet will blend the rest.


I decided to go this route because I knew my canopy fitting efforts were not perfect and figured fiberglass would smooth over the difference. At least in that aspect it succeeded. The huge PITA that finishing and filling has turned out to be is making me regret that decision and I almost with there was a way to do an all-metal cowl as well. I shoulda bought that English wheel when I had a chance... Fiberglass finishing is about 75% of what I have left to do and it's making me so miserable I briefly considered selling the project.
 
Last edited:
^^^^
You aren't alone. Fiberglass is something I've worked with a bit over the years and I've never enjoyed it. Like a kid forced to eat broccoli, I find ways to push it around the plate until it's the only thing left...
 
^^^^
You aren't alone. Fiberglass is something I've worked with a bit over the years and I've never enjoyed it. Like a kid forced to eat broccoli, I find ways to push it around the plate until it's the only thing left...


I HAD a similar disdain for fiberglass work but after the terrific results of one piece slider skirt i forced myself to hate it less. When it got to work on the wheel pants it really was a breeze to work with at that point. Drill a hole in the wrong place, fill it up with flox and move on. Albeit, the 24 hour wait for curing was a pain sometimes.

I think of fiberglass kinda like my skills as a welder…. I’m more of a grinder than a welder to make it look pretty. Fiberglass is a similar process.
 
^^^^
You aren't alone. Fiberglass is something I've worked with a bit over the years and I've never enjoyed it. Like a kid forced to eat broccoli, I find ways to push it around the plate until it's the only thing left...

That's a great comparison :D I do have to choke down the veggies abit and lay up my snorkel but at least that doesn't have to look good. Even my usual 5-year-old with playdough surface profile would work.

I still need to attach the braces to the skirt but I'm thinking about using sika for that instead of rivets. Riveting means more holes to fill and sand (again:rolleyes:). Anyone tried this before?
 
I'm not sure what my measurements were, but there is an angled line of rivets from the reinforcement brackets that goes up and runs into the ring of rivets holding in the baggage bulkhead. I used those as a guide for both the sides and rear of the canopy because I thought it made a decent looking line. It's not a constant width in the fiberglass in order to make it look like a smooth curve around the top of the plane.

My side skirts are a little different than yours though, I used the metal side skirts during the sikaflex process and left them installed but heavily trimmed. I then put the fiberglass over top of them and blended everything together. 1/16-3/32 is about right for the thickness and a fillet of proseal makes everything come together nicely. This gets opened at least twice every flight and it flexes, so my preference would be to leave some strength in the fiberglass and don't try to blend it smooth at the top. I only blended mine out on the top because I had the underlying metal side skirts for strength.

Once it was painted, everything came out looking nice, and most people don't even notice the steps I left in behind the canopy handles to make up for the fact that I gave up on trying to get the canopy frame to fit.
 

Attachments

  • 67926165431__69D9C42F-3FC9-46F2-97D1-1D2314A25045.jpg
    67926165431__69D9C42F-3FC9-46F2-97D1-1D2314A25045.jpg
    295.2 KB · Views: 50
  • PXL_20210117_180610185.jpg
    PXL_20210117_180610185.jpg
    329.2 KB · Views: 50
  • PXL_20201221_195106441.jpg
    PXL_20201221_195106441.jpg
    184.5 KB · Views: 42
  • PXL_20201219_044333730.jpg
    PXL_20201219_044333730.jpg
    291.4 KB · Views: 46
  • PXL_20201214_224120169.jpg
    PXL_20201214_224120169.jpg
    366.1 KB · Views: 54
Last edited:
Back
Top