What's new
Van's Air Force

Don't miss anything! Register now for full access to the definitive RV support community.

Scarf v Trim

Lukejaw

I'm New Here
Hello Fellow builders

Building my first experimental RV7A and i made the mistake of prepping and dimpling wing skins before scarfing the lap joints:eek:

Found a suggestion to trim inboard skin similar to the trim on the bottom of the skin?
Trimming means it will sit flush with the tank skin but means trimming the skin just below the spar?

Thanks in advance for any guidance

Ok maybe I wasn’t very clear my apologies. My question is can i trim the inboard skin just below the rear spar so that the lap joint at the top of the skin is very similar to the way it joins at the rear spar

There are a number of posts where people have done this rather then scarf the joint

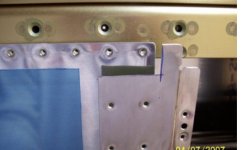
See pic which explains way better than me.

Jason
 

Attachments

  • IMG_0010.jpeg
    IMG_0010.jpeg
    412 KB · Views: 69
Last edited:
Hello Jason and welcome to the club. Mike Starkey will be along to give you the official welcome.:)

Not sure if you mean the lap joint that joins the outboard to the inboard wing skins or do you mean at the traiing edge where the wing skins butt up at the rear spar. If at the rear spar, yes, you can trim them so that they butt up to each other at the rear spar and thus the flaps will not be scored when going up and down. Others may have further guidance.

One alternative that you could consider is to do what I did and that is just use one continuous skin from wing root to wing tip. So this will require that you obtain a sheet of 0.032" 2024 T3 aluminum long enough to extend the entire length of the wing (X2). This, of course, eliminates the lap joints altogether and is a thing of beauty if you're into that sort of thing. Normally the outboard skin is 0.025 and the inboard 0.032, so there's that. Yes, it will be a little heavier. It really is not that difficult to do: I used a 4 X 8' sheet of plywood to mount the single 0.032 sheet on and then used the two skins in the kit as templates to overlay on the new sheet. Once you have drilled and clecoed a few of the pre-punced holes around the lap joints (in assembly) into the new sheet, it is locked in place, cannot move, and you're good to go doing the rest of the holes.

Seems like a pretty radical solution unless you had thought of doing this in the first place. At one time, Vans offered the single skins on the wings but you had to pick them up at the factory due to shipping limitations. Anyway, best of luck with your project!
 
I think the outboard skin is 0.025" while the inboard skin is 0.032". Doing the entire span with 0.032" will be heavier, and with the expense of greater weight toward the tips.
 
I personally wouldn’t be thrilled with deviating from plans without Vans approval in regard to cutting that skin. I would ask the question of them… if not….
I would consider flattening the dimples, scarf, and dimple again. There is risk here of inducing a crack in the dimple. However, many have made the mistake of dimpling a skin backwards, and common thought is you can reverse the dimple, once. I would do this knowing the risk and bite the bullet if the dimpled hole cracked and buy a new skin.
In regard to one piece .032 skins, back in the day, a few well known builders, Art Chard being one, did this, and perhaps drove Vans to offer that option. However, they typically did not dimple. They machine countersunk which can’t be done with .025. This made a beautiful end product but took a high degree of skill and mastery of machine countersink technique. If you have an Art Chard built airplane, you have a masterpiece, a perfectly smooth wing with no seam or dimple distortion.
 
Back
Top