
Van's Air Force
You are using an out of date browser. It may not display this or other websites correctly.
You should upgrade or use an alternative browser.
You should upgrade or use an alternative browser.
SB-00116 Regarding Autopilot Servo Attach Brackets Published
- Thread starter Van's Aircraft
- Start date

Stansuski
Active Member
No, I was trying to make a point, as you know you are laying stretched out with your head sticking in the back, not comfortable for a long period, Quick Look all was good, shop ends were all there, but on second look when I went back in to drill off head it was long gone. So if you are doing an inspection only just be sure, in my case I was changing them anyway, hope that clears things up.First, you stated that the six rivets holding the servo brackets looked fine. Then you stated that after removing 3 rivets from one of the brackets that the head of one rivet on the other bracket was missing. This seems contradictory. Am I misreading something?
Stan
Great write up, thanks for sharing. It will be interesting to find out if this is a RV-12 centered issue or more universal including RV-12iS. Perhaps this warrants a survey or poll on VAF or engineering report to Van's support to figure out how wide spread the issue is. Your sharing may make folks take the issue more seriously.I realize the 2 missing rivets are not what the SB addresses, I agree original builder didn’t follow directions, the broken rivet IS what the bulletin addresses.
Stan
Stansuski
Active Member
When I started this rambling post I never thought I was going to find a head missing on the servo mount with under 300 hrs TT.Great write up, thanks for sharing. It will be interesting to find out if this is a RV-12 centered issue or more universal including RV-12iS. Perhaps this warrants a survey or poll on VAF or engineering report to Van's support to figure out how wide spread the issue is. Your sharing may make folks take the issue more seriously.
STAN
Stansuski
Active Member
I still have the pieces, didn’t see any corrosion, will look at them again tomorrow , I keep it sprayed inside pretty good.Does that rivet body with the missing head look corroded? Looks like a white powdery substance in the hollow body.
Stan
The SB specifies both RV-12 and RV-12iS.Great write up, thanks for sharing. It will be interesting to find out if this is a RV-12 centered issue or more universal including RV-12iS. Perhaps this warrants a survey or poll on VAF or engineering report to Van's support to figure out how wide spread the issue is. Your sharing may make folks take the issue more seriously.
Both forward rivet heads are missing on my RV12 with 200TT, no hard events or flying, Dynon autopilot, installed per plans. Photos below of missing rivet head on left side and recent paint job which I did over most of 2024. Unclear other side photo with same missing forward rivet head not show. I will replace the LP4-3 rivets with AN470’s per the SB. I’m considering adding 2 more 470’s on each side.I opened my RV-12 today and all 6 rivets were pristine. I just wish Vans would enlighten us all with "the rest of the story."
Attachments

Last edited:
flightdoc101
Active Member
One final thought. In comparing the ULS set of plans to the iS set, (and kudos and thanks to Tony T for posting them side by side), the throw of the AP arm on the iS install is more in line with the arc of throw of the aileron control horn. The ULS install has a "flatter" less arced approach.
I would put the ULS installation at higher risk of failure, not only because of likely higher hours.
I would put the ULS installation at higher risk of failure, not only because of likely higher hours.
I am sharing my misery to suggest an alternate way to comply with the SB. If I could go back in time and do it again, I would drill out all six of the original pulled rivets and remove the brackets that hold the servo. Next, I would drill out the 10 pulled rivets that hold the other brackets to the bulkhead. They are much easier to drill out than the 6 servo bracket rivets. Then, on the bench, I would squeeze the rivets called for in the SB that hold the two brackets together and then finally, reinstall the brackets to the bulkhead using pulled rivets.
One final thought. In comparing the ULS set of plans to the iS set, (and kudos and thanks to Tony T for posting them side by side), the throw of the AP arm on the iS install is more in line with the arc of throw of the aileron control horn. The ULS install has a "flatter" less arced approach.
I would put the ULS installation at higher risk of failure, not only because of likely higher hours.
This, in conjunction with the unavailability of the old parts, makes me wonder if it would be better to just replace the brackets with the new 12iS version right off the bat (F-1286A-L to F-01286A-L-1, etc, and new pushrods).
Stansuski
Active Member
Let’s see what Van’s ultimately does, I do think this before further flight thing could be lawyer related, I have now complied with this bulletin by replacing with the called for rivets, things could change and we could all be in there again, just like the earlier exhaust revisions.This, in conjunction with the unavailability of the old parts, makes me wonder if it would be better to just replace the brackets with the new 12iS version right off the bat (F-1286A-L to F-01286A-L-1, etc, and new pushrods).
Stan
When I look at mine (12iS) it seems that there is not enough room to get the rivet puller on the center rivets in the groups of 5 if the servo mount bracket is already on, at least not with the stem on the aft side. Putting the new pulled rivets in with the stem forward might work.I worked on the SB today on my flying legacy RV-12. With 250 hours, the rivets looked just fine but they needed replaced according to the SB as my plane is Dynon equipped. I found that using a 12 inch bit gave me a little more control than the right angle drill but it still wasn’t easy considering the yoga required with the fuel tank always in the way. Squeezing the new rivets with my Avery squeezer was a real issue. The first two rivets had a bad set and were bent due to my inability to see them and the contortions I was undergoing. I borrowed a friend’s Cleaveland Main Squeeze and was amazed at how much better it was than my trusty Avery. The compound leverage made it much easier to get a good set than when I was straining with the Avery. I did a fine job on the remaining 4 rivets and then needed to drill out the first two bad sets and replace them. I am frustrated to say that while drilling them out, I enlarged the holes in the bracket to the point where I need to replace all four brackets. They have already been ordered from Van’s but my plane is grounded until I get the new brackets and install them.
I am sharing my misery to suggest an alternate way to comply with the SB. If I could go back in time and do it again, I would drill out all six of the original pulled rivets and remove the brackets that hold the servo. Next, I would drill out the 10 pulled rivets that hold the other brackets to the bulkhead. They are much easier to drill out than the 6 servo bracket rivets. Then, on the bench, I would squeeze the rivets called for in the SB that hold the two brackets together and then finally, reinstall the brackets to the bulkhead using pulled rivets.
I hope all of this makes sense and am wishing you the best of luck.
my 2 cents...
Had a look at that very bracket and it's holding rivets on a -12 yesterday... and don't really see the problem. Ok, having built an RV-4 I might be somewhat biased, or blasé, but it looks pretty accessible, and using a hand squeezer, or a rivet gun shouldn't present a big problem to an experienced builder.
A solution might be to look around for someone with solid rivet experience to help?
mnmisage
Member
I agree that installing the middle rivet needs to be done with the manufactured head forward. On a legacy 12, there is plenty of access once the aft baggage floor is removed and I imagine a 12iS is similar.When I look at mine (12iS) it seems that there is not enough room to get the rivet puller on the center rivets in the groups of 5 if the servo mount bracket is already on, at least not with the stem on the aft side. Putting the new pulled rivets in with the stem forward might work.
I have ample solid rivet experience, having driven/bucked/squeezed an RV-6 fuselagesmy 2 cents...
Had a look at that very bracket and it's holding rivets on a -12 yesterday... and don't really see the problem. Ok, having built an RV-4 I might be somewhat biased, or blasé, but it looks pretty accessible, and using a hand squeezer, or a rivet gun shouldn't present a big problem to an experienced builder.
A solution might be to look around for someone with solid rivet experience to help?
Perhaps you looked at an RV-12 ULS rather than an RV-12iS. The port side servo bracket on the RV-12iS is difficult to access due to the other bracket on the starboard side and fuel system components on the port side. The middle rivet of the bracket which holds the servo bracket is occluded by the the servo bracket itself. The starboard side bracket is a piece of cakemy 2 cents...
Had a look at that very bracket and it's holding rivets on a -12 yesterday... and don't really see the problem. Ok, having built an RV-4 I might be somewhat biased, or blasé, but it looks pretty accessible, and using a hand squeezer, or a rivet gun shouldn't present a big problem to an experienced builder.
A solution might be to look around for someone with solid rivet experience to help?
Another data point:
No missing or loose rivets @ 15 yrs and 865 hours.


I closed it back up without any attempted fix;. I'm of the "if it ain't broke" crowd and patient. The 25 hours grace period will take me to the next CI and there may be more comprehensive information on the best way to fix these brackets.
No missing or loose rivets @ 15 yrs and 865 hours.
I closed it back up without any attempted fix;. I'm of the "if it ain't broke" crowd and patient. The 25 hours grace period will take me to the next CI and there may be more comprehensive information on the best way to fix these brackets.
Last edited:
I did mine yesterday. All ok, and have the same plan as you. Next condition inspection in January.Another data point:
No missing or loose rivets @ 15 yrs and 865 hours.
View attachment 101560View attachment 101561
I closed it back up without any attempted fix;. I'm of the "if it ain't broke" crowd and patient. The 25 hours grace period will take me to the next CI and there may be more comprehensive information on the best way to fix these brackets.


Can you help us out with a bit more info? Old Brackets (RV-12) or new style (RV-12iS) Dynon or Garmin AP servo?I did mine yesterday. All ok, and have the same plan as you. Next condition inspection in January.
View attachment 101632View attachment 101633
Garmin or Dynon?Another data point:
No missing or loose rivets @ 15 yrs and 865 hours.
View attachment 101560View attachment 101561
I closed it back up without any attempted fix;. I'm of the "if it ain't broke" crowd and patient. The 25 hours grace period will take me to the next CI and there may be more comprehensive information on the best way to fix these brackets.
Mine is Dynon, mounted on the old style brackets.Garmin or Dynon?
NORDO Industries LLC
Well Known Member
350 hrs on my non-iS with Dynon, no issues noted.
However, me and the other RV-12 owners on the field are trying to track down 4-4.5 solid rivets, since Van's store is out of stock. Friend tried using his solid rivet cutter to bring 4-5 rivets down to size, but we weren't able to reliably and repeatably get them cut to the correct size. If anyone has a lead on where to purchase the correctly-sized rivets, or ideas of a fixturing solution to use a lathe, that'd be appreciated.
However, me and the other RV-12 owners on the field are trying to track down 4-4.5 solid rivets, since Van's store is out of stock. Friend tried using his solid rivet cutter to bring 4-5 rivets down to size, but we weren't able to reliably and repeatably get them cut to the correct size. If anyone has a lead on where to purchase the correctly-sized rivets, or ideas of a fixturing solution to use a lathe, that'd be appreciated.
Last edited:
Sending a DM since the suppliers I know aren't advertisers on Vans Air Force.350 hrs on my non-iS with Dynon, no issues noted.
However, me and the other RV-12 owners on the field are trying to track down 4-4.5 solid rivets, since Van's store is out of stock. Friend tried using his solid rivet cutter to bring 4-5 rivets down to size, but we weren't able to reliably and repeatably get them cut to the correct size. If anyone has a lead on where to purchase the correctly-sized rivets, or ideas of a fixturing solution to use a lathe, that'd be appreciated.
I just bought some from Spruce for a friend's -12. You can order just 0.13 lbs., it was $4.50 and received about 100 rivets.350 hrs on my non-iS with Dynon, no issues noted.
However, me and the other RV-12 owners on the field are trying to track down 4-4.5 solid rivets, since Van's store is out of stock. Friend tried using his solid rivet cutter to bring 4-5 rivets down to size, but we weren't able to reliably and repeatably get them cut to the correct size. If anyone has a lead on where to purchase the correctly-sized rivets, or ideas of a fixturing solution to use a lathe, that'd be appreciated.
They arrived in 2 days along with the rest of my stuff.
If anyone gets in a bind, just PM me and I'll send a handfull for cost of shipping.
Last edited:
Which Rivet tool have people found sucess with? I am reading of many that can't get a Rivet gun or squeezer into the tight space (expecially the front-most rivet). Right now, I have good solid blind rivets, and I am worried I won't be able to get the solid rivets set properly. The CherryMax sure sounds tempting.
I would think it would not put torque on the servo and bracket, so probably it would lessen risk.During the 25 hour grace period for the inspection, does avoiding use of the autopilot prevent any possible risk?
Just did the inspection on my 768-hour legacy ‘12. I’m also missing the middle two of the ten F-1286A-to-fuselage rivets, with no evidence of them ever having been installed; however, all the other rivets look pristine.
I don’t have a rivet squeezer, so I’m buttoning things back up for now and will deal with it at the condition inspection in January (hopefully with CherryMax rivets, but failing that, having my mechanic put in squeezed rivets).
I don’t have a rivet squeezer, so I’m buttoning things back up for now and will deal with it at the condition inspection in January (hopefully with CherryMax rivets, but failing that, having my mechanic put in squeezed rivets).
rdockery_3
Active Member
Anyone ever find out any info on the failure that caused this SB? I'm curious to exactly what happened when the rivets failed.
I worked on the SB today on my flying legacy RV-12. With 250 hours, the rivets looked just fine but they needed replaced according to the SB as my plane is Dynon equipped. I found that using a 12 inch bit gave me a little more control than the right angle drill but it still wasn’t easy considering the yoga required with the fuel tank always in the way. Squeezing the new rivets with my Avery squeezer was a real issue. The first two rivets had a bad set and were bent due to my inability to see them and the contortions I was undergoing. I borrowed a friend’s Cleaveland Main Squeeze and was amazed at how much better it was than my trusty Avery. The compound leverage made it much easier to get a good set than when I was straining with the Avery. I did a fine job on the remaining 4 rivets and then needed to drill out the first two bad sets and replace them. I am frustrated to say that while drilling them out, I enlarged the holes in the bracket to the point where I need to replace all four brackets. They have already been ordered from Van’s but my plane is grounded until I get the new brackets and install them.
I am sharing my misery to suggest an alternate way to comply with the SB. If I could go back in time and do it again, I would drill out all six of the original pulled rivets and remove the brackets that hold the servo. Next, I would drill out the 10 pulled rivets that hold the other brackets to the bulkhead. They are much easier to drill out than the 6 servo bracket rivets. Then, on the bench, I would squeeze the rivets called for in the SB that hold the two brackets together and then finally, reinstall the brackets to the bulkhead using pulled rivets.
I hope all of this makes sense and am wishing you the best of luck.
I have legacy RV12 with 1292 hours. One of my suspect rivets is smoking as you can see. Since I will be replacing all rivets I want these six solid rivets set right. As many have realized that's a tough job while the bracket holes are under the bracket shelf. I plan to take this advice (thank you) and pull the two 1286A brackets from the baggage bulkhead by removing the easily accessible 10 LP-3 rivets with the 1286B "shelves" attached. The smoking rivet is on the left side. The right side is fine.
Attachments
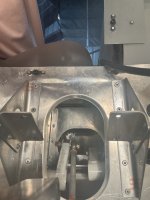

I have legacy RV12 with 1292 hours. One of my suspect rivets is smoking as you can see. Since I will be replacing all rivets I want these six solid rivets set right. As many have realized that's a tough job while the bracket holes are under the bracket shelf. I plan to take this advice (thank you) and pull the two 1286A brackets from the baggage bulkhead by removing the easily accessible 10 LP-3 rivets with the 1286B "shelves" attached. The smoking rivet is on the left side. The right side is fine.
Are these cracks? Maybe a result of or the cause of the loose rivet.

Def work a look when I have it off - thx.

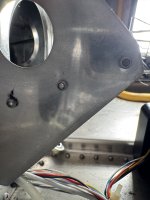
Both forward rivet heads are missing on my RV12 with 200TT, no hard events or flying, Dynon autopilot, installed per plans. Photos below of missing rivet head on left side and recent paint job which I did over most of 2024. Unclear other side photo with same missing forward rivet head not show. I will replace the LP4-3 rivets with AN470’s per the SB. I’m considering adding 2 more 470’s on each side.
I’ve been working on my SB 120116 repair today. I think I have found the cause of the LP4-3 rivet failures, at least on my plane. When I went reinstall the servo (Dynon), I found the servo bolt holes were spaced about 1/16” too wide in right- left dimension. This looks like the F-01286A brackets are spaced too far apart.Let’s see what Van’s ultimately does, I do think this before further flight thing could be lawyer related, I have now complied with this bulletin by replacing with the called for rivets, things could change and we could all be in there again, just like the earlier exhaust revisions.
Stan
Thus the bracket rivet holes closest to the bulkhead are under unplanned excess tension and thus the cracks, loose rivets and popped heads…
My presently planned solution is to remanufacture the F-1286B brackets with the correct lateral spacing for the servo mounting holes. I will also replace the first and last AN470-4.5 rivets with AN3 bolts for additional margin in this area.
Last edited:
To clarify;My presently planned solution is to remanufacture the F-1286B brackets with the correct lateral spacing for the servo mounting holes. I will also replace the first and last AN470-4.5 rivets with AN3 bolts for additional margin in this area.
Are you working on 399AD the legacy -12 or your new one the -12is? Tony_T has discovered the -12is to be slightly different than a legacy -12 in that area.
The current rivets are 1/8" and you are replacing them with 3/16 bolts?
Yes, I’m working on my 12, N399AD. My new project is a RV-15, reserved N499AD.To clarify;
Are you working on 399AD the legacy -12 or your new one the -12is? Tony_T has discovered the -12is to be slightly different than a legacy -12 in that area.
The current rivets are 1/8" and you are replacing them with 3/16 bolts?
Thanks for mentioning Tony_T. I’ll investigate the 12is brackets.
Concerning my fix, only replacing the first and last rivets on both sides with AN3’s.
BTW, I forwarded my postings to Vans, no response so far
Deene
The reason I asked about the AN3's was the need to oversize the holes.Yes, I’m working on my 12, N399AD. My new project is a RV-15, reserved N499AD.
Thanks for mentioning Tony_T. I’ll investigate the 12is brackets.
Concerning my fix, only replacing the first and last rivets on both sides with AN3’s.
BTW, I forwarded my postings to Vans, no response so far
Deene
I am surprised Van's hasn't chimed in on this thread. In the past, (before re-orginazition) they were a frequent voice on this forum.
Edge distance on the existing F-1286Bs was the second reason for making a new set of the brackets with adequate edge distance. I have not received any feedback from Vans Support.The reason I asked about the AN3's was the need to oversize the holes.
I am surprised Van's hasn't chimed in on this thread. In the past, (before re-orginazition) they were a frequent voice on this forum.
DaleB
Well Known Member
2011 vintage with Dynon AP, no missing or smoking rivets found at 1040 hours. I went ahead and replaced with solid rivets since, as usual, we finished the CI a month before the SB was released. *grumble*
I opted to remove the assemblies from the bulkhead, set the solid rivets, then put the whole thing back in. The middle of the 5 attaching each side to the bulkhead is blocked by the angle bracket, so will need to be riveted from the front side.
What fun. Let’s do this again.
I opted to remove the assemblies from the bulkhead, set the solid rivets, then put the whole thing back in. The middle of the 5 attaching each side to the bulkhead is blocked by the angle bracket, so will need to be riveted from the front side.
What fun. Let’s do this again.
I see this as the only reasonable option also. Does it matter which side this rivet is installed from?The middle of the 5 attaching each side to the bulkhead is blocked by the angle bracket, so will need to be riveted from the front side.
With my 3 missing rivets I also found the front holes too far apart to put the bolts back in, I had to squeeze the brackets together a bit the get the bolts in. I thought about replacing the brackets but on the Legacy/Classic models the old bracket is no longer available. I suppose I could make it from scratch. And I may just do that, but I would like to hear what Vans has to say about this since several of us have come across this same issue. I wonder if they would recommend using the newer brackets that the 12is uses.I’ve been working on my SB 120116 repair today. I think I have found the cause of the LP4-3 rivet failures, at least on my plane. When I went reinstall the servo (Dynon), I found the servo bolt holes were spaced about 1/16” too wide in right- left dimension. This looks like the F-01286A brackets are spaced too far apart.
Thus the bracket rivet holes closest to the bulkhead are under unplanned excess tension and thus the cracks, loose rivets and popped heads…
My presently planned solution is to remanufacture the F-1286B brackets with the correct lateral spacing for the servo mounting holes. I will also replace the first and last AN470-4.5 rivets with AN3 bolts for additional margin in this area.
Gerald Clabots
Well Known Member
Checked my early 12 today. 586hours looks like the day it was installed. After crawling back to check it out sure seems like using cherry rivets would be a whole lot easier.With my 3 missing rivets I also found the front holes too far apart to put the bolts back in, I had to squeeze the brackets together a bit the get the bolts in. I thought about replacing the brackets but on the Legacy/Classic models the old bracket is no longer available. I suppose I could make it from scratch. And I may just do that, but I would like to hear what Vans has to say about this since several of us have come across this same issue. I wonder if they would recommend using the newer brackets that the 12is uses.
Less chance to mess up.
Mine is a 2015 with 1780 hours. All the rivets were in place and in good condition. I removed the angles from the bulkhead and replaced the 6 rivets on the bench. Total time to remove the interior, panels, R&R rivets, 42 minutes. Putting it back together will take a little longer.


I measured the hole spacing in the bulkhead and mocked the servo support brackets on the bench. My servo mount holes were exactly on for spacing. Beware without the floor bolted down the bulkhead is flexible allowing the servo mount to change spacing angle.When I went reinstall the servo (Dynon), I found the servo bolt holes were spaced about 1/16” too wide in right- left dimension. This looks like the F-01286A brackets are spaced too far apart.
Thus the bracket rivet holes closest to the bulkhead are under unplanned excess tension and thus the cracks, loose rivets and popped heads…
NORDO Industries LLC
Well Known Member
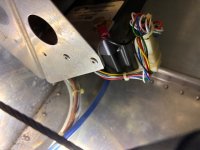
I went to replace my rivets today, and when grabbed the part to drill out the forward-most rivet, it just snapped right off.
There’s dark markings on the surface, which indicates the rivet cracked at some point and started weakening.
There’s dark markings on the surface, which indicates the rivet cracked at some point and started weakening.
Last edited:
