What's new
Van's Air Force

Don't miss anything! Register now for full access to the definitive RV support community.

SB-00036 Rev 3

Desert Rat

Well Known Member
I just knocked this out on a new uninstalled horizontal stab. Wasn't that hard, but I thought I'd throw a few observations out there for other folks.

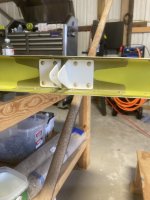
This requires both an internal and external doubler if spar cracks are already present, or just an external doubler if it's accomplished as a preventative measure. If you're using Cherry rivets to install the new steel hinge brackets, be aware that Vans ships two different lengths of cherries in the same bag to cover both situations.

If you are doing this as a preventative measure and aren't installing the internal doubler you can minimize your paint touchup work, by with just drilling out 6 skin rivets top and bottom, plus the inspection hole in the end rib.

Since I was able to work on mine is on the bench and it's not painted, it made more sense to just open it up. That way I can skip drilling the inspection/debris removal hole in the end rib and also skip the cherry rivets.

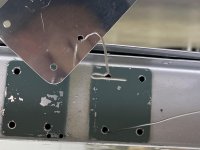
On the top flange I removed the 6 rivets that will be common to the spar flange and the new doubler. On the bottom side, I opened up the entire bay. Probably around 20 skin rivets or so.

This allowed me to get in there with a small bucking bar and shoot on the new steel angles with conventional rivets, rather than trying to get cherries to set with a hardware store hand puller (and yes, I'm aware of vans video where they suggest lubricating them first).

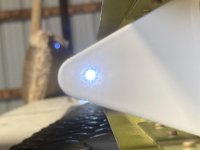
It's hard to get it to show up in a picture, but once everything was done, the hinge line holes all still lined up appropriately. You can kinda see it below where I shined a flashlight in one end and took a picture from the other end. really good precise kit Vans, thanks!
 

Attachments

  • IMG_9089.jpg
    IMG_9089.jpg
    248.4 KB · Views: 238
  • IMG_9088.jpg
    IMG_9088.jpg
    150.1 KB · Views: 188
If you are doing this as a preventative measure and aren't installing the internal doubler you can minimize your paint touchup work, by with just drilling out 6 skin rivets top and bottom, plus the inspection hole in the end rib.


I have done the kit installation with the doubler, with only the 6 top and bottom rivets removed.
It can be inserted between the spar flange and skin and pulled into position with a piece of strategically placed safety wire.
To do this properly does require cogsdill type deburring tools to deburr the interior side of the stop drill holes.
Note- photo posted upside down. To do this, you need to insert the doubler through the bottom and then pull it to a top hole.
 

Attachments

  • IMG_1965.jpg
    IMG_1965.jpg
    217.1 KB · Views: 219
Last edited:
Bucking the rivet on the thin spar I believe plays a role in the spar cracks.
STD practice is manufactured head on the thinner material side.
 
Bucking the rivet on the thin spar I believe plays a role in the spar cracks.
STD practice is manufactured head on the thinner material side.

Hey Walt,

It would be interesting to know how many of the people who've had cracks show up drove them that way initially vs squeezing them or having them oriented the other way.

I know in my case, I wanted the manufactured head on the outside but I used a hand squeezer initially. I understand that convention says that the shop head should be on the thicker side, but I've never seen that documented as a rule, more like guidance that usually has the caveat "if practical".

During the rework, my options were to either use cherries or shoot -4's from the outside. Both fasteners are approved in the SB text. I chose to use driven rivets, frankly because I didn't have a puller handy that could get to the rivet holes closest to the radius of the steel angles without side loading them, and we all know how much havoc you can cause if you side load cherries even a little bit.

This is a brand new h/s that now has the approved preventative fix on it. If cracks start showing up I'll know that I chose wrong.

I wouldn’t worry about it. Lots of us did this originally and some with high times. Mine is only 1000 hours. No cracks. There are others with lots more time and no cracks.
It’s a good rule but it isn’t absolute and no real world data to back up any claim otherwise.
 
75% price increase

I guess I shouldn't have procrastinated while trying to find out what shipping costs would be.

Both the RV-3 and RV-4 SB-00036 kits increased 75% ($75 -> $131.25 and $60 -> $105 respectively), plus tax.

Wonder if that was an automatic (across-the-boards) increase or based on actual cost to produce these repair kits.

(I realize this is peanuts compared to other's deposits and kit price increases.)

Edit: Solved by only ordering the spar inserts/doublers. Anyway have to make the angles for the RV-3 so may as well do it for the RV-4 too. Intend to use solid rivets anyway.

Finn
 
Last edited:
I just did this SB as well over the last two days on a finished but non flying stab. Took the same approach as the OP by opening up the bay. I originally chose to install the bracket rivets with the manufactured head on the inside (following the adage of manufactured head on the thin side) so I got to experience the fun of drilling them out from the tail end. Came out fine. I opted for both doublers and went with solid rivets all set with a squeezer. Pre-punched parts fit right in. Nice work Van's! With this upgrade plug the front spar SB, the HS seems bulletproof.
 
Back
Top