Van's Air Force

The definitive Van's Aircraft support community! Buying, building or flying an RV? Join our exclusive family of mentors and enthusiasts!

RV6 Empennage attachment doublers?

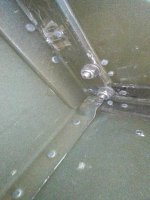
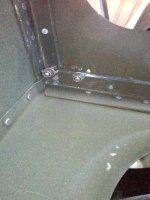
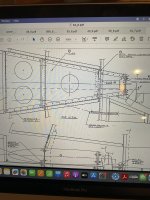
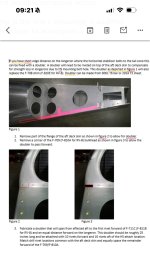
I’m the proud owner of a new to me RV6A. Going through it pretty thoroughly and the pre buy identified missdrilled/ poorly aligned attachment for the empennage. Reference drawing 34. I understand Vans has a kit or drawing or something that describes a repair? I’m probably not describing what I mean well so see the pictures for details.
Any help or reference would be appreciated!
 

Attachments

  • Image_2025-04-01 15_28_16_206.jpeg
    Image_2025-04-01 15_28_16_206.jpeg
    881.7 KB · Views: 204
  • Image_2025-04-01 15_27_49_835.jpeg
    Image_2025-04-01 15_27_49_835.jpeg
    873.8 KB · Views: 200
  • image.jpg
    image.jpg
    2.5 MB · Views: 215
There is no kit available.
If you contact tech. support they should be able to provide you with a diagram showing the recommended re-enforcement.
I am not sure that will fully correct the issue you have though.
The purpose of the re-enforcement is for instances where the outboard bolt holes were poorly located laterally such that they have poor edge distance on the longeron angle (often times there is virtually no edge distance at all for the holes through the longeron… the purpose of the fix is to re-establish the strength in the longeron ).
It doesn’t do anything to re-enforce the issue you have of poor edge distance on the lateral angle. On at least one side, it looks like the bolt shank is visible with the angle just being clamped by the washer. That is the detail most concerning to me.
Any suggestions for corrective actions? I’ve reached out to Vans as well
 
Unfortunately, I believe tech support misunderstood your issue in this area. As Scott mentioned, and as the first line of the second photo says, the prescribed doubler fix addresses a misdrilled longeron, not a misdrilled lateral angle.

I would approach this by replacing the lateral angle (and the spacer sandwiched to the aft deck). An angle with a longer leg parallel to the aft deck will let you drill with comfortable edge distance.

(Technically the longer leg would place greater bending moment on the angle, but your close enough that the effects will be null, especially where the lateral angle sits under the longeron).

1743630391770.png
 
Last edited:
Unfortunately, I believe tech support misunderstood your issue in this area. As Scott mentioned, and as the first line of the second photo says, the prescribed doubler fix addresses a misdrilled longeron, not a misdrilled lateral angle.

I would approach this by replacing the lateral angle (and the spacer sandwiched to the aft deck). An angle with a longer leg parallel to the aft deck will let you drill with comfortable edge distance.

(Technically the longer leg would place greater bending moment on the angle, but your close enough that the effects will be null, especially where the lateral angle sits under the longeron).

View attachment 84498
I agree with Taylor‘s comments regarding tech-support and his fix
recommendation. (by the way, Taylor is very familiar with the loads in this area. Of structure because of some advanced analysis, he has done in the past.)
 
I did as Taylor suggested plus replaced the 1/8 shim under the horizontal spar with triangular pieces that has additional bolts through the longeron. My tail hasn’t fallen off yet so it must be ok😀. You can PM me if you would like to see pictures.
 
Unfortunately, I believe tech support misunderstood your issue in this area. As Scott mentioned, and as the first line of the second photo says, the prescribed doubler fix addresses a misdrilled longeron, not a misdrilled lateral angle.

I would approach this by replacing the lateral angle (and the spacer sandwiched to the aft deck). An angle with a longer leg parallel to the aft deck will let you drill with comfortable edge distance.

(Technically the longer leg would place greater bending moment on the angle, but your close enough that the effects will be null, especially where the lateral angle sits under the longeron).

View attachment 84498
Thanks. That seems appropriate as well. I’ll draft up your sketch and send it to Vans for a nod, I’m guessing they will approve.
 
Vansairforce to the rescue again. May have lost Taylor from the factory, but that might not be so bad for the community. Another reason I have purchased Taylor’s products. Have a few bucks in your pocket? Buy something from Aero Garage.
Go Taylor!
 
I am still surprised there are so many RV’s flying out there with these gross errors in one of the most critical areas. They keep popping up.
When was this airplane built? I finished mine in 2007 and issue’s with empennage attach errors were well known and beaten into us.
This should have been caught at any CI.
 
Looks to me like the lateral angle needs to be removed and replaced with an angle of larger dimensions. Not a pleasant job, but not impossible. [He says from experience]
 
This area has little room for edge margin. Even for pre punched kits, it easy to make this kind of mistake. I am surprised vans has not modified the kits in this area to use a wider angle flange to improve the edge distance margin even when the builder isn’t as precise with the assembly.
 
I am still surprised there are so many RV’s flying out there with these gross errors in one of the most critical areas. They keep popping up.
When was this airplane built? I finished mine in 2007 and issue’s with empennage attach errors were well known and beaten into us.
This should have been caught at any CI.
This one is new to me as of a month ago. I’m just going through the whole thing as I would an FCF- previous job as a U2 Functional Check Pilot. It was completed in 2003. I’m working with a few smart RV mechanics, VAF bros, and of course the factory. I have no limits on time nor $$ to make things right. It was the plan all along. Thanks to all!!! Much appreciated!
 
This one is new to me as of a month ago. I’m just going through the whole thing as I would an FCF- previous job as a U2 Functional Check Pilot. It was completed in 2003. I’m working with a few smart RV mechanics, VAF bros, and of course the factory. I have no limits on time nor $$ to make things right. It was the plan all along. Thanks to all!!! Much appreciated!
Gotcha. You’re doing it right. I had a couple neighbors do the chase car thing. Not sure who their connection was but it was fascinating.
 
I did as Taylor suggested plus replaced the 1/8 shim under the horizontal spar with triangular pieces that has additional bolts through the longeron. My tail hasn’t fallen off yet so it must be ok😀. You can PM me if you would like to see pictures.
PM sent. Thanks!
 
Are there drawings for those or is it something you eyeballed? Probably a dumb question.
I made the size and shape of the parts and transferred existing holes on the plane to the new parts. I was able to remove the old angle and spacer from inside the tail (on the hottest day of the year) it was tuff, but it worked out.
 
Back
Top