Van's Air Force

The definitive Van's Aircraft support community! Buying, building or flying an RV? Join our exclusive family of mentors and enthusiasts!

RV-4 CHEEK COWL REPAIR

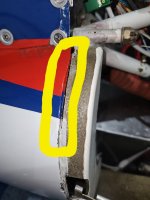
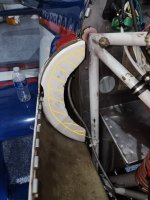
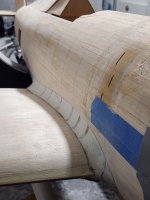
This RV-4 I picked up a few months ago has a strange "cut" or "rub through" where the right cheek cowl fits under the engine cowl. It appears that is was sanded down from the outside since there is no apparent wear on the under side of the engine cowl where it over lays this defect. I want to put a few glass layups on the inside to repair & strengthen it but access is a bit difficult. I'd like to cut back some of the thick, flat face on the forward part of this fiberglass piece to access the inside to work... but how much can I safely / logically remove without adversely affecting the structural strength? The first pic shows the "cut", second pic shows the area I'd like to remove some of the material for a larger opening.

Any suggestions and notes of potential caution / problems???
 

Attachments

  • 20250610_153236.jpg
    20250610_153236.jpg
    184.4 KB · Views: 109
  • 20250610_153241 A.jpg
    20250610_153241 A.jpg
    321.8 KB · Views: 108
Well my first thought is that the cheek extension really isn’t structural at all - it’s primarily cosmetic, so I wouldn’t;t worry too much about residual strength. If you’re goign to cut it away to give access, make sure to leave enough for it to be rigid. And…its just composite - you can always glass some back as part of your repair if you feel the need.
 
Roger that! I've done fiberglass work with my giant scale RC planes, and this seems very similar. However, I want to make sure that RV experts out there ping me if there are any landmines in this area. Thanx for chiming in! By the way, I plan to use West Systems epoxy... I'm familiar with that and just used a bunch making wing fillets for my 1/6th scale (scratch built) P-47D-23RE... epoxy mixed with Q-cell for a very light & easy to sand fillet... that is easy to fiberglass over with 3/4 oz cloth.
 

Attachments

  • 20250618_164903.jpg
    20250618_164903.jpg
    786.1 KB · Views: 51
  • 20250618_164919.jpg
    20250618_164919.jpg
    926.4 KB · Views: 51
  • 20250618_165007.jpg
    20250618_165007.jpg
    1.2 MB · Views: 51
What Paul said. You can cut back a lot and leave a flange, then glass the backside of the flange for thickness as part of the cut repair.

The hard part will be sanding the inside of the cheek. You must break the surface of that old polyester glass if you expect anything (including epoxy) to stick in the long term. That includes down in the backside recesses, a fingertip job.

When sanded, wipe a filet of flox/epoxy (cyan) into the recesses, then lay a few plies of glass. The combination is kinda overkill, but heck, you're in there, the brush is wet...

ScreenHunter_2853 Jun. 30 09.04.jpg
 
Great recommendation Dan. That technique will also help to get a good bond and I can use a mirror to "look around the corner" for any air bubbles for each layer. From prior work I found that making the first layer with "veil" rather than bi-directional cloth gets a good bubble free start. Then the next layups will be tighter and stronger. The flox trick will also help round out the radius in the tight corners so the layups will be easier. Thanks a million for the pointers!!!
 
You can pretty much do what you want in that area. My flanges were about the size you are looking to trim down to. I built my -4, and I made aluminum cover plates that I pop riveted on to keep air from swirling around in the cheek. I also secure the upper and lower cowl at the cheek with a screw to keep that are from fretting.
 

Attachments

  • 20171011_183930.jpg
    20171011_183930.jpg
    1.7 MB · Views: 33
Wow... I'm glad you mentioned what you did. I am also having a problem with excess heat building up in the avionics compartment... when I climb out after a flight the metal foreskin panel is wicked-hot... and if I do a couple touch & go's or fly around the pattern slow too long my iPad A17 overheats and must be shut down! I suppose heat is radiating through the firewall... but if heat is also getting into the aft cheek cowl area that may be also adding heat to the SIDE of the avionics compartment. Hmmm.... I'm going to investigate this a bit. I was planning on fabricating some sort of "scoop" to place by the vent at the right rudder pedal with a small section of scat tube to shoot air up into and swirl around the avionics area. On my next flight I'm going to check the sidewalls where the cheek cowl fairing passes by to see if I'm getting excess heat from there.

The iPad MINI A17 is in a mount with a cooling fan behind it... but the air apparently does not circulate enough OR the air is just too hot. It fits fairly tight, so I just fabricated a small Z-bracket that will allow the top of the iPad to extend a bit without falling out so that cooling air can flow up and out. Then I can check during flight to feel how hot that air is. Will be interesting to see what is going on with my thermal budget behind the instrument panel...20250305_114335 01.jpgCOCKPIT 01.jpg
 
Last edited by a moderator:
Back
Top