Van's Air Force

The definitive Van's Aircraft support community! Buying, building or flying an RV? Join our exclusive family of mentors and enthusiasts!

RV-4 #4175 Fastback Conversion

climbak

Active Member
My 4 is down for a bit for a several little projects, like elevator reskinning due to some cracking, adding a light to the tail, possibly electric trim, fiberglass repair due to some less than perfect fits over the years, etc. While it's down, I decided to make it way worse for time and money and do the fastback conversion plus a new paint job. It's not a full build, but it'll make it more my own until I can start building a new kit. I'll be using the Harmon Rocket bulkheads and top skin, and a Rocket canopy. I'll be using Axel's (user AX-O) really good writeup on his fastback build as a reference and stealing a lot of ideas from Dave Paule's RV-3 build log, especially his full fiberglass canopy frame since he lives a few towns over from me and is a wealth of knowledge. I'll try to update whenever I make any real progress or come across something interesting. Might throw in a few WW1 biplane replica photos since I'm bumming some hangar space from the Vintage Aero Flying Museum that I do a lot of work at to avoid having to buy a lot of extra tools and such.

Here's the current winning paint scheme for my own motivation since I was bored waiting for tools and parts to show up before I could really get to work and have just been photoshopping in the meantime:

mid blue tail vert only stripes.jpg
mid blue tail vert only stripes 3d.jpg
 
Can’t wait to see more! The best plane in the GA fleet has got to be the RV-4.. and making it a fastback just makes it look even better! Please most more! What engine,prop, avionics are currently in it?
 
Can’t wait to see more! The best plane in the GA fleet has got to be the RV-4.. and making it a fastback just makes it look even better! Please most more! What engine,prop, avionics are currently in it?
I agree, I've debated if I should plan on upgrading to an 8 at some point, but honestly the 4 just looks way better to me. Thinking about building a Rocket though if I ever get around to getting my Kitfox ready to sell. Panel is pretty basic, with an AV-30 added in and iPad to connect to my Echo UAT. It's got a 160hp O320 and a Prince prop. Great combo up here in the mountains. Here's what it looked like before I started taking things apart. Paint isn't anything to write home about, but simple and looks good.

large_image_1765628_1_1660995779.jpeg20220919_163950.jpg
20221114_182337.jpg20221210_141828.jpg
 
To heck with the RV-4 (just kidding just kidding! ;) ), but please tell us a little about the Spad XIII, the Fokker D.VII, and the Sopwith Camel replicas in the background.
I sometimes do ignore the RV for those haha. They're really fun beasts. The Fokker was built by the museum owner's father in the 70s. Really nice airplane to fly, quite well behaved. I've not flown a Stearman, but I'm told it feels very similar. Only issue I ever have is seeing around that super long nose! The inverted Ranger up front sounds pretty amazing.

The Spad was finished and had its first flight a number of years ago, but had a carburetor issue that grounded it until we finally got around to replacing the carb a couple summers ago and had its re-first flight. I'm waiting on our main test pilot to get some more hours on it before I hop into it, but his airline pilot job and neighbor with a shiny DC-3 has been stealing all his focus. Rude 😅 I can't remember off hand which motor is in it, but I think it's the GO-480. It's got the original very thin airfoil with no dihedral so I'm quite curious how the stall is going to (mis)behave.

The Camel is our newest plane. I finished up the last of the little nagging issues that needed to be done before inspection not too long ago so now we're just waiting on paperwork to get done and an inspector to come out. I'll likely fly it a lot since I'm the only one that fits in it well. The perks of being kinda short. We made the plastic faux radial to hide the O320 in the nose. Also has the original thin airfoil.

We also have a couple 7/8 scale SE5as that fly like a cub with a bit better performance, a full scale SE5a that needs a more suitable prop and the wings re-rigged before flying it again. New projects are a couple of Fokker Dr.1s and a couple others that we may or may not ever really work on. Fun fact on the small SE5s, they were in the movie The Aviator. One is briefly in the flying scenes and the other was a ground prop.
 
Not much progress, but I did get the parts from HR in. Went in to the hangar to start removing all the trim so I can get the wings and tail feathers off. Found some damage in the skin where the empennage fairing wore through the skin. Good thing it's the skin that I'm replacing anyway. Also stuck the front bulkhead on for a quick mock up although at the wrong angle from hitting the existing one. Still gives me some motivation. Otherwise, got some quick wing stands built and mostly built the Vans practice kit I had laying around. You can see some bad riveting in the reflections. The 3x gun I picked up has no teasing ability in the trigger. I've got a better one on order. Hoping to move it to the other hangar in the next week or 2 and then I can get to drilling rivets out.

20240203_122250.jpg20240203_121345.jpg

20240213_173045.jpg
 
Out of curiousity ...

Does it look like the new aft seat bulkhead is slightly narrower than the original?

Thx

HFS
HRII S/N 002
 
I agree, I've debated if I should plan on upgrading to an 8 at some point, but honestly the 4 just looks way better to me. Thinking about building a Rocket though if I ever get around to getting my Kitfox ready to sell. Panel is pretty basic, with an AV-30 added in and iPad to connect to my Echo UAT. It's got a 160hp O320 and a Prince prop. Great combo up here in the mountains. Here's what it looked like before I started taking things apart. Paint isn't anything to write home about, but simple and looks good.


View attachment 55552

Climbak-
What iPad mount are you using and how's the mount attached to the panel. Seems like you made a bracket to install in a standard 3" hole. Is it possible to quickly remove the entire assembly.
 
Out of curiousity ...

Does it look like the new aft seat bulkhead is slightly narrower than the original?

Thx

HFS
HRII S/N 002
Yeah it's not a perfect fit. I suspect there's gonna be a bit of rework required, very similar to AX-O's writeup. I'll have a better idea once I get the skin off.

Climbak-
What iPad mount are you using and how's the mount attached to the panel. Seems like you made a bracket to install in a standard 3" hole. Is it possible to quickly remove the entire assembly.
That mount on the panel is just for an old garmin gps (I think) and I haven't bothered taking it out because it makes for a very convenient headset hanger for short periods of time and haven't figured out what I want to put in its place. My ipad is attached to the right side of the cockpit using some ram mount parts. I can look them up if you're interested. It's about the only place I've found that holds it in an easily visible spot that's out of the way. I like kneeboards for paper and I use them a lot for gliders and towing, but I can't stand them for an iPad.
 
Yeah it's not a perfect fit. I suspect there's gonna be a bit of rework required, very similar to AX-O's writeup. I'll have a better idea once I get the skin off.


That mount on the panel is just for an old garmin gps (I think) and I haven't bothered taking it out because it makes for a very convenient headset hanger for short periods of time and haven't figured out what I want to put in its place. My ipad is attached to the right side of the cockpit using some ram mount parts. I can look them up if you're interested. It's about the only place I've found that holds it in an easily visible spot that's out of the way. I like kneeboards for paper and I use them a lot for gliders and towing, but I can't stand them for an iPad.
FYI - Although the aft fuselage (pretty much) conforms to the RV-4 plans, what is not widely known is that at the F-407 bulkhead, John made the fuselage 1/2" (1/4" each side) narrower to make a straight line down the sides, from the spar bulkhead to the F-412 tailcone bulkhead ... So, the replacement bulkhead you have (unless John changed things) is narrower for that reason.

My Rocket build was from the ground up, but as narrow as the -4 is anyway, I went ahead and used the original width, and modified that bulkhead (and the others behind it, as needed), to allow for the "wider" fuselage section there.

HFS
HRII S/N 002
 

Attachments

  • tempImagexCgjlB.png
    tempImagexCgjlB.png
    12 MB · Views: 236
  • tempImage23A7oe.png
    tempImage23A7oe.png
    12.5 MB · Views: 244
FYI - Although the aft fuselage (pretty much) conforms to the RV-4 plans, what is not widely known is that at the F-407 bulkhead, John made the fuselage 1/2" (1/4" each side) narrower to make a straight line down the sides, from the spar bulkhead to the F-412 tailcone bulkhead ... So, the replacement bulkhead you have (unless John changed things) is narrower for that reason.

My Rocket build was from the ground up, but as narrow as the -4 is anyway, I went ahead and used the original width, and modified that bulkhead (and the others behind it, as needed), to allow for the "wider" fuselage section there.

HFS
HRII S/N 002
That's great info to know. I assumed it was something like that. since mine is already built and I'm retrofitting I'll definitely just be modifying the bulkheads. Great seeing those pictures too, not a lot of build pics around. (although I've not looked around much for HR specific posts yet)
 
That's great info to know. I assumed it was something like that. since mine is already built and I'm retrofitting I'll definitely just be modifying the bulkheads. Great seeing those pictures too, not a lot of build pics around. (although I've not looked around much for HR specific posts yet)
As you can tell from the pics, you need to "back up" the bulkheads with something (plywood or ?) to stabilize them when installing the top skin. You may (probably) find that the intermediate bulkhead flanges are not a good fit. I cut all those flanges off and made new ones that conformed after the skin was strapped down - insuring the skin "line" was straight from front to back.

You can see on the attached pic the "new" flange - discount the battery location, it wasn't mounted there in the end.

HFS
 

Attachments

  • tempImageur6DVv.png
    tempImageur6DVv.png
    11 MB · Views: 201
As you can tell from the pics, you need to "back up" the bulkheads with something (plywood or ?) to stabilize them when installing the top skin. You may (probably) find that the intermediate bulkhead flanges are not a good fit. I cut all those flanges off and made new ones that conformed after the skin was strapped down - insuring the skin "line" was straight from front to back.

You can see on the attached pic the "new" flange - discount the battery location, it wasn't mounted there in the end.

HFS
That's excellent info, thank you. I'll probably reach out here and there once I get the existing skin off and start test fitting the bulkheads if you don't mind. I had heard the flanges weren't always a good fit and that I might need to make new ones. I'm going to try to get the wings off this weekend if I can find a helper so I can trailer it over soon after.
 
Finally got the wings off, will be trailering it over to it's new temporary home hopefully this week. Also decided to get a new panel blank and rearrange a bunch of things. There were a few choices over the years on switches and instrument placement that I just didn't like. Not finished with the design yet because I need to measure a bunch of things, but it's close and the ergonomics and control flow should be much better. Panel will be one of the last things I do so there's no rush, I was just bored.

IMG-20240225-WA0023.jpgIMG-20240225-WA0027.jpgCapture2.JPG
 
Still waiting on a friend to be available with his trailer so worked on some other things this weekend. Still iterating on the panel and have been making the new throttle handle with an integrated switch for my electric flaps. Needs some more shaping and finish work before I put the switch all the way in since it'll be a bear to remove it but so far it's coming along really well and the switch fits great pending a bit of final filing to the mounting hole. The existing flap switch is on the switch panel that's on the right side of the cockpit which I consider an awful placement. The handle is a very cheap item so if I don't like the ergonomics I can just move the existing switch over to the left side or hook it up to the so far unused buttons on my stick grip.

An unrelated question, but I was thinking about some of the regs and I'm assuming that the fastback conversion itself is going to be considered a major alteration by the FAA and so I'll need to do a bit of paperwork and put it back into phase 1 for a time. Does anyone know for sure? I was planning to email my local FSDO as well, but curious in the meantime.

20240303_142251.jpg20240303_142353.jpg20240303_142448.jpg
 
Finally got it trailered over to it's new temporary home and now it has some new friends for a few months. Should have some actual progress starting this weekend. Tail feathers are coming off and top skin is getting drilled out.

20240307_102013.jpg20240307_113707.jpg
 
How long and difficult to pull the wings off? I'm keeping an eye on your build as I'd like to do the same FB conversion some day on my -4.
 
How long and difficult to pull the wings off? I'm keeping an eye on your build as I'd like to do the same FB conversion some day on my -4.
The worst part was just getting all the bolts out, there are a few over 50 of them and they're a tight fit. Otherwise wasn't too bad. I added disconnects to ask the wires running to the wings, mostly drained the fuel, disconnected the fittings and then the controls and they come right out.
 
Got the tail off, drilled out all the rivets, removed the skin, cut the top off one of the bulkheads and started some basic fitting of the Harmon bulkheads. F407 lines up with the new line very well, but 408 and 409 are a bit low. All three are also narrow so I'll split the aft two and cut off at least the side flange for 407 and make a new one. I need to check the rear seat back against the plans as well because the 407 bulkhead doesn't at all line up with my existing seat. Most of this is expected. Need to get some more aluminum sheet and start fitting it all together. Still waiting on the canopy itself as well.

1000024677.jpg20240309_143449.jpg20240309_161012.jpg20240309_164608.jpg20240309_161016.jpg
 
Small progress today. Made a work platform and riveted some angle supports for it. might need to make another, but I'll deal with that a bit later if I need it. Did some more cutting and have a plan for the flanges on the bulkheads to take up the extra space from the bulkheads since the RV-4 is wider than the HRII. Still trying to sort out exactly how I want to handle bulkhead F407. The longeron slots that come standard from Harmon have the bulkhead sitting much too low for the seat back without cutting at least an inch off the seat. I need to move the bulkhead up a bit anyway to get the canopy transition line I want so I have a few ideas for that. I'm also planning to attach F407 at a slight angle to avoid some binding and chafing with the canopy after discussion with HFS. Canopy is also on order finally so should have that in a couple weeks hopefully.

20240316_183058.jpg20240316_181011.jpg

20240316_183142.jpg20240316_183121.jpg
 
Didn't get a whole lot done on my bird this weekend. Still waiting on the canopy to show up so can't drill or cut much else until I get that to make sure it's all gonna fit how I want. I did get the seat figured out after talking to HFS and AX-O. That'll get riveted back together once I confirm the height I've got set on HRF407. Canopy should hopefully be here this week so I can start drilling, clecoing and making new flanges soon. Also started some more test flying on one of our newer replicas and we're working through some squawks on that.

20240323_190951.jpg20240323_191012.jpgIMG_7213.JPG
 
Very little progress the last few weeks. The canopy supplier wants to make a new one that has a better profile so still waiting on that before I can start final fitting of the bulkheads and cleco them in place for the skin fitting. Made a few bulkhead supports that are just roughed out on shaping. Been making some small parts like new throttle lever and templates for the bulkhead doublers. The rest of my time has been research, testing and making adjustments to one of the museum planes. Also scheming up another museum warbird project because I can't sit still and if I'm stuck waiting and not building, then I start planning.

20240406_185517.jpg20240406_185528.jpg20240406_185522.jpg
 
Still waiting on the canopy and at this point I've been pretty frustrated with the lack of progress so I've started moving forward and will just fill in fit issues with fiberglass, but also there shouldn't be anything major. Been fine tuning the bulkhead placement and started fitting the skin yesterday. Waiting on a replacement drill head as well so once that gets here I think I'll start drilling things and cleco them into place.

20240421_131739.jpg20240421_131713.jpg
 
Been busy with other things, but finally got a bit more done. Remade a couple small pieces, got started on the side flanges for F407 and started fitting the skin for drilling. I'll get it drilled and clecoed to 407 and 410 and then get inside and make the templates for the flanges for 408 and 409, maybe this coming weekend. Gotta finish a conditional on one plane and at least do a portion on another as well, plus the motor swap on my other plane. Busy busy.

20240519_220504.jpg20240519_220419.jpg20240519_220430.jpg

Here's one of the reasons I haven't been working on it lately, had to run overseas to grab a new project for the museum and get it on a boat. We're branching out from WW1...

20240510_145655.jpg
 
Been busy with test flying the Spad at the museum and the engine swap on my Kitfox, but finally got the canopy delivered and have been making some progress. Got the skin fitted and drilled to F407 and F410 and made the doubler/flange for each side of 407. Next up is to crawl inside and make the new flanges for 408 and 409.

20240608_134415.jpg20240606_140703.jpg
20240610_220542.jpg20240610_220548.jpgVideoCapture_20240603-153326.jpg
IMG-20240526-WA0004.jpeg
 
I don't understand the purpose of converting the RV-4 to a "fastback" design. How does this improve the airplane?
 
Work continues, still slowly, but I've been making more time for it between all my other projects. Fuselage is nearing riveting time. Made and drilled the new flanges for F408 and 409. Drilled the flanges/doublers for F407 with the exception of drilling to the skin, need to do a bit of finish work and make sure the bends line up perfectly. Next will be tail modifications, the elevator hinge SB, some tail reinforcement since I already have everything off and the canopy. Somewhere in there I'll do some cockpit updates like throttle relocation, etc. Maybe I'll have it back flying within a year from starting...

IMG_20240626_132139_548.jpg20240707_211704.jpg20240715_222916.jpg
 
I converted my RV4 into a fastback back at the end of the 1990s. I purchased the required parts from John Harmon. The secret to a good looking conversion is an absolute straight line from bubble canopy back to the last rib. I sold my -4 in April 2021. The aircraft still resides at Airpark in Oregon where I live. The conversion was worth it. I can’t absolutely tell you the mph difference but 5 mph at the least. I could provide you with photos, if interested . My contact 503-302-6298. Text ok. Jake Thiessen, Independence, OR
 
I converted my RV4 into a fastback back at the end of the 1990s. I purchased the required parts from John Harmon. The secret to a good looking conversion is an absolute straight line from bubble canopy back to the last rib. I sold my -4 in April 2021. The aircraft still resides at Airpark in Oregon where I live. The conversion was worth it. I can’t absolutely tell you the mph difference but 5 mph at the least. I could provide you with photos, if interested . My contact 503-302-6298. Text ok. Jake Thiessen, Independence, OR
Photos are always welcome. My rear deck angle is already set and drilled so no going back now. I'm actually avoiding the perfectly straight line. I prefer a very slight angle where the canopy meets the deck. If I ever get around to building a full Rocket, I may go for the straight line though. Kind of the signature look.
 
A few steps forward and a step back. Started rough trimming the canopy and getting the rear deck prepped for riveting. I bent one of the flanges on the doubler/flange of D407 too much and cracked it so I have to make another one. Luckily the second go is way faster. I also started making the new throttle bracket/panel for when I relocate that.

IMG_20240721_114723_446.jpgIMG_20240721_114726_103.jpg20240720_120233.jpg20240720_181702.jpg
 
Been busy, made some good progress. Fuselage is just about finished. Since my bulkhead flanges were separate, I back riveted them directly to the skin and then clecoed all that back to the canoe. All inside riveting is finished and just waiting on a friend to help me finish the rivets on the side that I can't reach alone. Canopy frame and tail modifications will start soon. I'm also adding a tail reinforcement to the fuselage that I don't have pictures of yet, still waiting on some fresh .063 to show up.

Also got the throttle block mostly finished, just need to add some structure for it to mount to and then move all the cables from the original throttle and make a "patch" for the hole that will be left.

20240818_170911.jpg20240824_171837.jpg20240818_170855.jpg20240818_170807.jpg20240824_193410.jpg20240907_144518.jpg1000027601.jpg1000027603.jpg20240907_131730.jpg
 
Last edited:
Been a minute since I posted an update. As usual, life and the museum have been getting in the way. I've been working on our Spad 13 a lot to get it ready for some airshows in the next couple months. That's pretty much done and have just been putting it through its test flight program. Van's recent announcement that they're killing off the 3, 4 and 6 for good has given me a kick in the butt to get going at a faster rate again.

Fuselage is now complete and all rivets done. New throttle has had a bit of progress, just needs a new bracket made for the throttle and mixture cables since the offset is different in the new location. Just need to go get a piece of 5052 and bend it. I made a bracket that fits behind it and mounts to the same points as the trim lever did. That came out since I'm converting to electric trim.

Old panel is out, new panel is all cut, first coat of prime and the flange at the top installed. Only have a photo from a couple months ago when I was still cutting it. Need to mount it to the longerons where the old one was, then put all the gauges back in and organize the wiring. Also started the template for the center console like thing where I'll be putting the fuel gauges and xpndr. New switch and break panel is complete, but I'm waiting until I finish the panel so I can redo the wiring.

I also finally started building the new tail since I can do that at home so I've been trying to work on that at least 3 or 4 nights a week. Horizontal is in the jig. Need to make brackets for setting the end ribs. Vertical stab I previously completed most of the main spar so I'm hoping that will go quickly.

Hopefully more to come soon. I'm itching to get this bird back in the air and get working on other projects.

20250628_175223.jpg20250719_194415.jpg
20250703_002956.jpg20250814_223826.jpg
 
Some progress made the last few weeks. I finished the horizontal, mostly finished the vertical, just waiting on a hinge bracket I was missing to get delivered so I can rivet it together. Finished the rudder too except 8 rivets that I needed to order some longer ones for and bend the leading edges. Next up are the elevators and then I can start fitting them to the plane.

I've also finally mounted the new throttle quadrant and waiting on some aluminum to show up so I can bend up a cable offset bracket. The new panel has been fitted and work to redo the rats nest of wiring has started including a new mounting tray in front of the panel so I can organize everything better and have something to mount the radio tray and center console bits to.

And I changed my original paint scheme plan to something much more simple because I really want to fly this thing again someday.

IMG_20250923_163135_665.jpgbd0ce978-ea2f-4124-bb9d-5daf99a8c85a.jpg

5de27332-c179-47ad-856b-1c9a8a9b7db4.jpg12423e57-117b-4121-a373-c60402231acd.jpg

grey with dark accents (1).jpg
 
Where did you order your canopy from if you don't mind me asking? I've tried to contact aerocanopy multiple times with no luck.
 
Where did you order your canopy from if you don't mind me asking? I've tried to contact aerocanopy multiple times with no luck.
I got mine from Ranny at AeroCanopy. He was pretty slow with responses and getting it to me, but once it arrived it was very good quality. I believe Airplane Plastics also makes a Rocket canopy, but they were a bit more money when I was getting quotes.
 
My 4 is down for a bit for a several little projects, like elevator reskinning due to some cracking, adding a light to the tail, possibly electric trim, fiberglass repair due to some less than perfect fits over the years, etc. While it's down, I decided to make it way worse for time and money and do the fastback conversion plus a new paint job. It's not a full build, but it'll make it more my own until I can start building a new kit. I'll be using the Harmon Rocket bulkheads and top skin, and a Rocket canopy. I'll be using Axel's (user AX-O) really good writeup on his fastback build as a reference and stealing a lot of ideas from Dave Paule's RV-3 build log, especially his full fiberglass canopy frame since he lives a few towns over from me and is a wealth of knowledge. I'll try to update whenever I make any real progress or come across something interesting. Might throw in a few WW1 biplane replica photos since I'm bumming some hangar space from the Vintage Aero Flying Museum that I do a lot of work at to avoid having to buy a lot of extra tools and such.

Here's the current winning paint scheme for my own motivation since I was bored waiting for tools and parts to show up before I could really get to work and have just been photoshopping in the meantime:

View attachment 55532
View attachment 55534
I think the RV4 is the best looking airplane Vans ever made and the fastback is even better.
 
I got mine from Ranny at AeroCanopy. He was pretty slow with responses and getting it to me, but once it arrived it was very good quality. I believe Airplane Plastics also makes a Rocket canopy, but they were a bit more money when I was getting quotes.
Thanks for that, I will keep trying to contact him. I'm hesitant to just use the online store, but maybe money will get a response haha.
 
Thanks for that, I will keep trying to contact him. I'm hesitant to just use the online store, but maybe money will get a response haha.
I believe that's exactly what I did. He seemed to respond after my order, but it was long enough ago that I don't remember real clearly. Just be prepared to wait a couple months to get it. To be fair, he was right in the middle of swapping box suppliers and freight companies when I ordered mine so there were some delays outside his control.
 
Lots more work getting done. Slowly, but surely. I think I'm averaging 30-40 hours a week which has been nice.

When I was building the rudder, I somehow got a hold of one of the original versions of the sketch for the stiffener layout that was missing the topmost stiffener. No idea how, but I ended up building it without it. I thought it was quite weird that it didn't have one, but kept on my merry building way. Shortly after bucking the last rivet, I decided it was weird enough that I should look into it again, sure enough, I just build it wrong. About 60 rivets drilled out later, I have a partial stiffener as far back as I could get my hand. Annoying, lesson learned, pay more attention. (how many times will I need to learn this one the hard way)

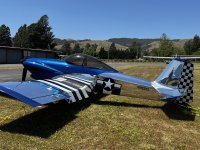
Since my main bottleneck is finishing the cockpit changes and the canopy, I've pushed the elevators back and have been driving to the hangar 3 nights a week and Saturdays to try and get that done. I've got the canopy frame mostly bent into the shape I need. I stretched too hard on one of the angles and cracked it, but that can be easily welded back so just annoying. I've got the tubing and latch parts I need to finish it on order so whenever that shows up I can get the frame finished. I of course had to pull the canopy out again and take picture for motivation.

I've got the panel and mounting for things pretty much finalized. Lots of fresh wiring and tubing done, new center console for the fuel gauges and xpdr done, the new switch panel wired up and installed. I picked up a Showplanes flap controller which I've gotten half mounted, but need to cut a notch for the little rod to move along and then I can wire it up. I had a nice powder coated bracket made for the throttle cables, but the bends came out offset so the supplier is sending a new one and then I can finish the throttle. I still need to install the flap, boost pump and primer switches and wire them up. A few cables routed to the tail for trim and lighting and the electrical will be done. Also ordered new stick boots because I had ordered boots for a 6/7/9 hoping they'd fit, but the 4 has a rectangular stick envelope rather than squarish like the others. Once the new boots come in I can finalize the new trim panels. Last for the cockpit is I splurged and ordered an Oregon Aero seat core for my seat and I have a bunch of foam waiting to get cut out for the rear seat. A local buddy is good with upholstery and has offered to sew that up for me. The cockpit is getting close, but as usual still lots to go.

The major bits left after that are the various fairings, canopy trimming, mounting and skirts. I've changed my mind over and over on how I want to tackle things, and have done it again. For the skirts, I have an english wheel and other shaping tools so I'm going to just try my hand and making the bits that are compound curves out of aluminum rather than fiberglass. I have a lot of scrap aluminum to practice on so the worst that can happen is I need to change back to glass. The only tough parts I see will be the reverse compound curves around the rear and front, but they are mild enough that I think I can handle it. Might be wishful thinking, but worth a try and I think it would just be cooler to have it metal. The tail and other fairings I need to make I'm still planning to just do glass.

20251001_230345.jpg20251009_232140.jpg20251015_204823.jpg
20251011_183544.jpg20251011_211939.jpg
20251017_004903.jpg20251018_225247.jpg
 
Steady progress. Got the remade throttle bracket in and the throttle cables are mounted now. I removed the throttle assembly to paint the housing and will be adding that back in soon. Most of the work lately has been canopy frame, canopy and the occasional random thing when I get stuck or sick of it.

The side quests have been a rear stick area cover and added an extension to the baggage compartment rear panel since was too short with the fastback. Just need to sort out something to hold the top since it doesn't fit quit as well with the Harmon bulkhead back there.

Canopy frame is more or less done as of tonight. I may do some minor tweaks and add a brace to the rear hoop, but the major bits are finished. The canopy is also fully trimmed. I had to order an acrylic drill bit because I didn't have the right size, I plan to cleco the canopy to the frame in a few spots to make sure it's exactly where I want it and then SikaFlex it on. That all showed up today as well. Hoping to glue next weekend. Also ordered a fresh sheet of 2024 for the canopy skins. I've decided to commit to the aluminum for at least the side and rear skins. really not much different than the original skins and I think it looks better than fiberglass. I'll start shaping some scrap I have for the front fairing and see how it goes after I finish the rest.

After that, really all I have left are the elevators which I've started and should go quickly, mount the empennage, empennage fairing and tips, a couple other fiberglass repairs, button up some remaining odds and ends like the throttle and a bit of wiring, and then get it prepped for paint. I think I'm still on track for ready to paint close to the new year and hopefully flying by end of February. Getting close.

20251024_144910.jpg20251107_224837.jpg20251113_214250.jpg
20251101_202750.jpg20251114_212846.jpg20251115_155116.jpg20251115_172725.jpg
 
Glued the canopy over the weekend. Nerve wracking even though it's probably the easiest part of the whole canopy process. I ended up drilling 3 holes per side for clecos to make sure I had it in the exact spot I wanted. I left it to cure on the plane for a few days with the heaters at the hangar on, but there's a cold snap coming through CO so I brought it home to live in my office for a few days. Next step is to fill the gaps where the spacers are and then I'll get started on the skirts. I'm pretty excited for those, I've almost finished building my planishing hammer and have ordered a nice linear stretch die so I should be able to get the reverse curves done decently well.

20251122_160848.jpg20251122_160837.jpg20251122_210104.jpg
20251122_160901.jpg20251122_160856.jpg
 
Looking good! I'm a bit behind you but plugging away. I noticed you and Axo were able to have the canopy reach further forward over the boot cowl. I live a little ways due North of you and obviously want to fly more than a month or 2 a year lol. So I'm wondering about putting a few holes in the cowl there for a defrost of sorts? Do you think it would work/ be needed?

BTW I sincerely appreciate your posts and pics. Many times already I've left the hanger scratching my head. Then found the answer here.

29.jpg
 
Looking good! I'm a bit behind you but plugging away. I noticed you and Axo were able to have the canopy reach further forward over the boot cowl. I live a little ways due North of you and obviously want to fly more than a month or 2 a year lol. So I'm wondering about putting a few holes in the cowl there for a defrost of sorts? Do you think it would work/ be needed?

BTW I sincerely appreciate your posts and pics. Many times already I've left the hanger scratching my head. Then found the answer here.

I'm glad I'm helping in any way. I know AX-O's posts were really helpful to me. If you ever want to come down and see anything in person or ask about how I did something, just shoot me a message. I'm certainly not an expert, but happy to help if I can.

The Rocket canopy is definitely a lot longer so yeah you can extend the front by a decent amount. I probably could have gone up to a full 12" forward of the panel, but I thought it might look funny. I've flown the original canopy down to maybe 30 degrees or so and didn't have any fogging issues, but I can't say if it would be in colder. I honestly hadn't thought of a defrost system, but there would be room for sure. I'll try to take a picture from inside to show how much room is in there when I go back out after the cold snap coming. I was thinking it would be really cool to install a HUD up there, but $$$. I'm still trying to sort out exactly how to handle the skirts up there.
 
I honestly hadn't thought of a defrost system, but there would be room for sure. I'll try to take a picture from inside to show how much room is in there when I go back out after the cold snap coming. I was thinking it would be really cool to install a HUD up there, but $$$. I'm still trying to sort out exactly how to handle the skirts up there.
This is good to know, my canopy should be here in the next few weeks (I ended up going to airplane plastics). I'm actually in Dumas, Tx for work (due South lol) and it turned off cold here too. Amazon diesel heaters are great, but 2 of them can't warm the drafty T-hanger I rented haha.

If I make a trip back home in the near future I'd love to stop by. Your other projects are just as interesting to me.
 
Back
Top