

The RV-3 lends itself to customized cockpits, since the plans are, shall we say, a it ?Sketchy? when it comes to internal appointments. It is only a slight exaggeration to say that they suggest a throttle control be placed somewhere, and oh yes, a couple of side pockets would be nice! Being a bit of a nut about cockpit design, I decided from early on that we?d have to do better than that. Yes, it would add a little bit of weight, but seeing as how this is going to be a multi-purpose machine, with one of those purposes being cross-country, I wanted to have as much storage space as would fit (for maps, flashlights, chocks, etc.). And there isn?t much room to play with.
Louise and I are building the -3 together, and one of my goals is not to do any work on the primary airplane structure or systems without her being part of it. That doesn?t include amenities and appointments ? my creative areas when I need something to do! With her going off on a two-week trip for work, it looked like cockpit design work was going to be on my agenda for awhile! It took about that long to reach what I would call the ?roughed in? phase of construction ? the basic design is finished, the boxes are built and attached, and what is left is fit and finish ? making them look good enough for eventual paint, and installation of systems.
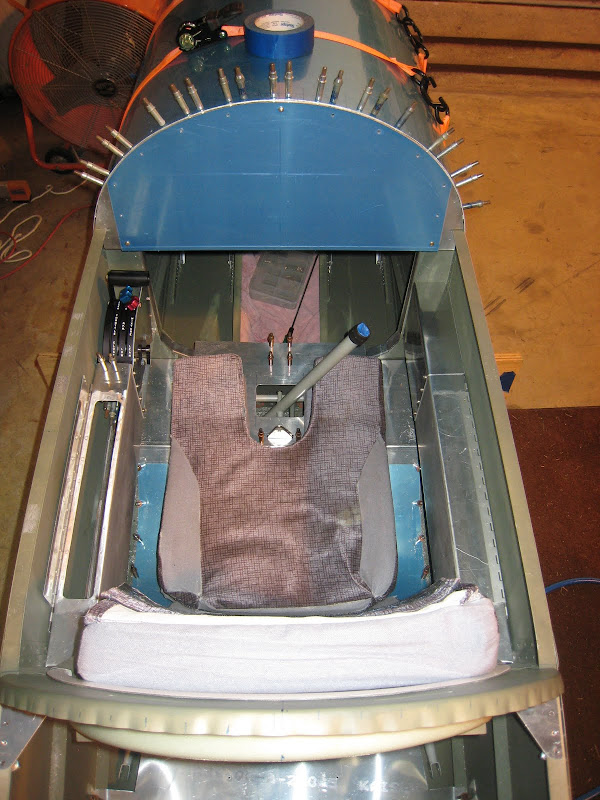
I wanted the cockpit to be as symmetrical as possible ? symmetry catches the eye, and makes for pleasing lines. That meant I wanted storage boxes on both sides, and something on the right to balance the throttle quadrant on the left. The plans suggest the right front area as a good place for switches, and I agree ? so I built a panel (which is blank for now) to mirror the throttle. The quadrant is the curved-top, short lever model from DJM ? a beautifully-crafted piece of engineering that operates smoothly and fits perfectly in the space available. I left room across the bottom of the quadrant panel for switches (with switch guards) or circuit breakers related to engine operations. The right side panel has room for switches on top, and circuit breakers on the side ? we?ll have to make maximum use of space for the electrical requirements of a glass panel.
I built the consoles pretty much by eye, starting with a 2? x 2? sheet of .025 aluminum which I cut in half, and bent into a ?C?-channel on my neighbors three-in-one brake. What a fast and precise why to make the blanks. I taped heavy card stock to the sides of the fuselage and did some preliminary fitting (the tops of the console are 6.5? below the longerons). I used the paper to determine the angle at which to cut the rear so that they matched the F-305 bulkhead, leaving material to bend flanges to rivet to the bulkhead. I used 0.060 stock to make forward bulkheads for the consoles. The length of the console was determined by figuring out where I wanted the throttle quadrant, then cutting the appropriate panel out of 0.060 sheet. This will attach to the F-303 with an aluminum angle, and to the forward end of the console/bulkhead with screws, forming a strong and rigid box for the engine controls. Both the throttle panel and right side electrical panel (bent from 0.040 stock) are open on the bottom.
I wanted consoles with storage compartments, and I wanted lids on those compartments that will cont only keep the contents inside, but will act as arm rests. (I have open metal ?pockets? on the -8, and they work fine, but the cockpit is too wide for them to be effective arm rests ? the -3 is much narrower) Before I cut the openings for these pockets, I riveted on a double (on the inside) to the top of each console. I then used a cutting wheel to open up the holes. The covers are flat 0.040 with piano hinge. I have yet to decide on a ?clever? latch design - stay tuned!
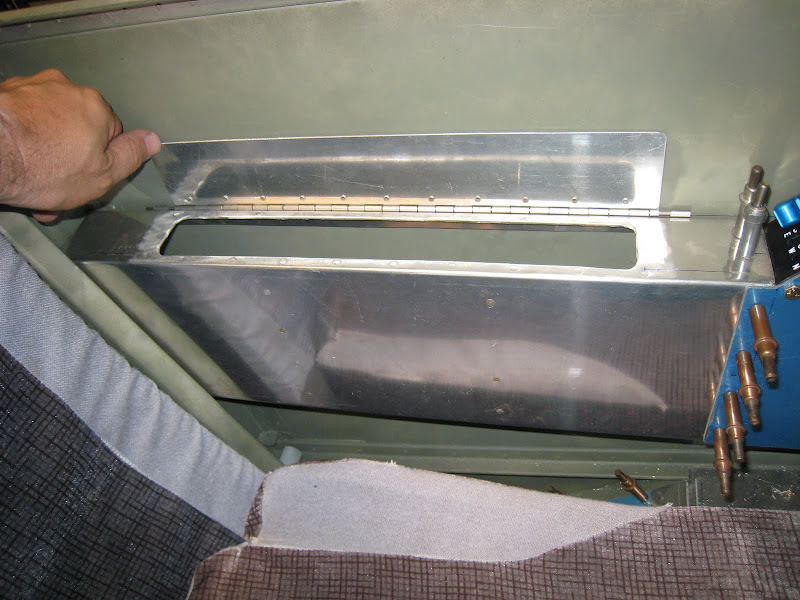
After a final position approval from Louise, I drilled the rear flanges to the F-305 bulkhead, removed the forward panels, and drilled the notched flanges to the side of the fuselage, then to the forward end of the consoles ? this way, I got the curvature correct. Fortuitously, the consoles were JUST the right length that I could fit the mini palm drill in between the rear of the F-303 and the front of the console to drill those holes?.whew!
The consoles are ?open? on the outboard sides ? the flanges on the bottom and top horizontal sections will rest (with foam tape, probably) against the outer skin of the airplane to make a ?closed? box. Next up will be straightening all the flanges, filing the openings to perfection, mounting the hinges, finish riveting the assemblies, and coming up with a latch for the doors. Then we can move on to our next exciting design task ? building a battery box/flap actuator cover behind the seat!
More pictures at: http://picasaweb.google.com/Ironflight/2010_06_18RV3SideConsoleDevlopment#
Paul
Louise and I are building the -3 together, and one of my goals is not to do any work on the primary airplane structure or systems without her being part of it. That doesn?t include amenities and appointments ? my creative areas when I need something to do! With her going off on a two-week trip for work, it looked like cockpit design work was going to be on my agenda for awhile! It took about that long to reach what I would call the ?roughed in? phase of construction ? the basic design is finished, the boxes are built and attached, and what is left is fit and finish ? making them look good enough for eventual paint, and installation of systems.
I wanted the cockpit to be as symmetrical as possible ? symmetry catches the eye, and makes for pleasing lines. That meant I wanted storage boxes on both sides, and something on the right to balance the throttle quadrant on the left. The plans suggest the right front area as a good place for switches, and I agree ? so I built a panel (which is blank for now) to mirror the throttle. The quadrant is the curved-top, short lever model from DJM ? a beautifully-crafted piece of engineering that operates smoothly and fits perfectly in the space available. I left room across the bottom of the quadrant panel for switches (with switch guards) or circuit breakers related to engine operations. The right side panel has room for switches on top, and circuit breakers on the side ? we?ll have to make maximum use of space for the electrical requirements of a glass panel.
I built the consoles pretty much by eye, starting with a 2? x 2? sheet of .025 aluminum which I cut in half, and bent into a ?C?-channel on my neighbors three-in-one brake. What a fast and precise why to make the blanks. I taped heavy card stock to the sides of the fuselage and did some preliminary fitting (the tops of the console are 6.5? below the longerons). I used the paper to determine the angle at which to cut the rear so that they matched the F-305 bulkhead, leaving material to bend flanges to rivet to the bulkhead. I used 0.060 stock to make forward bulkheads for the consoles. The length of the console was determined by figuring out where I wanted the throttle quadrant, then cutting the appropriate panel out of 0.060 sheet. This will attach to the F-303 with an aluminum angle, and to the forward end of the console/bulkhead with screws, forming a strong and rigid box for the engine controls. Both the throttle panel and right side electrical panel (bent from 0.040 stock) are open on the bottom.
I wanted consoles with storage compartments, and I wanted lids on those compartments that will cont only keep the contents inside, but will act as arm rests. (I have open metal ?pockets? on the -8, and they work fine, but the cockpit is too wide for them to be effective arm rests ? the -3 is much narrower) Before I cut the openings for these pockets, I riveted on a double (on the inside) to the top of each console. I then used a cutting wheel to open up the holes. The covers are flat 0.040 with piano hinge. I have yet to decide on a ?clever? latch design - stay tuned!
After a final position approval from Louise, I drilled the rear flanges to the F-305 bulkhead, removed the forward panels, and drilled the notched flanges to the side of the fuselage, then to the forward end of the consoles ? this way, I got the curvature correct. Fortuitously, the consoles were JUST the right length that I could fit the mini palm drill in between the rear of the F-303 and the front of the console to drill those holes?.whew!
The consoles are ?open? on the outboard sides ? the flanges on the bottom and top horizontal sections will rest (with foam tape, probably) against the outer skin of the airplane to make a ?closed? box. Next up will be straightening all the flanges, filing the openings to perfection, mounting the hinges, finish riveting the assemblies, and coming up with a latch for the doors. Then we can move on to our next exciting design task ? building a battery box/flap actuator cover behind the seat!
More pictures at: http://picasaweb.google.com/Ironflight/2010_06_18RV3SideConsoleDevlopment#
Paul
")


