Van's Air Force
You are using an out of date browser. It may not display this or other websites correctly.
You should upgrade or use an alternative browser.
You should upgrade or use an alternative browser.
RV-10 cowl jig
- Thread starter ybarra15
- Start date

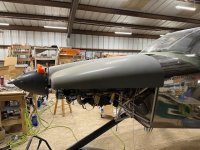
I just finished cutting and mounting my Cowl. I’m not sure which jig you’re referring to?I am looking for a cowl jig for my RV-10. I've heard David Howe fabricated and distributed a large number of them with the intent they would float around as needed by various builders. Does anyone have one they are ready to pass along?
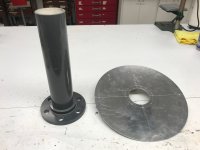
It functions as an extension of engine crankshaft to ensure the cowl is perfectly aligned with the engine thrust lineI just finished cutting and mounting my Cowl. I’m not sure which jig you’re referring to?
Attachments
outnumbered
Member
I have one that I can send along to you Message me your address and I’ll send it out.I am looking for a cowl jig for my RV-10. I've heard David Howe fabricated and distributed a large number of them with the intent they would float around as needed by various builders. Does anyone have one they are ready to pass along?
glider_rider
Well Known Member
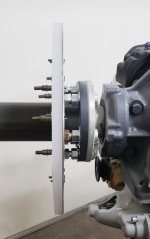
Could you please measure the distance from engine flange to the jig front surface? I'm based overseas, want to make my own jig.I have one that I can send along to you Message me your address and I’ll send it out.
Attachments
Could you please measure the distance from engine flange to the jig front surface? I'm based overseas, want to make my own jig.
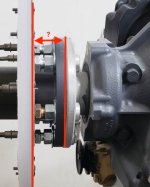
That’s going to depend on the exact prop/spinner/backplate combination that you have. You need to know the distance between the aft most edge of your actual spinner/backplate and the front of the prop flange.
It dosent really matter what the distance is from the prop flange to the jig is. As long as you space the cowl back appropriately for whatever spinner/cowl gap you want.
When built my RV7 I used a surplus propeller hub without blades to mount the backplate to in order to jig up the cowl. That was more or less foolproof.
For the 10 i couldn’t find a surplus equivalent hub. So I took lots of measurements and then fabricated a timber jig and spaced the cowl backwards off that.


glider_rider
Well Known Member
I've got a stock spinner and 2 pale aluminium prop
outnumbered
Member
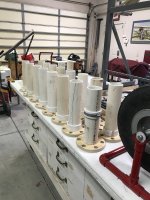
I designed and then 3D printed my cowl jig. Design just needs to account for distance between spinner aft and prop plate and then which spinner to cowl gap you want. The benefit of this design is that you can cleco in the cowl against the jig for an easy and repeatable fixturing during removal/installation of cowl while fitting.

outnumbered
Member
My print bed wasn’t large enough. I just broke up the print (in the bamboo labs slicer) into 4 pieces and then glued togetherI'll be doing this soon myself -- I would love to pay for shipping if anybody is willing to send me one that you are done with. I love the 3D-printed one and I have a printer but I don't think my print bed is that large.
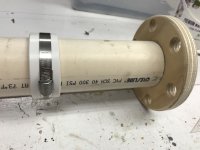
My tool - EZ-COWL uses forward/aft movement of the cowling (along the crankshaft centerline) to establish the "cut line" for the cowl to FW interface. A lot of the other ideas out there have some sort of fixture (fixed) on the crankshaft, requiring up & down motion for "fitting" - this can be restrictive, frustrating & time consuming. Mine attaches the cowling via a centering ring to the EZ-COWL tube (12" long) attached to the crankshaft flange. With this system, once the desired clearance between the cowl nosebowl and aft face of the spinner has been determined, a ring "stop" is clamped to the tool preventing further aft movement of the cowl when making the FW cut. If you do the math right, and the make centering ring accurately, basically what you are doing is moving the cowling (half or whole) fore & aft as needed to facilitate the marking/cutting of the aft cowl face. Think of it this way - Van's is up and down with attendant interference, while mine is fore and aft with interference only at the face to be cut at the FW.
YYMV - But this has worked for me since 1985
HFS
YYMV - But this has worked for me since 1985
HFS
Attachments
Is there a way to get a copy of the STL for this?My print bed wasn’t large enough. I just broke up the print (in the bamboo labs slicer) into 4 pieces and then glued together
outnumbered
Member
I can send you my stl but the dimensions are specific to my spinner/prop and spinner/cowl gap that I wanted. I have a fusion360 design file that you can modify to your requirementsIs there a way to get a copy of the STL for this?
Envious of those who have the time & tech savvy to produce these wonderful tools that are useful once in the build process.
But-
- how much extra effort (none) to mount the spinner bulkhead temporarily (or permanently) to the prop hub? (Even less if it is a fixed pitch prop)
- How hard or time consuming is it to temporarily (or permanently) mount the prop & spinner bulkhead to the engine?
- How hard to tape a temp spacer block (I use rigid foam) to the top of the flywheel to hold up & center the top cowl, & set the perfect gap?
- How hard to than join the lower cowl (I use lots of duct tape here) for fitting referencing the spinner bulkhead again for perfect gap & fit?
Some argue that not having the prop on makes makes installing & fitting the two cowl half’s easier & is difficult if you have a 3 blade… well you will STILL have to figure out how to get the lower cowl around that prop sooner or later, might as well be sooner.
Don’t get me wrong, I love new & tech based tooling to make building easier, I just prefer to use the (time proven) process described above to get perfectly aligned & spaced cowling results.
Again, a lot of time & talent expended to produce a one time usage tool that still needs some sort of spacer to hold the cowls up, & leaves you to calculate (or guess) the gap spacing??
If you happen to have a 3d printer an engineer from Hartzell posted some 3d models here https://vansairforce.net/threads/hartzell-hub-and-blade-proxies.224970/ that you can use to fit the cowl and also the spinner. I went that route and just installed the real prop yesterday and everything fit great. I don't have a better picture than the one I attached.
Attachments