Van's Air Force

The definitive Van's Aircraft support community! Buying, building or flying an RV? Join our exclusive family of mentors and enthusiasts!

RV-10 Beringer Master Cylinder Question

kirkbauer

Well Known Member
I know I have been spamming with a lot of questions lately, but as a first-time builder I really appreciate all of the help! I purchased the Beringer wheels/brakes kit directly from Van's as part of my fuselage and I'm working on the rudder pedals and master cylinders now. I think I mostly have it figured out but considering how important brakes are I want to run this by the experts.

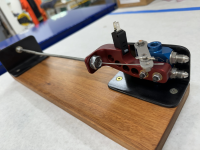
So far, I have found the Beringer instruction manual kind of lacking. Specifically, drawing 5.1.4 on page 23 seems to be lacking quite a bit:
  • It doesn't show the actual rudder pedal frame relative to the AN3 bolts, so it isn't clear where it fits in with the ordering.
  • It shows an extension on the top of the master cylinders, but those part numbers aren't listed anywhere in the document. I went ahead and put them on.
  • It does not reference any sort of extra spacers on the bottom AN3 bolt. Without a spacer, the spring will rub against the rudder pedal frame and will definitely not be straight.
  • I received Qty 8 of RDL-007(A) in my kit which look like they should be used as spacers. If I use one spacer things line up pretty well, but not if I use two spacers. So I'm unclear why I have 8 of them.
Here is my test fit -- can anybody let me know if this looks acceptable? I switched the top bolt to an AN3-10 with a castellated nut, and the bottom bolt to a longer AN3-13 with a castellated nut (cotter pins will be done later). It's also odd to me that they didn't include longer AN3 bolts even though it seems clear you have to have spacers on the bottom.

PXL_20250130_023840396.jpg
 
Mine is a 7A. It's slightly different. They clear with one at the bottom, but I don't see a problem with your solution.
Tip... don't permenant secure the bottom bolts till after the system is charged. There's less air if the masters are horizontal. Once full, you can secure them and start the air purge.
 
Last edited:
Kirk, switch out the nuts and bolts. Rod ends should use locknuts rather than castellated nuts and be torqued to spec.
 
Kirk, switch out the nuts and bolts. Rod ends should use locknuts rather than castellated nuts and be torqued to spec.
I know that's what the Beringer manual said to do, but I read a suggestion elsewhere (can't remember where) to use cotter pins. Is there a scenario in which cotter pins are less secure than locknuts? It felt like the castellated nuts are the safer option (and it's also what Van's recommends for the stock master cylinders in the standard plans).
 
Not really a security issue, neither will come apart. The issue is where the wear occurs. If rod ends are used, they are meant to be the bearing surface - the part that moves. The stock setup needs the castellated nut since it isn't using rod ends. In that case, the bolt and the holes it passes through become the bearing surface and call for wheel bearing grease. Look at all of your flight control rod ends, I'm pretty sure all are torqued and use locknuts.
 
Mine is a 7A. It's slightly different. They clear with one at the bottom, but I don't see a problem with your solution.
Tip... don't permenant secure the bottom bolts till after the system is charged. There's less air if the masters are horizontal. Once full, you can secure them and start the air purge.
True, review the entire procedure: Screenshot 2025-01-30 193720.jpg
 
Warning: i misread the parking brake instructions so my brake is inop until i fix at next conditional. Just a warning to take extra time to get it right.
 
I know I have been spamming with a lot of questions lately, but as a first-time builder I really appreciate all of the help!

Kirk, keep spamming, please. You’re a few steps ahead of me and the info has been great.

So far, I have found the Beringer instruction manual kind of lacking.

That’s my challenge too. Great system, lousy instructions. Lots of info out there but nothing consistent and I too assembled the master cylinders based on web search photos. Looking at your photo, I missed the thick spacers and used washers to align the lower mount. Based on that and info from @Halleffect , I’ll need to undo these again. 🤦


@PilotjohnS can you elaborate? I’d like to avoid the same mistake.

For the group, any input on directional alignment of the banjo bolts? Should they all run to the center?

Thanks, everyone.

IMG_1627.jpeg
 
Kirk, keep spamming, please. You’re a few steps ahead of me and the info has been great.


That’s my challenge too. Great system, lousy instructions. Lots of info out there but nothing consistent and I too assembled the master cylinders based on web search photos. Looking at your photo, I missed the thick spacers and used washers to align the lower mount. Based on that and info from @Halleffect , I’ll need to undo these again. 🤦


@PilotjohnS can you elaborate? I’d like to avoid the same mistake.

For the group, any input on directional alignment of the banjo bolts? Should they all run to the center?

Thanks, everyone.

View attachment 79864
Kevin---wen we first set up the prototypes of the Beringer hoses, we thought having the hoses run between the master cylinders would provide some protection for the hoses and look better. As it turns out, with our angled banjo hose ends, the hoses and parallel the masters anyway. OH---and check your left lower one---flip it 180* and the hose will route between the masters.
 
Great system, lousy instructions.
Agreed! It's amazing to me how little effort some companies put into their instructions. It's just brakes for an airplane... 😲

Just a few hours of work would probably reduce their customer service support costs and builder installation errors by 50%.
 
Last edited:
Kevin---wen we first set up the prototypes of the Beringer hoses, we thought having the hoses run between the master cylinders would provide some protection for the hoses and look better. As it turns out, with our angled banjo hose ends, the hoses and parallel the masters anyway. OH---and check your left lower one---flip it 180* and the hose will route between the masters.

Is there any chance you can post a photo of the Beringer master cylinders on standard pedals and your angled banjo connectors? It would be great to have a reference.

I originally tried to point all of my banjo connectors towards the middle but the hoses were interfering with pedal movement. Now I'm tempted to point them all outwards.
Kirk---i sent you a DM---email me at [email protected]
 
Kirk, keep spamming, please. You’re a few steps ahead of me and the info has been great.


That’s my challenge too. Great system, lousy instructions. Lots of info out there but nothing consistent and I too assembled the master cylinders based on web search photos. Looking at your photo, I missed the thick spacers and used washers to align the lower mount. Based on that and info from @Halleffect , I’ll need to undo these again. 🤦


@PilotjohnS can you elaborate? I’d like to avoid the same mistake.

For the group, any input on directional alignment of the banjo bolts? Should they all run to the center?

Thanks, everyone.

View attachment 79864
The drawing for the installation shows some fittings that are labeled” to brakes” i routed this to the brake pedals, not the actual brakes on the axles, my bad. I think i can flip the valve around, and rotate the cam 180 degrees without redoing my “brake on” microswitch. Which was difficult to get it to work reliably. I am just not looking forward to doing this under the panel, because i rhought i was right so i buried the valve under the panel where it is hard to get too. I swore i was right, until i was wrong.
 
The drawing for the installation shows some fittings that are labeled” to brakes” i routed this to the brake pedals, not the actual brakes on the axles, my bad. I think i can flip the valve around, and rotate the cam 180 degrees without redoing my “brake on” microswitch. Which was difficult to get it to work reliably. I am just not looking forward to doing this under the panel, because i rhought i was right so i buried the valve under the panel where it is hard to get too. I swore i was right, until i was wrong.
Understood. Sounds like a morning of contortion is in your future. I worried that with the brake on top of the rudder pedal mounting block, it would be a pain to ever remove with the lock nuts and washers so close to the side skin. I ended up using nut plates for the AN3 bolts.
 
Understood. Sounds like a morning of contortion is in your future. I worried that with the brake on top of the rudder pedal mounting block, it would be a pain to ever remove with the lock nuts and washers so close to the side skin. I ended up using nut plates for the AN3 bolts.
Some of you may have seen our Beringer Parking Brake mounting bracket with the microswitch at Oshkosh this past year. Designed to mount on the left pedal bar mount it can be used with either the stock Vans pedals or the Control Approach pedals. Cable controls the valve lever. Microswitch closes by the lever and signals an indicator either on your EFIS, or a separate lite on the panel. The install location is per Beringer/Vans. Some builders have opted to use the MATCO valve mounted on the firewall with the Airward mount in place of the F6122 firewall bracket.
 

Attachments

  • Beringer PB bracket with switch.png
    Beringer PB bracket with switch.png
    494.3 KB · Views: 38
The drawing for the installation shows some fittings that are labeled” to brakes” i routed this to the brake pedals, not the actual brakes on the axles, my bad. I think i can flip the valve around, and rotate the cam 180 degrees without redoing my “brake on” microswitch. Which was difficult to get it to work reliably. I am just not looking forward to doing this under the panel, because i rhought i was right so i buried the valve under the panel where it is hard to get too. I swore i was right, until i was wrong.

Understood. Sounds like a morning of contortion is in your future. I worried that with the brake on top of the rudder pedal mounting block, it would be a pain to ever remove with the lock nuts and washers so close to the side skin. I ended up using nut plates for the AN3 bolts.
In talking with a bush pilot he questioned the need for a parking brake on a light RV. Landing with it on by accident may make for a interesting landing. If one is on the ramp with a strong wind, maybe turn the plane so it doesnt blow away, and if it is accidentally left on at the ramp of an fbo, will be hard for them to move the plane.

I rhink i will take it out next condition inspection. I have never used it in 300 hrs.JMHO. YMMV
 
I have 500 hours in a -10 with no parking brake. I'm not sure when I would ever use it if I had one. Everywhere I park they ask me to make sure my parking brake is off.

I'm not putting one into my new -10.
 
Beringer wheels seem to make the airframe roll much easier than standard wheels. I've moved a few 14A's (non-Beringer) and mine seems to roll much easier. There have been multiple times when I gas up and stop, the wind or gradient of the ground my airframe starts rolling. I'm glad I have a parking brake and very simple to install. (See TSF post above for the switch installed that lets you know if for some reason your PB is on but frankly if it is on you are not going anywhere) The Sence-Air temperature and pressure monitoring system also works very well. (Mine have been on for 5 years and still battery life is good, but they are not cheap)
 
In talking with a bush pilot he questioned the need for a parking brake on a light RV. Landing with it on by accident may make for a interesting landing.
How would you land with the parking brake on? You couldn't take off with it on. Are you suggesting somebody would pull and set the parking brake while in flight and then ignore the warning light on the panel? Serious question from a low time pilot.
 
How would you land with the parking brake on? You couldn't take off with it on. Are you suggesting somebody would pull and set the parking brake while in flight and then ignore the warning light on the panel? Serious question from a low time pilot.
You are correct. Been flying Beringer wheels, parking brakes and anti-skid for years. There is no way you can takeoff or even move with the parking brake on. Then you would need to push on both brakes in flight (Not easy, but possible I guess) pull the parking brake (Anyone see a pattern here) ignore the Parking Brake on CAS alarm (Swiss cheese holes gaining alignment one in a million) and land. I'm a very pessimistic pilot but even I would lose very little sleep over this possibility.
 
You are correct. Been flying Beringer wheels, parking brakes and anti-skid for years. There is no way you can takeoff or even move with the parking brake on. Then you would need to push on both brakes in flight (Not easy, but possible I guess) pull the parking brake (Anyone see a pattern here) ignore the Parking Brake on CAS alarm (Swiss cheese holes gaining alignment one in a million) and land. I'm a very pessimistic pilot but even I would lose very little sleep over this possibility.
Maybe just fix and quit overthinking. Long weekend w family.
 
Some of you may have seen our Beringer Parking Brake mounting bracket with the microswitch at Oshkosh this past year. Designed to mount on the left pedal bar mount it can be used with either the stock Vans pedals or the Control Approach pedals. Cable controls the valve lever. Microswitch closes by the lever and signals an indicator either on your EFIS, or a separate lite on the panel. The install location is per Beringer/Vans. Some builders have opted to use the MATCO valve mounted on the firewall with the Airward mount in place of the F6122 firewall bracket.
Dang. Another cool add on for my -10. Tom, does that fancy switched bracket come with the Van's supplied Beringer kits? I understand Vans Beringer Kits have your hoses which was the tipping point for me on the upgrade. Just added it to a fuse kit coming in a couple of weeks.
 
Dang. Another cool add on for my -10. Tom, does that fancy switched bracket come with the Van's supplied Beringer kits? I understand Vans Beringer Kits have your hoses which was the tipping point for me on the upgrade. Just added it to a fuse kit coming in a couple of weeks.
The Vans supplied kits dont come with the bracket. Vans specified the type of kit they wanted, Beringer supplies the hard parts, we supply the hoses. So you can easily retrofit the bracket.
Tom
 
Back
Top