Van's Air Force

The definitive Van's Aircraft support community! Buying, building or flying an RV? Join our exclusive family of mentors and enthusiasts!

RV-10 #42122

I've been lurking since 2015, never posted. Started building my RV-10 on March 10, 2022. Figured I probably should be more active considering how much I read threads here and that I am actually building now. Currently 361.7 hours into the build and working on the wings. Since the start I've documented my build on my YouTube channel:


and I have a build log that I made for Excel:
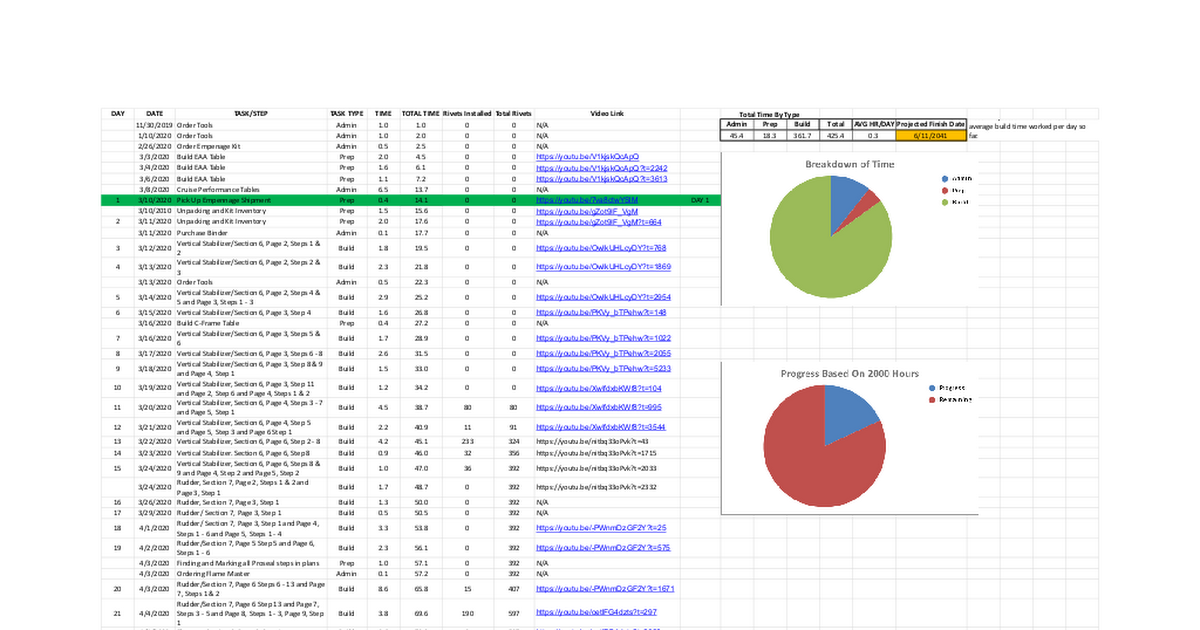

Feel free to drop by, watch a few on the more interesting videos, comment, leave a thumbs up, or subscribe. Currently, I have 58 videos up on just the build and several more waiting to be edited. I was planning to build quicker, but I am also working on my Masters in Mechanical Engineering.

Yesterday I just finished making by second pair of Long Wingbox J-stiffeners. I really wish that the plans didn't use the word nest in the direction. Overlap would have been a much better word choice. Also, wish I had read the Gotchas page for Tim Olsen's build. At least I seem to be in good company with several other builder/owners who have done the exact same thing. I'll post some pictures later.
 
This is from March 2020, we borrowed a truck and picked up the empennage from the local airport. If the truck went to my house, the shipping company wanted it to have a lift gate and charged extra. Also, the airport had a forklift in case we needed it. We backed the truck up to the shipping truck and carried the crate into the back of the pickup. I bought furniture dollies in case I over estimated how much weight the four of us could lift.
004.jpg

Man I miss long bed trucks.
007.jpg

At the house, we just picked it up and placed on the furniture dollies so I could move it around by myself as needed.
013.jpg

So it begins. I am not sure my son completely understood what he was looking at and what it would become.
036.jpg
 
March 14,2020: I clecoed the skin to the vertical stabilizer. For the first time something looks like an airplane part.

20200314_184707.jpg

Ten days later, March 24, I finished the part and took a obligatory part finished celebration photo with my kids.
20200324_183434.jpg

They helped build the EAA tables, even let them operate the miter saw (keeping both hands on the handle) while I held the wood for them. For the stabilizer, they helped measure pieces, remove the blue vinyl, and installed and removed clecos.
 
Last edited:
20200805_185950.jpg20200809_181322.jpgimage-20200729_074032.jpg
I finished the rudder on day 50 and the elevators on day 53. I worked on both up to the proseal step so I could proseal both and the same time. Ex-wife (at the time she wasn't), kids, and parents were involved with these. It was great having someone to cleco while I put the proseal on, allowing me to focus just on mixing, applying, and clean up.

Edited to add proseal picture of rudder and one elevator.
 
Last edited:
20200919_092800.jpg
The first time the horizontal stabilizer looked like a complete part.

20201108_103310.jpg
A cool inside picture to show my friends/coworkers what the internal structure looks like.
 
I haven't worked on my project for a year. I took a temporary position in VA and sold my house so everything went into storage. I am back now, but still looking for a new house with more garage space.
Here is the completed tail cone in my storage shed.
20241109_102941.jpg

Before moving I tried to complete both wings to this point. I had some laser cut parts (almost all of the ribs, nothing else) so I changed how I processed and assembled the parts. I inspected every hole before working on the parts. I assembled everything to the point shown in the picture then match drilled everything despite not needing to with laser cut parts. This way I was not drilling holes and deburring after I had already partially assembled and riveted parts together. I noticed I got a little bit of shavings from each hole. I then made sure to debur everything. I again inspected each hole. I noticed after this process the holes no longer had the uneven edges and didn't appear have any points that could act as a starting point for a crack. I then assembled the ribs to the spar and again inspected since I read that bucking rivets could lead to cracking. Then I attached the rear spar and checked those freshly riveted holes, then finally the skins and inspected before storing it behind my tv in the living room. BTW that's the right wing. The left was assembled with clecos, drilled, deburred, and inspected. I had to stick it in storage before riveting anything.
20241006_183439.jpg 20241006_183355.jpg 20241006_183412.jpg

I took the wing tips and position lights with me to work on in my apartment, but I didn't seem to have time. Plus, I didn't want to cut fiberglass on my deck and have it get into the apartment or blow into another renter's space. I am chomping at the proverbial bit to get back into this. I am actually looking forward to building the tanks after I get the left wing riveted together and inspected for cracking.
 
Some photos of the right wing build.
Not going to lie; I was really nervous letting him countersink some holes, even with the microstop.
20240116_182636.jpg

20240116_184027.jpg
My hands where tired with putting clecos in, its nice to have back up.
20240515_161437.jpg
20240515_164732.jpg
Just starting to rivet the top skin on. Finished top skin in the previous post. My garage was such a wreck, I stowed it in the living room behind the TV.
20240517_220143.jpg
I can't wait to get the left one to this point and start on the leading edge. I am estimating May 31st completion date on that.
 
Back
Top