A lot of builders that I talk with do not understand how to make the flap and trim systems work in their planes, especially when using multi-function grips like the Infinity and others.
Relay decks are available, but they can be expensive. Decks that I have seen are a single unit with several relays installed, and they work fine, but what happens if one of the relays goes bad. You probably have to replace the entire unit.
Anyway, I have been using readily available relays to make up flap and trim relay decks. They work great, are easy to replace if necessary and they are cheap. Following is a flap relay system that you can easily build up for about $30. The relays are about $7.50 each and the microswitch is about $15, depending on what kind you buy, although I have found a larger switch is easier to work with. Also, some fast connectors, a scrap of aluminum to mount them on and wire. I typically mount the unit with velcro for future maintenance
Following is a wiring diagram and some example pictures of the project being assembled and a typical installation.
I have installed quite a few of these and they have worked well for hundreds of hours. I think I had one relay go bad over the entire time.
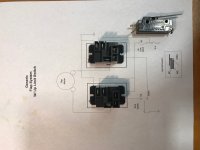
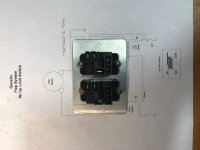
The first picture is the wiring diagram. You have to click on it to view.
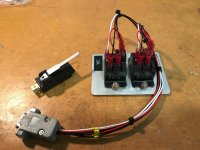
Second pic is the relays and a microswitch. (One of many you could use.)
Third pic is the relays mounted on a scrap of aluminum.
Fourth pic is the assembled unit. You can wire everything direct, but I like to use a connector for ease of future maintenance.
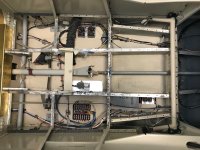
The next pic shows an RV8 I was working on. The flap relay system is in the lower left fuselage area partially obscured by fuse frame. The trim system, using the same relays is on the right center. (FYI a speed control is easily added to this setup if needed.)
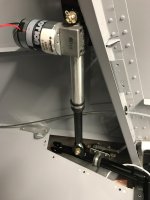
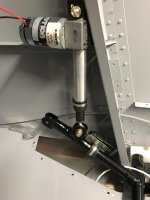
The next two pics show the microswitch installation, under construction, in my RV3. in this case, when the flaps go up, the switch touches the back of the bulkhead and turns off the flap motor at the top of the travel. On the RV8, I used a similar method, but since the geometry is different, I was able to thread a long 8-32 machine screw through the bulkhead, in a nutplate, which the switch arm contacted. This made the system adjustable by turning the screw in or out. Use your own creativity here.
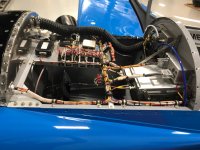
If there is any interest, I can provide similar information on building up a trim system, using four of these same relays. Additionally, you can use relays to operate other things such as the starter, and fuel pump. The last pic shows how I wired up the relays in the RV3. Instead of making separate decks, I just lined them up on the electronics shelf and wired them in directly to the units since access was so easy.
Its a lot of fun, doesn't take much time to do, is pretty cheap and will help give you a better understanding of how relay systems work.
Hopefully, you will find this useful and maybe give you some ideas on how to use relays..
Relay decks are available, but they can be expensive. Decks that I have seen are a single unit with several relays installed, and they work fine, but what happens if one of the relays goes bad. You probably have to replace the entire unit.
Anyway, I have been using readily available relays to make up flap and trim relay decks. They work great, are easy to replace if necessary and they are cheap. Following is a flap relay system that you can easily build up for about $30. The relays are about $7.50 each and the microswitch is about $15, depending on what kind you buy, although I have found a larger switch is easier to work with. Also, some fast connectors, a scrap of aluminum to mount them on and wire. I typically mount the unit with velcro for future maintenance
Following is a wiring diagram and some example pictures of the project being assembled and a typical installation.
I have installed quite a few of these and they have worked well for hundreds of hours. I think I had one relay go bad over the entire time.
The first picture is the wiring diagram. You have to click on it to view.
Second pic is the relays and a microswitch. (One of many you could use.)
Third pic is the relays mounted on a scrap of aluminum.
Fourth pic is the assembled unit. You can wire everything direct, but I like to use a connector for ease of future maintenance.
The next pic shows an RV8 I was working on. The flap relay system is in the lower left fuselage area partially obscured by fuse frame. The trim system, using the same relays is on the right center. (FYI a speed control is easily added to this setup if needed.)
The next two pics show the microswitch installation, under construction, in my RV3. in this case, when the flaps go up, the switch touches the back of the bulkhead and turns off the flap motor at the top of the travel. On the RV8, I used a similar method, but since the geometry is different, I was able to thread a long 8-32 machine screw through the bulkhead, in a nutplate, which the switch arm contacted. This made the system adjustable by turning the screw in or out. Use your own creativity here.
If there is any interest, I can provide similar information on building up a trim system, using four of these same relays. Additionally, you can use relays to operate other things such as the starter, and fuel pump. The last pic shows how I wired up the relays in the RV3. Instead of making separate decks, I just lined them up on the electronics shelf and wired them in directly to the units since access was so easy.
Its a lot of fun, doesn't take much time to do, is pretty cheap and will help give you a better understanding of how relay systems work.
Hopefully, you will find this useful and maybe give you some ideas on how to use relays..