What's new
Van's Air Force

Don't miss anything! Register now for full access to the definitive RV support community.

Rivets between rudder hinge brackets

[email protected]

I'm New Here
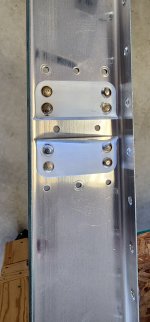
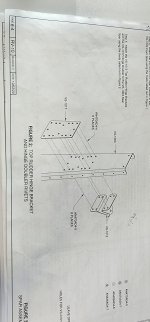
I screwed up and set the rivets connecting the VS-1012 rudder hinge brackets before setting the two rivets between the brackets that connect only the VS 1017 doubler and the VS-1003 rear spar. Not sure I can effectively get a bucking bar or rivet set in between the brackets.... though I am open to suggestions.

Has anyone used pull rivets for those two? 1000002579.jpg
1000002580.jpg
 
I'm not expert enough to give you an answer on using pop rivets, but I have had great success with both calling and emailing Van's. I usually get a good answer very quickly.

I can't remember where I bought it (sorry, tried to find it online) but I do have a bucking bar that's really thin that would probably fit between those brackets.

Random question -- why do the factory heads on your other rivets look funny? Is it just the photo making them an odd color?
 
I suspect you can take your round head rivet set to the bench grinder and take off enough to fit inside the brackets.

Tip - cover your round head rivet set with 3 layers of masking tape. The rivets come out perfect. Replace the tape when it works through.

Carl
 
Just me, or do some of the other holes in that spar look stressed? - like they've been dimpled and then flattened again or something. Looks like concentric scoring from the edge of a die.
 
The only option is that you have to drill out all 8 and start again.. those rivets in the hinge bracket have to go though the doubler anyway. It’s so easy to drill and remove those rivets without damage.. get an experienced person to help you. Especially easy because the heads are on a steel bracket and that’ll help guide the drill from creating a figure 8, even though you should only be drilling just enough to pop off the head anyway.
 
3x from Cleaveland. I have the post-tank gauge at 90psi for all my tools. I have the inline restrictor and the gun trigger feathers very well.
So what is the pressure is at the gun?
Tape etc not withstanding, your rivet set is clearly bouncing on the manufactured head and/or not straight.
This is either a pressure or technique issue.
These rivets I’d probably do with a squeezer FWIW.
 
Im with Richard above.
We still don't know the gun pressure. Just as an experiment since you are early in your build; remove the inline restrictor. Set your compressor at 55-60 PSI for these specific length rivets in a piece of scrap angle in your vice. Shoot them at the confirmed air pressure and see if you have more control.
I agree with above that I would have used my squeezer, (hand or pneumatic) to set those.

I had the inline restrictors when I first began but there was no way of determining the pressure at the gun.

I do run 90psi for my air drill, pneumatic squeezer.

Let us know what you find out.

Arnie
 
Do you have a grinder? If so, then you have a bucking bar or set that will fit. They’re tools, not jewels!
Also, a chunk of steel bar works just fine as a bucking bar. Look around your garage, I’ll bet you have something suitable. A few minutes with a hacksaw, file, and sandpaper and you’re good to go.
 
Photo don't match the drawing, and I don't see a doubler through the unfilled rivet holes. But ya, drill and reset.
 
3x from Cleaveland. I have the post-tank gauge at 90psi for all my tools. I have the inline restrictor and the gun trigger feathers very well.
With the inline restrictor, I use that too, but you should close it almost all the way, then open it one click at a time and test the gun on a piece of wood.. you may be surprised at how far you need to close it to control the hitting pressure. Once I find the proper setting for -3 rivets, I found that in order set -4 rivets, all I need to do is open the restrictor 3 clicks. It lives between those two settings. The set rivets that you show do look polished like they were set too high of a gun pressure.
 
This is a great time to get better at drillling out rivets. Watch some YouTubes. Read some descriptions. I have given up on center punching the head first but that’s recommended. Then you use your #30 (preferably on a 90 degree drill, more precise) to make a divot in the head. Then look closely at how far you missed the middle and what direction, and aim for the base of the rivet head as you drill it deeper. When you get about there either the head will pop off or you put a 1/8 pin punch in the hole just the right depth and snap it off. After that downsize to #40 or so drill and carefully drill straight into the hole at the base of the head to weaken the hold on the tail. Then gently tap with a shorty ball-pien hammer (from HF) on a wrecked 1/16 pin punch a few times. Eventually you will damage that punch, no matter. If the tail doesn’t come after a few medium whacks, look at it. You can grab it from behind and twist, if it moves you’re golden (hint hint about loose rivets getting looser over time) or drill into it a little more, or whack a little more. In this case you won’t damage the work easily by whacking but often there’s a small tab to support on the back and your hammer can destroy as easily as your drill.

Careful and supportive of the work you can do it. Easy peasy in this case with the steel bracket on top to guide your access.

Keep trying and keep learning! And don’t be afraid to scrap small parts and order new.
 
Last edited:
Back
Top