Van's Air Force

The definitive Van's Aircraft support community! Buying, building or flying an RV? Join our exclusive family of mentors and enthusiasts!

Rivet alignment issues

con_doggiee

I'm New Here
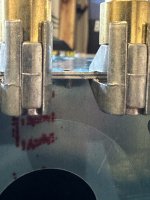
I’m working on drilling and aligning my first skin, the vertical stabilizer. Several of the rivet holes, particularly the ones that align with the root and tip ribs, seem to be ever so slightly misaligned when assembled (by what seem to be microns) to the point where the rivet is not 100% flush with the skin. I’ve attached an example, I tried taking a picture of the rivet going through both the skin and the root rib and you can see the stem at a slight angle which raises the rivet head on one side. What I want to do is use the hydraulic squeezer and dimple the skin and the rib while they’re assembled together. Is that advisable? Or am I making a mountain out of a molehill? I don’t want to try riveting with that misalignment if it means the finished product will be unsat.
 

Attachments

  • IMG_0791.jpeg
    IMG_0791.jpeg
    1.1 MB · Views: 168
It's hard to tell from your pic, but are you using regular Clecos (the kind that insert in a hole) instead of the Cleco clamps to hold alignment? You want that rivet to sit flush before you squeeze it, and inserting regular Clecos as you drill will help maintain all the holes in alignment.

If you haven't gone to an RV-specific workshop, I'd suggest you get an experienced builder to work with you for the first few steps just to make sure you're developing good habits and best practices. It'll help build your confidence and maybe prevent butchering a few parts.
What David ^ said. At least 50% clekos if not every hole.
Mentor will save you time and money on mistakes.
 
I agree with the above posts. Ditch the clamps. Clamps are typically only used for holding things from moving. Cleco every other hole and address minor alignment issues with a punch.
 
Make sure you have the “tight” Clecos as well; I.e. Wedgloc.
Don’t use a pick to pry, may elongate hole.
With the new final sized holes “if it don’t fit; you cannot quit”

Long stiffener runs on the empennage we had a cleco every 4th hole when the riveting commenced.
We team set: center rivet, fwd rivet, aft rivet, them moved to next set. Came back after removing cleco to set last rivet hole.
 
I found that after “final sizing” then dimpling, on the larger skins in particular, there’s just enough variation that you can get just the tiniest bit of misalignment. You get the Clecos in the holes and start bucking the first couple of rivets, then you end up having to run a reamer through to get some of the rest of the rivets to sit in the holes.

The fix I found is to drop a rivet in a hole in the middle (as a positioning aid) then a cleco next to it. Continue this on either side for a few holes then all the rest will be perfect. Don’t start bucking till the alignment is right. Remember, they all fit when you matched drilled and you didn’t do anything to make any of the holes smaller.
 
Last edited:
Thank you all very much for the responses! I do use normal clecos during these processes; I probably should have specified the cleco jaw clamps were used in this picture because I needed to get the metal clamped together with a rivet in the hole to demonstrate what I’m describing, and I couldn’t put a rivet in the hole for the picture if the hole was cleco’d.

For my issue the trick with the 3/32 punch as an alignment tool seemed to work out really well! I absolutely plan on cleco-ing every other hole during the riveting process. Thank you all!
 
When I zoom in on the attached picture, it looks like you might still have blue vinyl between the mating surfaces? If so, the extra thickness is going to exacerbate any alignment issues you have where the skin has to wrap around a curve...
 

Attachments

  • IMG_0791.jpeg
    IMG_0791.jpeg
    1.7 MB · Views: 32
Roger that- I was planning on removing the blue vinyl before priming, it was advised to me earlier to leave the blue vinyl on while I prep parts as far as match-drilling and other prep work but I’ll absolutely remove the blue vinyl and give it a shot. Thank you all for your advice, first time doing this after only one class so I’ll definitely have more questions going forward but this is all helping out a lot. Cheers!
 
Back
Top