What's new
Van's Air Force

Don't miss anything! Register now for full access to the definitive RV support community.

Priming - Planning for first attempt and have Q's

bertschb

Well Known Member
Friend
I've been working on my RV-14 horizontal stabilizer and have all the parts ready to prime before assembly. I'm going to be using Akzo and a 3M Accuspray paint gun for the first time. I have everything ready to go but I have some questions.

1- I will be paining all the parts for the horizontal stabilizer - which isn't very many really. Does anybody have any idea how much paint I need to mix? Would 8oz be enough? I plan to do one coat.

2- I'm assuming I will get some overspray on the "outside" of the skins. Do folks mask the outside of the skins to prevent this or do you just let the finish painter remove it before painting?

3- I'm using the Mixing Mate paint can lids for the 1g Akzo cans. These are the things that stay on the can and have a built in stirring wand. I wore a full face 3M mask with filters while installing them but afterwards (like 30 minutes later) I could smell a slight chemical odor. I didn't spill a drop while putting the lids on so I'm wondering where this smell is coming from. Can vapors escape around the shaft of the stirring wand/handle? That is the only place in the lid that I would guess vapors could escape from. Kinda bummed because these things looked like a great solution to avoid spilling paint and get precise amounts dispensed each use.

Thanks for your help!
 
8 oz will be too much, even 4 oz will likely result in leftovers. It only needs to be sprayed on very thin.

There is no need to mask the outside surfaces because any overspray will be very light and will get scuffed off during prep for the final painting.

Sorry I don't know about the mixing lids. I mix the paint with a flat stirrer just in the can.

Good luck, once you have sprayed a bit it becomes second nature and you will get a feel for quantities and technique. It would be worth practising on some scrap first before hitting the actual parts.
 
Thanks Paul. Great information!

That would be great if I only use 4oz of primer!

I moved the primer cans from the hangar to the garage an hour ago. I just went out and smelled for vapors and couldn't detect any. I'm thinking the vapors that came out of the cans when I initially removed the lids must have just hung around the cans longer than I expected. Not too worried about it now.

I will practice on scrap for sure. I'm also watching videos to figure out what settings to use on the two knobs on the spray gun.
 
Those lids are awesome, but if you came back 6 months from now, half the solvent would have evaporated from the can.. they aren’t air tight. You are better off using paint sticks and putting the lids back when you are done.
 
When you mix the primer, be sure to let it sit for the required 30 minutes after mixing it.. then strain it though a filter into the cup. As for the overspray, acetone can get it off before it cures.
 
Epoxy calculator

Download my Epoxy/Paint calculator spreadsheet. My blog below.
It will get you pretty close. Use the Kirker EnduroPrime amount. It's a 2K Epoxy. Adjust the calculator for your product. I usually set it for 2 ft² per ounce of mixed paint per coat. Fog coat is more like 3 ft². I don't throw out much paint.
 
I was planning to use the 2K epoxy primer for the entire plane so I orders a few gallons.

One note about using the Mixing Mate, it doesn't scrape the bottom of my gallon size paint can. All the solid at the bottom didn't get mixed, some of the solid got stuck to the paddles and didn't mix. I ended up mixing it by hand which was a better job.

I also account for the wet sanding after the epoxy had cured. Spraying outdoor will attract some fine particles, and from the overspray, so the wet sanding create smoothest surfaces as possible. I found out that I had to respray the epoxy on some of the surfaces because the original epoxy was too thin, and after filler was added. A smooth epoxy surface really showed all the imperfections that I didn't notice before wetsanding. This is just a data point from a perspective of a beginner.
 
Primer

I was planning to use the 2K epoxy primer for the entire plane so I orders a few gallons.

One note about using the Mixing Mate, it doesn't scrape the bottom of my gallon size paint can. All the solid at the bottom didn't get mixed, some of the solid got stuck to the paddles and didn't mix. I ended up mixing it by hand which was a better job.

I also account for the wet sanding after the epoxy had cured. Spraying outdoor will attract some fine particles, and from the overspray, so the wet sanding create smoothest surfaces as possible. I found out that I had to respray the epoxy on some of the surfaces because the original epoxy was too thin, and after filler was added. A smooth epoxy surface really showed all the imperfections that I didn't notice before wetsanding. This is just a data point from a perspective of a beginner.

Just my opinion.
If it's parts no one will ever see, the primer need not be as thick as a primer coat for a top coat paint. I would apply a uniform coat and walk away. Just enough to seal the surface. Maybe a tad more on fay surfaces. Save the weight.

I did use primer as my interior paint. I bet no one can tell which parts are just primer and which are expensive Jet Flex. Saved a bunch of weight shooting primer with a top coat. Colors are limited and some will question my decision but it worked.
 
In my case, the 2K epoxy coat was the primer coat. The single-stage gloss polyurathane paint went on top. This was why I wet sanded the epoxy primer coat.
 
roll the skin interior side

I primed every single part in my RV-4, as I make my living on heavy jet overhaul and its just the way I am used to for many reasons. Years ago, OSHA and local regulators made it near impossible to spray any high VOC stuff, so anything that couldn't be done in the spray booth got rolled..even the finish coat touch up work. For my RV-4 skins, I rolled everything including the wings, tail group skins and fuselage skins with AKZO overthinned using foam rollers. The finish is almost hard to differentiate from spraying..and there is no airborne mess or paint guns to clean up. My interior coats are very thin,and you don't need much. The rollers and mini trays are dirt cheap and just let them dry and trash them when done.
 
1) It takes a certain amount of courage to come on detail-obsessed VAF and confess you used a paint roller. Kudos to you!

2) I’m surprised the aluminum provided enough friction to make the roller roll.

3) Did you brush things like ribs and stiffeners?

4) Got any pictures of your insides?

I mean, if the priming can be done with brushes and rollers, there might be hope for a -14 in my garage!
 
Roller finish/brush application

StuBob,
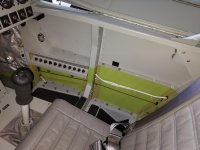
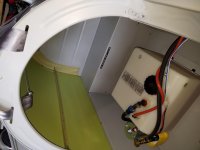
I'm serious when I say most cant tell the difference between sprayed and rolled..here are a couple pics I have handy based on the areas that can still be seen. I don't have a pic of the wing skins in primer with me but these should get the point. And yes, I'm guilty of brushing parts as well, though the majority of the internal ribs and frames, ect. I sprayed hanging on PVC rack outside. Brush strokes can hardly be detected on the longerons and extruded stuff. I thin my AKZO (or other similar epoxy/ urethane primers) to allow good flow and very thin coating. Since I work in the business,, the "out of date" primers often make it home for my projects, hence several different shades of green. I'm also a fan of the Preval type bottle sprayers and seldom use one of my good guns to spray primer with.
 

Attachments

  • RH sidewall.jpg
    RH sidewall.jpg
    257 KB · Views: 83
  • RV-4 baggage.jpg
    RV-4 baggage.jpg
    182.9 KB · Views: 88
Back
Top