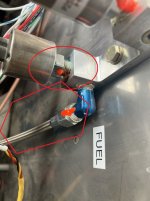
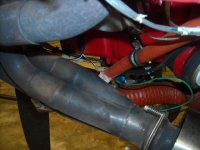
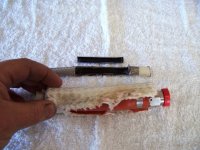
I am about 1/2 of the way into my phase 1 flight testing. I routinely inspected the engine compartment for anything that could cause problems. After doing about 5 hours of flight testing, I thought I smell fuel. I tracked down the tanks and found nothing. Today, I removed the upper cowl and discovered the fuel had leaked through the fuel sensor at the firewall. I had thought I torque the fuel sensor but I didn't torque it enough. It took almost 20 hours for the problem to reveal itself. Chalk it up for luck that I found it. This is the picture with the blue fuel stain.

Van's Air Force
You are using an out of date browser. It may not display this or other websites correctly.
You should upgrade or use an alternative browser.
You should upgrade or use an alternative browser.
Possible Serious Fuel Fire Averted
- Thread starter PhatRV
- Start date

Good find. It is interesting that it leaked in spite of the sealant. Do you need a fire sleeve on the fuel line to the manifold?I am about 1/2 of the way into my phase 1 flight testing. I routinely inspected the engine compartment for anything that could cause problems. After doing about 5 hours of flight testing, I thought I smell fuel. I tracked down the tanks and found nothing. Today, I removed the upper cowl and discovered the fuel had leaked through the fuel sensor at the firewall. I had thought I torque the fuel sensor but I didn't torque it enough. It took almost 20 hours for the problem to reveal itself. Chalk it up for luck that I found it. This is the picture with the blue fuel stain.
“Chalk it up for luck that I found it”
I would not call that luck. You uncowled the engine and snooped around and found it. That’s skill, or at the very least
perserverance . Good job.
I would not call that luck. You uncowled the engine and snooped around and found it. That’s skill, or at the very least
perserverance
. Good job.Just goes to show you torque seal won't stop it from leaking.
But my luck varies Fixit
But my luck varies Fixit
I don't think it's needed since it is on the cool side of the engine, plus the fuel line is restricted so very little fuel is in the line. At least the installation is in accordance with the Vans FWF kit instructions.Good find. It is interesting that it leaked in spite of the sealant. Do you need a fire sleeve on the fuel line to the manifold?
I think by using the sealant, it was able to slow the leak or else I would have seen it right after the engine first start or maybe after the first flight. I have a fuel injected engine and the pressure is up to 31 psi compared to a lower pressure of the carbureted engine. Maybe it was the extra fuel pressure that will require extra care. The torque seal is only to help with the visualization so I can verify if the nut or fitting stays in place. I am going to fly around the pattern for a couple of hours to verify the new torque will fix it.
You don't say what sealant you used. Some so-called "sealants" are somewhat miscible in gas and will slowly dissolve away. And as Walt mentioned earlier, it appears that there is sealant on a flared fitting. Flared fittings are designed to be metal to metal, no sealant. Nor is sealant required under the nut on a flared fitting - there should not be any liquid there. Pipe threads are designed to always need sealant (except for some ultra high tolerance, very expensive ones, which are designed to seal metal to metal along the thread path)(not found on most Vans aircraft).I think by using the sealant,
What Walt and Bob said....

It's needed.
Better to verify with a wrench.
I don't think it's needed since it is on the cool side of the engine, plus the fuel line is restricted so very little fuel is in the line.
It's needed.
The torque seal is only to help with the visualization so I can verify if the nut or fitting stays in place.
Better to verify with a wrench.
Will look into this. Thanks.You don't say what sealant you used. Some so-called "sealants" are somewhat miscible in gas and will slowly dissolve away. And as Walt mentioned earlier, it appears that there is sealant on a flared fitting. Flared fittings are designed to be metal to metal, no sealant. Nor is sealant required under the nut on a flared fitting - there should not be any liquid there. Pipe threads are designed to always need sealant (except for some ultra high tolerance, very expensive ones, which are designed to seal metal to metal along the thread path)(not found on most Vans aircraft).
Hmmmmm.... not sure what sealant you used but when it looks like that, perhaps it is one that is not good at sealing. Looks like a familiar paste but I can't place it. What sealant did you use? Many of them break down with any type of gasoline or other petroleum products or just aren't good at sealing tapered (pipe-type) threads. Even Permatex #2 eventually starts to leak. The best I have found is Loctite 565 (no to low heat) or 567 (places exposed to heat). Anything you find at Home Depot is not for sealing fuel fitting lines (NOT thinking that is what you used; just saying!) You might consider redoing all of the fittings you did with whatever this sealant is with something better...... I would predict this might not be the last one to leak. It might be you torqued them OK but the sealant failed. Just a thought.....I am about 1/2 of the way into my phase 1 flight testing. I routinely inspected the engine compartment for anything that could cause problems. After doing about 5 hours of flight testing, I thought I smell fuel. I tracked down the tanks and found nothing. Today, I removed the upper cowl and discovered the fuel had leaked through the fuel sensor at the firewall. I had thought I torque the fuel sensor but I didn't torque it enough. It took almost 20 hours for the problem to reveal itself. Chalk it up for luck that I found it. This is the picture with the blue fuel stain.
 IMHO....
I agree with the firesleve. It is a FUEL line, after all. And....why not?
If you want to seal flared fittings better, consider using Del seals. They come in different sizes. Aircraft Spruce Part# 04-05006 for the 3/8" fittings. Good to seal up fuel lines.
All good points given above
My cent and a half:
I've been using Loctite 577 as a thread sealant for a while, good results.
I recently removed the manifold altogether. It offers no real advantage but weight (...) and installing them sensors directly onto their respective hose, attached to the engine mount with an adel clamp seems a better solution.
Nope - not luck. You suspected a problem and chose not to ignore it, chased it down and found it. Good job.Chalk it up for luck that I found it.
loctite actually recommends using sealant on the threads and mating surfaces of flare fittings these days. Page 10.
Yeah and they can suck an egg. All they want to do is sell you more of their products. Flared fittings don’t need sealant. Never have and never will.
loctite actually recommends using sealant on the threads and mating surfaces of flare fittings these days. Page 10.
Agreed. More pertinent would be what Aeroquip (the people that make the fittings) recommends.....which is dry fittings on a properly-done flair. If the flair is scratched or otherwise not perfect, that is where the Del seals come in. Nowhere can I find anything about using something gooey..... And if you think about putting goo on a flair, that is a setup for contamination of whatever fluid is flowing through it as there is no way to put anything gooey on without getting it in the area of fluid flow. Goo is a very technical term, BTW. Huston, we have a problem. We might need some goo up here.....Yeah and they can suck an egg. All they want to do is sell you more of their products. Flared fittings don’t need sealant. Never have and never will.


Hey there, maybe I missed it, but I didn't see you say whether you first cleaned off the threads and reapplied new thread sealant. On some sealers, you can get by with just cranking more torque in, but some of them become semi-hard as time goes by and the manufacturer will tell you that you have a limited working time after application to apply the final torque. I want to say that lock tight 567 is one of those, but may be mis-remembering that....I am going to fly around the pattern for a couple of hours to verify the new torque will fix it...
Anyway, if you just cranked down the torque on the pipe goop that was already in there it might be worth looking up the specs an see what they say.
I wasn't aware that locktite recommended applying anything to flared fittings, but unless I'm missing something, that seems like a really bad idea on an airplane fuel or oil system. If you're squirting thread sealer in the flare, there's no way I can see to insure that it's not oozing out into the fluid path and if chunks come loose they can wreak all kinds of havoc inside an engine. A properly flared line into a good fitting will go literally decades without leaking. As roadjunkie already mentioned, If theres a need to address it, thats what a del seal (a kind of soft aluminum conical washer/gasket that sits in the flare) is for.
agirard7a
Well Known Member
I have to tune in. Maybe my experience will save someone else’s bacon. I had a very close call and a near disaster. While in flight, the low fuel pressure alarm went on. I turned on the aux fuel pump and began to smell fuel in the cockpit. I was unfortunately a few miles offshore over the ocean. Was able to land at my coastal airport. Taxied to the hanger and began to inspect. I first dove into removing the panels in the cockpit and inspected for fuel line leaks.
Pressured up the line with the aux pump and no leaks. The fuel smell became evident. Must have been a gallon of fuel on the hanger floor. De cowled and discovered the fuel line connection into the engine fuel pump was less than finger tight. The only thing holding the line in place on the fitting was the compression in the loop of the line.
Further inspection indicated it was the one connection in the system where i did not use Permatex 2 on the outer part of the threads.
The sealant as you know doesn’t harden. It gets very gooey.
I could be 100% wrong this case, but this fitting took almost 500 hours to loosen from vibration.
The Permatex in my opinion, correct me if i am wrong, helps deter the loosening of the fitting.
I reinstalled the fitting using Permatex on the outside of the threads being careful not to get it into the line itself.
Here is a question for the pro’s. Seems like a small hole in the nut allowing for a safety wire would solve this issue? Lesson learned, put a wrench on every nut at annual.
Even better, do that at every oil change. It only takes a few minutes to check the hose fittings under the cowl and is worth the peace of mind.Lesson learned, put a wrench on every nut at annual.
And if you think about putting goo on a flair, that is a setup for contamination of whatever fluid is flowing through it as there is no way to put anything gooey on without getting it in the area of fluid flow.
Yep. Ask someone like Don Rivera or Kyle Day what they most often find plugging up fuel controls...sealants and EZ Turn.
Sealant is used sparingly, on NPT threads only, and never on the first two threads close to the tip of the fitting.
Phat, if you applied a sealant to any flare fitting, as in the photos above, dismantle it, clean every trace of sealant from all threads, and flush the line. Following reassembly, check the inlet screen on the servo after a half hour run.
De cowled and discovered the fuel line connection into the engine fuel pump was less than finger tight. (snip) I reinstalled the fitting using Permatex on the outside of the threads being careful not to get it into the line itself.
All stop. The female threads in the fuel pump are straight SAE, not taper NPT. The seal between fitting and pump is an o-ring...i.e. the threads are not expected to seal. Angle fittings compress the o-ring under a jamb nut. Sealant is inappropriate.


The connection between the above fitting and the fuel line is a standard AN flare. Again, sealant is inappropriate.
Who the *&^%$#@! is inspecting these airplanes?
Last edited:
Also amazes me how many people don't read section 5 of the manual. I even tell people building other brands to read it...Who the *&^%$#@! is inspecting these airplanes?
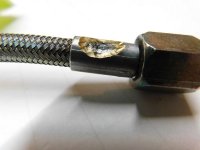
and dispite opinions here, FIRESLEEVE the hose. Even if you do have a restricted fitting to lessen the volume of fuel, the firesleeve is there to protect not only hear but some abrasion as well. This was on a RV10 where the firesleeved fuel hose was rubbing on the exhaust for at least a year, by the log book. Had the braid been rubbing on the exhaust, it most probably would have created a hole. Check out the fuel pressure hose that was rubbing against something aluminum. Plated brass collar was no match. Any protection is a plus.Also amazes me how many people don't read section 5 of the manual. I even tell people building other brands to read it...
Tom
Attachments
Baffles the mind!Who the *&^%$#@! is inspecting these airplanes?
It amazes me how many people lack common sense! Gee: let's put this fuel line so it rubs against the exhaust. It has a fire sleeve so it should be OK, right? Ka f#%*&^# BOOM!!Also amazes me how many people don't read section 5 of the manual. I even tell people building other brands to read it...

Careful!Also amazes me how many people don't read section 5 of the manual. I even tell people building other brands to read it...
If people start reading the manual VAF traffic will halve…

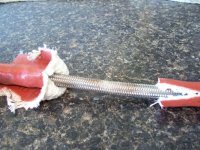
Im NOT going to mention the Plane, the former owner, OR the A&P that installed the hose. This was found after the cowling was off for another issue. Had about 150 hours of installed flight time, as this RV10 was flying ALOT. After inspecting the section of the hose that was rubbing---you can see that the liner was not damaged. BUT--given more time, it could have been a bad situation. It even pressure tested prior to the autospy. A real eye opener for the attributes of teflon hose. But even a teflon assembly cant make up for improper installation. This was about 10 years ago, but even more critical now with more and more builders.Isn't reading a manual a direct violation of "The Guy Code"?
Tom
Attachments
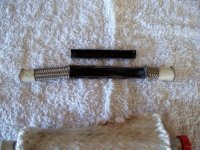
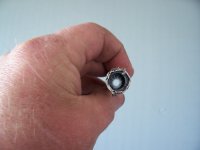
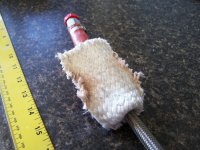
After inspecting the section of the hose that was rubbing---you can see that the liner was not damaged. BUT--given more time, it could have been a bad situation. It even pressure tested prior to the autospy. A real eye opener for the attributes of teflon hose.
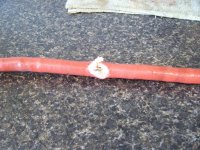
And this is what you get with a rubber liner, a "not quite rubbing the pipe, but close" installation error, again by an A&P. The rubber baked hard, cracked, and fed fuel into the firesleeve at ~25 psi. It caught fire at both ends and the airplane burned, on the runup pad.
Three A&P annuals, two owner/pilots, and nobody saw it.
Or they thought "The firesleeve will protect it". No, it won't. It's better than nothing, but fails address a fundamental physical property, the poor absorptivity and emissivity values for a rubber surface. Ballpark, you're looking at 0.9, vs 0.1 for a shiny aluminum foil surface. The silicone sheath provides fire protection and oil resistance, but it's a lousy reflector. Wrap it in shiny tape or buy a reflective sleeve.
Better yet, re-route the hose away from the hot pipe. A basic rule says the amount of energy received is inversely proportional to the square of the distance from the source. It means doubling the distance reduces heat transfer to 1/4, and doubling it again reduces it to 1/16. Think about that in terms of 1" separation, 2" separation, and 4" separation.


Last edited:
When I do my Condition or 100-hour inspections or when the cowling is off for any other reason (oil changes, for example) I try to look at things "for the very first time". The problem for us builders is that we built what we are looking at. It takes some backing up and looking at things with a critical eye to find things that might have looked or been OK when we did them that, with a little perspective or experience, might not have been Best Practice or just could have been done a little better. My inspections take days as SuzieQ sits in the hangar with the cowling off as all the inspection covers and fairings are taken off so, every time I go by, I stop, sit on my shop stool, and just LOOK  at things. Again. Over years I have found things that were OK but might have been done better and I have corrected them. A few of them have been 'what was I THINKING?' moments; nothing profoundly stupid, just not done how I would do them today. Or things that at the time were considered standard practice that since have been improved on. Zip ties etching themselves into what they are tied to, for example. Who knew that would be a problem? And it amazes me that I was able to put everything together in there (and the entire airplane, actually) and it actually WORKED! I think the firewall forward area looks SO COOL! Wait......I DID ALL THAT?? I still remember how amazed I was when she started for the first time!
I have a personal relationship with SuzieQ and rushing through an inspection to get her in the air again is not how we do things. It is a chance to reestablish what we developed when she was going from a pile of aluminum to a flying piece of sculpture. I take care of her; she takes care of me......
Take your time. Go out and look.....LOOK....at things. As my instructor once said: just sit back, roll a cigarette, smoke the whole thing and LOOK at things. (He never smoked and would NEVER recommend actually smoking, especially around an aircraft; it was a Montana analogy.) Get personal with your ride. He/She will treat you well if you do..........and you might find something.....um......stupid..............
at things. Again. Over years I have found things that were OK but might have been done better and I have corrected them. A few of them have been 'what was I THINKING?' moments; nothing profoundly stupid, just not done how I would do them today. Or things that at the time were considered standard practice that since have been improved on. Zip ties etching themselves into what they are tied to, for example. Who knew that would be a problem? And it amazes me that I was able to put everything together in there (and the entire airplane, actually) and it actually WORKED! I think the firewall forward area looks SO COOL! Wait......I DID ALL THAT?? I still remember how amazed I was when she started for the first time! I have a personal relationship with SuzieQ and rushing through an inspection to get her in the air again is not how we do things. It is a chance to reestablish what we developed when she was going from a pile of aluminum to a flying piece of sculpture. I take care of her; she takes care of me......
Take your time. Go out and look.....LOOK....at things. As my instructor once said: just sit back, roll a cigarette, smoke the whole thing and LOOK at things. (He never smoked and would NEVER recommend actually smoking, especially around an aircraft; it was a Montana analogy.) Get personal with your ride. He/She will treat you well if you do..........and you might find something.....um......stupid..............
I am about 1/2 of the way into my phase 1 flight testing. I routinely inspected the engine compartment for anything that could cause problems. After doing about 5 hours of flight testing, I thought I smell fuel. I tracked down the tanks and found nothing. Today, I removed the upper cowl and discovered the fuel had leaked through the fuel sensor at the firewall. I had thought I torque the fuel sensor but I didn't torque it enough. It took almost 20 hours for the problem to reveal itself. Chalk it up for luck that I found it. This is the picture with the blue fuel stain.
Good catch!
Torque doesn't seal NPT, that's why you need a good sealant such as Loctite 567, which it appears you have. Without a sealant, there is a path for fluid through threads. What I've noticed is that Van's manifold female NPT tolerance compared to some male threads can be pretty tight (ie not many threads engaged before it's tight)...looks like the act of you tightening the sensor actually engaged threads with enough sealant on it to stop the leak.
Others have pointed out the sealant on the flared fitting which is a no-no. However, it is ok to use something on the threads only, such as EZ Turn to prevent galling...it's very important that it's use sparingly on the threads. EZ Turn is fuel resistant, so you don't want to get that stuff in your fuel system and plug stuff up. Personally, I would live with the possibility of galling, and replace the fitting if it ever happens...much cheaper than fuel starvation.
Last edited:
I have not heard that the OP has Loctite 567 or 565. They have been mentioned but not by the OP. In the original photos, that does not look like the semiliquid Loctite products and appears more like a sealing paste. At any rate, if it is Loctite, there is WAY too much used. It should be used sparingly (a thin line completely around the fitting) and at least two threads up from the business end of the fitting. I was a Permatex fan until discovering how well the Loctite products work. (I had a quick drain on the Cub that was sealed with Permatex #2 and, after a period of time, seemed to just ooze fuel. Not that I could see but the drain was always stained and I could smell fuel. Pulled the drain out, replaced the "O" ring (while it was out), sealed it with Loctite 565: no leaking since.)Torque doesn't seal NPT, that's why you need a good sealant such as Loctite 567, which it appears you have. Without a sealant, there is a path for fluid through threads. What I've noticed is that Van's manifold female NPT tolerance compared to some male threads can be pretty tight (ie not many threads engaged before it's tight)...looks like the act of you tightening the sensor actually engaged threads with enough sealant on it to stop the leak.
And, as stated NEVER use anything on flared fittings.
I have been using Aeroquip fitting for decades and have never used anything on the threads. And I have never seen galling with any of the hoses I have replaced. Agreed: I would live with the possibility of galling (what is that anyway?Others have pointed out the sealant on the flared fitting which is a no-no. However, it is ok to use something on the threads only, such as EZ Turn to prevent galling...it's very important that it's use sparingly on the threads. EZ Turn is fuel resistant, so you don't want to get that stuff in your fuel system and plug stuff up. Personally, I would live with the possibility of galling, and replace the fitting if it ever happens...much cheaper than fuel starvation.
) than have ANYTHING that close to where fuel flows. IMHO....YMMV.....There are many good things about using teflon, but probably one of the best is the heat resistance properties vs buna neoprene (rubber) lined hoses. Teflon can resist heat consistantly to 450* and for limited periods of 500*+. Rubber doesnt come close. Even so, we alway recommend firesleeving teflon assemblies. You have to understand that even though the temp rating is much higher than rubber, the wall thickness of the teflon liner is much thinner, .040 to .120 or more for rubber. So with constistant prolonged temps over 500*, the liner can thin out and then create a potential leak path for pressurized fuel or oil, YES oil. So, we recommend protecting the hose assemblies.I have not heard that the OP has Loctite 567 or 565. They have been mentioned but not by the OP. In the original photos, that does not look like the semiliquid Loctite products and appears more like a sealing paste. At any rate, if it is Loctite, there is WAY too much used. It should be used sparingly (a thin line completely around the fitting) and at least two threads up from the business end of the fitting. I was a Permatex fan until discovering how well the Loctite products work. (I had a quick drain on the Cub that was sealed with Permatex #2 and, after a period of time, seemed to just ooze fuel. Not that I could see but the drain was always stained and I could smell fuel. Pulled the drain out, replaced the "O" ring (while it was out), sealed it with Loctite 565: no leaking since.)
And, as stated NEVER use anything on flared fittings.
I have been using Aeroquip fitting for decades and have never used anything on the threads. And I have never seen galling with any of the hoses I have replaced. Agreed: I would live with the possibility of galling (what is that anyway?
While we're on the subject--even though teflon does not have a service life, that doesnt mean you install it and for get it. It means it doesnt have a recommended replacement time. BUT, it DOES mean that you inspect them at conditionals or when the cowling is off to make sure they are rubbing, or being acted on by an outside force. Properly installed teflon assemblies can last decades, as shown in military and commerical aircraft.
Tom
Another ticking time bomb. You're looking at a rubber lined hose running close to the #2 header. No shielding of any kind, and likely more than 10 years old. Safe bet the rubber liner will snap like a dry twig when removed and flexed.
If a full re-route isn't practical, this one needs a shorter hose, an insulated pipe shield, a reflective wrap on the hose, which should be Teflon lined.
Let's up our game folks.

If a full re-route isn't practical, this one needs a shorter hose, an insulated pipe shield, a reflective wrap on the hose, which should be Teflon lined.
Let's up our game folks.

There's another detail in the photo that's interesting. The blue knurled fitting at the bottom has a hose clamp above it. Anybody know what the hose clamp is for? The blue fitting is a sump drain valve I assume. I'm not suggesting anything is wrong, just curious why the hose clamp is there.Another ticking time bomb. You're looking at a rubber lined hose running close to the #2 header. No shielding of any kind, and likely more than 10 years old. Safe bet the rubber liner will snap like a dry twig when removed and flexed.
If a full re-route isn't practical, this one needs a shorter hose, an insulated pipe shield, a reflective wrap on the hose, which should be Teflon lined.
Let's up our game folks.
View attachment 57789
I would guess perhaps that it is a safety mechanism to prevent the valve from being pushed up and turned to the open position inadvertently.There's another detail in the photo that's interesting. The blue knurled fitting at the bottom has a hose clamp above it. Anybody know what the hose clamp is for? The blue fitting is a sump drain valve I assume. I'm not suggesting anything is wrong, just curious why the hose clamp is there.
Yes. It's no better back at the #4 header, although the builder did hang a shield there.Help me see what your seeing......I think the clearance at the yellow arrow is the concern.....
I thought this got missed too, but there is another hole for safety wire on the opposite side and you can just see the twisted tail where it loops through the hole in the sump.Another note on the blue "drain valve". Safety wire hole is "Empty"???
