Van's Air Force

The definitive Van's Aircraft support community! Buying, building or flying an RV? Join our exclusive family of mentors and enthusiasts!

Pinholes vs Craters

Webb

Well Known Member
Sponsor
Not only the battle but the war was won with my pink Pepto Bismol cowl from HE.. and as my solemn word, I will never build a glass airplane. For those that have one of these pink atrocities, I thought I would share a few things I learned in hopes it will be of help in the same way VAF has helped me on other projects.

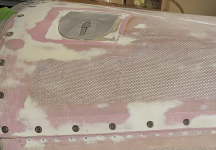
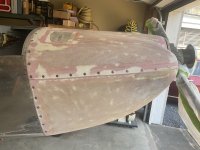
Since this cowl has a honeycomb interior, it has horrible pinholes and depressions I referred to as craters in the honeycomb section. I used UV Smooth Prime on other fiberglass parts and it did a good job filling pinholes, I thought it would work fine on the cowl. It did on the periphery where there was no honeycomb. After sanding the primer off, you could still feel the depressions in the honeycomb section with your fingers. The pin holes were filled, but they were still depressions.

The remedy was to follow Dan Horton‘s advice. Using a foam roller, I rolled three coats of neat epoxy and sanded until the orange peel was gone. The surface is now perfectly smooth and free of any depressions/craters. Looking back, I should have eliminated the Smooth Prime and only have done the epoxy step which would have saved a lot of time.

IMHO sanded neat epoxy isn’t the easiest or the fastest way to tackle pinholes, however it produces the best results. In this particular case, I could’ve eliminated the primer and cut my time in half.
 

Attachments

  • IMG_1823.png
    IMG_1823.png
    12 MB · Views: 146
Looking back, I should have eliminated the Smooth Prime and only have done the epoxy step which would have saved a lot of time.
This!
I did Smooth Prime approach on my second build (RV-10) as my Lancair IV neighbor strongly recommended it. It more than doubled the work compared to neat epoxy, sand then PPG (Omni) high build primer as the sand coat before prime/topcoat.

Fill the craters with micro and block sand before anything else.

Warning - NEVER wet sand Smooth Prime!

Carl
 
Finished the cowl. The rope…………that was in case the cowl won………

I like smooth prime on non honeycomb fiberglass like a fairing because it is easy to roll on and then sand because the surface is already fairly level/smooth but it is definitely not made for surfaces with depressions.
 

Attachments

  • IMG_1824.jpeg
    IMG_1824.jpeg
    3 MB · Views: 75
The earlier green honeycomb cowl that came in my kit was also full of small pits and craters. I put on a first coat of wet spoxy micro and squegeed it in then sanded and brushed on a second coat of straight epoxy thinned per the Vans construction manual. After sanding this a third coat of epoxy primer was sprayed on and there were no pinholes. It was quite a bit of work and took several days overall to get the cowl ready for painting.


20240222_124224.jpg
20240228_081813.jpg
 
The earlier green honeycomb cowl that came in my kit was also full of small pits and craters. I put on a first coat of wet spoxy micro and squegeed it in then sanded and brushed on a second coat of straight epoxy thinned per the Vans construction manual. After sanding this a third coat of epoxy primer was sprayed on and there were no pinholes. It was quite a bit of work and took several days overall to get the cowl ready for painting.

Don't thin epoxy. It's a physical properties risk with no benefit, and makes it harder to build a suitable thickness.
 
I didn't invent the idea. It's straight from the composites community. Best known early example was probably Cory Bird's Symmetry, but there are plenty more in the EZ world.


Seals the surface with a moderately hard shell which block sands flat.

Speaking of which...I'd much rather have a green or pink cowl than the later gel coated gray cowl.

Bruce, there's a sticky in the fiberglass forum.
 
Don't thin epoxy. It's a physical properties risk with no benefit, and makes it harder to build a suitable thickness.
Understood; in this situation the acetone flashes off in a few seconds, leaving a thin layer of neat epoxy to seal the cowl. The benefit of thinning 50:50 as per the Vans construction manual is that a very thin layer can be applied easily and quickly.

I would not thin epoxy in any other situation e.g. in a fibreglass layup or in a fairing filler etc., in alignment with the West Systems technical documentation.

I know quite a few have been built that way. Next time, try unthinned and a foam roller. Never can tell. You might like it better.

Here's the surface coated with thinned epoxy.

ScreenHunter_2378 Aug. 18 22.26.jpg

This is a quick female mold pulled from a buck. Sanded micro cleaned up the contour and filled the pits. Then it was brushed with unthinned epoxy and rolled for leveling, i.e. uniform thickness, no brush marks, scratches and divots filled. The coat relatively thick, meaning there is enough material for block sanding. The orange peel finish is desirable; it's a sanding guide. Block it just until the orange peel is gone, and you won't sand through into the underlying glass.

2012-08-23_10-17-37_895 1000w.jpg

After blocking the surface contour is good enough to go straight to a rattle can for mold surface gloss. Let it dry in the sun, wax it, shoot it with PVA, and lay up the flight part.

2012-08-24_09-55-09_495 800w.jpg

Flight part, as removed from the above mold, with no finishing at all.

2012-08-27_08-11-26_648 1000w.jpg

2012-08-27_08-14-26_500 1000w.jpg

Results speak. Risk aside, thinning is pointless. Viscosity works better.
 
I know quite a few have been built that way. Next time, try unthinned and a foam roller. Never can tell. You might like it better.

Here's the surface coated with thinned epoxy.

View attachment 68739

This is a quick female mold pulled from a buck. Sanded micro cleaned up the contour and filled the pits. Then it was brushed with unthinned epoxy and rolled for leveling, i.e. uniform thickness, no brush marks, scratches and divots filled. The coat relatively thick, meaning there is enough material for block sanding. The orange peel finish is desirable; it's a sanding guide. Block it just until the orange peel is gone, and you won't sand through into the underlying glass.

View attachment 68745

After blocking the surface contour is good enough to go straight to a rattle can for mold surface gloss. Let it dry in the sun, wax it, shoot it with PVA, and lay up the flight part.

View attachment 68744

Flight part, as removed from the above mold, with no finishing at all.

View attachment 68748

View attachment 68749

Results speak. Risk aside, thinning is pointless. Viscosity works better.
I shall give the roller a try on another cowl; does the roller cover need to be saturated with resin, or do you just use it dry, after the un-thinned resin has been brushed on?
 
I drizzled the epoxy on the surface and then started rolling which quickly saturated the roller. Work quickly because the roller is kinda like the pot and will harden much faster than the surface. If it does, just get a new roller. You can buy a box of them on Amazon cheap.

Apply three coats of neat. The second and third coat are applied when the previous coat is still slightly tacky. You end up with an orange peel glaze. Sand until the orange peel is gone, and you will have a glassy smooth surface.

Regarding the amount of epoxy to use, I started with 4 ounces of resin plus hardener on the top cowl and 5 ounces of resin plus hardener on the bottom cowl. If the roller started getting a little dry, I mixed up another ounce.
 
Having built a Long EZ, pin holes are always a problem. One of the things you can do to get rid of them early, is to set your parts in the sun and let them heat up. The air expands out of the foam, or in your case honeycomb. Then move the part back into the shade and add a coat of West Systems epoxy and let it cool. This draws the epoxy into the void. Worked great on sealing the fuel tanks as well. Then do a quick sand with some 120 grit and coat with West and micro for initial contouring. Then, use West Microlite (410) to fill any small areas. The reason to switch to 410 is because you don't want to sand off the micro coat... the 410 is much softer and will come off with 180/240 grit, but won't sand the ruin the micro coat. Definitely use a roller with the Smooth Prime and light sand between coats to knock down the "volcanos" which form and prevent you from filling remaining pin holes.

MTCW,
 
Back
Top