Van's Air Force

The definitive Van's Aircraft support community! Buying, building or flying an RV? Join our exclusive family of mentors and enthusiasts!

Orange Peel, Runs, Solvent Pop and Dust!!

PaulvS

Well Known Member
Patron
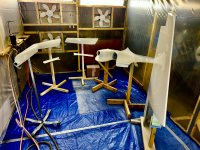
I've started painting my RV, in a temporary paint booth inside my farm shed. The paint is single stage polyurethane 2K and the plane is going to be red and white.

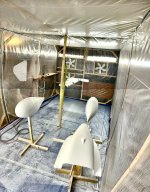
It's been a bit of a learning curve painting the top coat and trying to get it to turn out nicely.

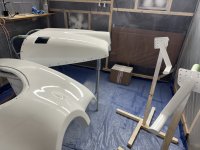
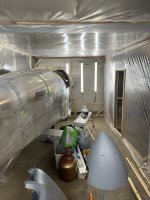
This morning I got up early and sprayed the lower cowl again, after sanding it down yesterday. It is currently drying and I will now leave it completely alone and stay out of the paint booth for several hours. The first attempt at painting it resulted in several dry patches, due to the complex shape and me failing to apply the paint evenly.

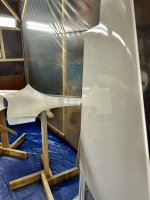
I also re-sprayed the wing tips a third time yesterday. The first attempt had runs. The second attempt had dry patches and orange peel. The third round has turned out well, except for very small dust, which is impossible to avoid, it seems. It can be polished out.

The top cowl has been painted three times also and it too has some bigger bits of dust and I have no idea how they got there. The first attempt was too dry and the second attempt had solvent pop. These are minute surface bubbles due to the first coat being not fully flashed off when the second coat was applied. I'm not sure if I will sand it back again and spray it a fourth time.


I've kind of figured out how to handle the gun now, though it is quite difficult to really see what is going on through the full-face respirator mask. I tied the two air hose umbilicals together along their length, because they were coiling up and creating a tripping hazard.


Another challenge is to estimate the correct amount of paint to mix, since the excess cannot be tipped back into the can. At the moment I'm experiencing about 15% waste, which is better I guess than having to stop and mix more paint and then find that it doesn't blend in to the already drying wet paint.


20241216_094548.jpg
20241227_080653.jpg
20241227_080714.jpg

20241227_080602.jpg
 
Sympathy! I found painting to be the hardest part of building. Now I look at all those thousands of cars with perfect paint jobs....
 
If it's single stage, cut & buff is your friend!
I usually spray four coats to allow for the process. I wet sand with the finest that will remove whatever imperfections. Orange peel usually. Drips are easily removed with a paint file or razor blade. Run a search for more detail. Wet sanding usually starts around 1000. Then wet sand in increments up to 3000. From there I use the buffing tool starting with Meguires 105, 205 and 305. Final wipe with a polymer wax.
Plenty of other methods. Seems like there's a "sticky" thread on the subject.
 
Too late to go base coat/clear coat? I had a job to do on my camper and had no experience at all. I was shocked at how easy it was. The base/clear materials are easy to use and seem to be designed to be nearly fool-proof.
 
Mount a panel of whatever smooth material you have laying around to the booth wall. Shoot a small area on that when you first start a session. After you have painted your parts, wait the datasheet time, and when the test panel is "glove slick", i.e. you can drag your gloved finger over it without sticking, you can spray the second/next coat. This will cure the solvent pop issue.
Runs are waaaay easier to deal with than orange peel, so move the wet edge with overlap and check by viewing on angle to avoid dry areas. Lights are your friends. I like linear strip lights over bulb lights. Even a single vertical or horizontal 4' LED strip mounted on a stands can be moved around to get you that angle reflection.
I always advise when starting a new paint system to get a quart of gloss black and practice on scrap panels, like junkyard trunk lids, to dial in your gun and technique. Black is a (fairly) cheap pigment, and it will show all your defects. When you can shoot a black panel fairly well, move on to the plane with your color choices.
Don't discount shooting parts and panels upside-down to minimize dust nibs. Or, shoot them vertical and immediately orient the paint side down. I have some wooden frames I wire parts to, hold to shoot and then lean against the wall with the wet side facing downward. I don't think I've every had a part without at least one dust nib or suicidal gnat in it.
Move your body, not your arm. Don't "arc" the gun. Maintain a constant distance to the part and just toggle the paint flow on/off at the ends of passes. Keep the air flowing to keep the pressure at the tip constant. Think of the gun as a gyro stabilized camera on the end of your wrist/arm.
Practice, practice, practice and good luck! It is really satisfying when you get asked "who painted it?" and you reply "me"!
And trust me, those award winning paint jobs didn't come out of the gun looking like that. Lots of "paint correction" cutting and buffing to remove defects. 3M has a very nice system for that side of the job. Practice on your black panel goof-ups.

1735271192404.jpeg

1735271057375.jpeg
 
Try flooding the floor with 10 lit of water to control the dust.
If you can't see what is going on you may need a stronger exhaust fan ...
As others have said, sanding 2K paint is straight forward, I would start with 600 or 800, then 1200, 1500, 2000, 3000 and possibly 4000, all used wet.
First couple by hand on a hard block, once the run is gone go to a softer block or a DA machine with a rubber backed pad.
Any of the commercially available ranges will work, I use Mirka Polarshine but 3M or Farecla (and probably a few others) do the same job.
You have to believe the shine will come back once you have hit the gun finish with wet & dry!!
I would leave the the paint for a week or two, or longer, to fully harden.
 
Paul,

The first tool to use against paint runs,etc. is a"nib file". It glides over the flat surfaces of the paint and removes what sticks up from the surface.

Fix Paint Imperfections | Remove Dust, Debris, Dirt, and Runs | Save Paint without Respray https://www.amazon.com/Gold-Label-Detailing-Imperfections-Without/dp/B07DD29H92/ref=sr_1_2_sspa?dib=eyJ2IjoiMSJ9.eoeNHh3_rD9oHv5QT9uydiqyXc2RT48Wvddlj_4vJTXC83IMfC1hqeRXwY7xi0C1lSmNp1Pzp1-UgNnSRMUL9EwjzjJOvnZKPAHbmcfcbY5-1r4hWunzPmsR30JY2-Zbj0UmeBGSSyyJd5Zdqu1EOyesb0GUNmMn-ti2Rn11PW21Hb89WSMW4s59iwrn1jjrA6piIgUA0Foh4eB_Mkmm5r8SResFtNXMSRzeBIbiPuc-HBb8mLiXinUWMtuGbbdx6fmxV5yEwxSDoxzaG8jsokgpWXFaMHckxV9a flatYIm6xrfI.2AMtSX_gCIo0czS--Zx6vXIaxcbvy8-XWiSbxapvbic&dib_tag=se&keywords=nib+file&qid=1735331724&sr=8-2-spons&sp_csd=d2lkZ2V0TmFtZT1zcF9hdGY&psc=1


You should have a flat vertical surface in your paint booth (that will accept paint) to test and adjust your spray gun pattern. Shoot too heavy a coat on that to create some runs and practice with the nib file.

A consistent distance from the gun to the surface to be painted is important. For a start, spread your hand as wide as you can. Put your little finger next to the surface, and your thumb adjacent to the spray nozzle. Try to maintain that distance to start and adjust from there.

Looks like you have plastic on the floor. All that plastic can create static electriciry which can attract dust. Mist that floor with water before you start.

Are those air inlet filters high on the wall? If so, consider deflecting the air down towards the floor and then back up. The dust should fall out of the airstream while making the upwards turn (similar to the sand trap for the intake air on a helicopter). The exit air should be at floor level. Optimal flow is top to bottom, not side to side.
 
Thank you for the replies, I've got a better understanding now of what I can do to try and make the rest of the job go more smoothly.

There are presently 18 lights mounted from above (producing 22,000 lumens) but this is not enough to illuminate the sides of the work. I will attach some strip lights to the side and end walls to help see if the paint is being applied evenly and wet enough to reduce the orange peel and runs.

The relative humidity here is quite low at the moment and has been below 50% so this may be part of the reason for the dust getting attracted to the painted surfaces. When I wiped down with a tack cloth prior to painting, there was enough static electricity to cause a spark/shock so I will try the suggestion of wetting down the floors before spraying. The dust particles are generally very fine and appear to float in the air and are visible in the beam of a flashlight when the other lights are off. Once the dust particles are in the paint, the wet spray collects and makes the speck bigger. The paint booth is sealed and the floors are covered in plastic to help protect the concrete from overspray. The exhaust fan does an effective job of extracting the mist and the filter at the inlet to the fan duct is collecting a lot of paint particles.

Before starting on the RV paint, I painted some practice pieces including a car fender and the wing tips and cowls for a friend's Sonex and ironically the test pieces all turned out better than what I have been able to achieve on the RV.

Here are pics of the rough patches on the top cowl, there is an area over the snout that was difficult to spray properly because it is recessed. The dry spots on the cowl sides at the lower corner are due to me not overlapping the spray pattern consistently.

20241224_102703.jpg
20241224_102719.jpg

The runs and sags on the wing tips are from putting the paint on too heavily to try and get a nice glassy finish. I've since sanded the tips right back with 280/320/400 and re-applied a single wet coat of polyurethane.

20241224_102852.jpg
 
Last edited:
Good tips in the thread, look for Dan Hortons sticky thread on painting, it has a bunch of good info in particular on the cut and buff approach which works well on a single stage paint application. Saved my butt painting in similar circumstances. Single stage also allows for touch up later which is useful.
Figs
 
What Fl-Mike said...all of it. Only thing I'd add is sometimes it helps to spray off-center, meaning the gun isn't held directly in front of you, but rather off to one side, so you can get a better view of the paint fan as it contacts the surface.

Do you wear glasses? They may not have the right focal distance for a detailed view of the fan contacting the surface.

Glare lights, on stands. Ordinary 4" fluorescent fixtures, Mount both on a plate so they can be rotated horizontal or vertical. Position them at a low angle to the surface you're spraying, then try the off center view of the paint fan.

Cut and buff is your friend. Very few of the perfect paint jobs came out of the gun that way.


The paint frame below was seen in Doug Ripley's shop. Shoot, then flip it over. Great way to handle small parts, and eliminates dirt settling.

Glare Light2.jpg

IMG_1063 800w.jpg
 
I used to paint airliners for a living many years ago.

1. orange peel: too much material, not enough air to atomize properly.
2. don't sand and paint in the same place. water on the floor does keep the dust down, but also elevates the humidity. Not bad for polyurethane, disaster for epoxies.
3. solvent pop: few factors here, temp too high which makes the outer layer cure too fast (see also 2), not enough tiime between two coats.
4. ideal distance between surface and gun is 8-9 inches.
5. dry patches, spray along with the mirror, you'll see a nice glossy finish, keep this closed with the next pass. your overlap should be about 50%.
6. practise on some paper pinned to the wall. this way ypu don't end up with 20lbs of extra paint on your surface. 2 cross coats should be sufficient to get a good covergae on your aircraft. spec for aircraft paint says topcoat between 40 and 60 micron dry film thickness
 
What Fl-Mike said...all of it. Only thing I'd add is sometimes it helps to spray off-center, meaning the gun isn't held directly in front of you, but rather off to one side, so you can get a better view of the paint fan as it contacts the surface.

Do you wear glasses? They may not have the right focal distance for a detailed view of the fan contacting the surface.

Glare lights, on stands. Ordinary 4" fluorescent fixtures, Mount both on a plate so they can be rotated horizontal or vertical. Position them at a low angle to the surface you're spraying, then try the off center view of the paint fan.

Cut and buff is your friend. Very few of the perfect paint jobs came out of the gun that way.


The paint frame below was seen in Doug Ripley's shop. Shoot, then flip it over. Great way to handle small parts, and eliminates dirt settling.

View attachment 77228

View attachment 77230
I wear glasses only for very detailed close-up work but not for the distance with the spray gun. The paint respirator mask is actually making it more difficult to see because it blocks peripheral vision and the booth lights tend to catch the dust on the visor, even if I change the protective film often.

20241230_171853.jpg

I guess I will be learning how to cut and buff and getting all of the gear to do it.

Thanks for the pics of the mobile light stands, I've got a couple under construction and I am sure that they will help.
 
Just started painting my project. Built a 8 x 8 x 20’ booth in my shop using 2x2” lumber and visqueen. 3 box fans with filters pressurize the booth. Harbor Freight sells Braun 4’ led tube lights (5000 lumen) for $17 on sale and I bought 8 of these lights and so far it’s adequate. It’s hard to have the light source exactly where you need it 100% of the time. Using single stage PPG Urethane and initially everything will get painted white. Anything electrical is “outside” and not exposed to paint fumes. Started with the smaller parts in batches and after every 2 nd batch I rinse out the entire booth. Seeing occasional dust specks in the cured paint. I lightly spray the walls and floor with water using a garden sprayer 30 min before spraying paint and it’s helping with the dust. Other things I’m doing to be consistent: Paint supplier is close by and I get them to shake up paint I’m about to spray. Every mix is thinned to the same viscosity using a stopwatch and a viscosity cup. Gun & regulator settings are exactly the same. Air temp between 60 & 75°. Gun cleaned 100% after every session. So far so good.

Don Broussard
RV9 Rebuild in Progress
57 Pacer
 

Attachments

  • IMG_3705.jpeg
    IMG_3705.jpeg
    3.1 MB · Views: 108
  • IMG_3708.jpeg
    IMG_3708.jpeg
    2 MB · Views: 102
  • IMG_3786.jpeg
    IMG_3786.jpeg
    2 MB · Views: 92
  • IMG_3800.jpeg
    IMG_3800.jpeg
    6.5 MB · Views: 90
  • IMG_3436.jpeg
    IMG_3436.jpeg
    1.4 MB · Views: 109
I'm painting my RV-6 project myself with base coat/clear coat.
One of the most helpful pieces of advice I found (on some random Youtube) was to turn the fluid needle adjustment in two turns from full open. A professional would not do this because it slows them down, but for a novice it may be just what you need to get the control of gun travel speed/overlap/distance. It helped me.
 
OP update here to report on recommendations that have helped to improve performance. I'm relieved to say the paint booth is now a happier place.

I added extra fluoro and LED lights around the walls to increase overall lighting from 22000 lumens to 37500 lumens and used mobile stands to provide reflection and it is now much easier to see what the paint spray pattern is doing.

20250102_171315.jpg20250102_171342.jpg

I increased the air flow through the gun and widened the pattern slightly so there is more paint in the centre of the cone and atomisation is much better now and the overlap is also easier to see and control.

20250102_171404.jpg

I didn't get any runs or dry spots or orange peel on the VS, though it is only a small part. There are still minute dust particles and I'm just going to have to polish those out afterwards (per DanH sticky).

20250102_171528.jpg

Apart from the test spray patterns on the wall paper there is also a test metal panel to check that the first coat is flashed off properly (glove slick) before spraying the second coat and this has been effective in eliminating solvent pop.

So thanks again to everyone for advice and in particular to fl-mike for clear and concise suggestions that are 100% spot on.
 
"Cut and buff is your friend. Very few of the perfect paint jobs came out of the gun that way."

So true. Here's another suggestion for that cut and buff stage: Seems scary at first, but works wonders: Get some inexpensive contrasting fast drying flat spray can primer (like Bondo)- light grey if your paint is dark, black if it is light - and very lightly spray over your finish coat. Just a very fine thin light spray - It's called "Guide Coat". Then, when you wet sand (start with 1000 or 1200, no more coarse) you'll know when you've gotten past all the orange peel and defects are gone when all of the "guide coat" is gone. Toward the end of the initial wet sand there will be a sprinkling of the primer corresponding to remaining defects. When all are gone, the surface is now perfectly flat. Wet sand to 2000. Then polish with 3M Finesse using yellow wool on the buffer (doesn't remove any more material, just re-flows the surface at the molecular level). Comes out like a mirror.
 
Just to make you feel better, we all have bad days.
I did a small batch of interior parts the other night (some were re-shoots). In the never ending quest to minimize dust nibs, I did my prepsol wipe down with some cloth wipes I "thought" I bought at the paint shop. Get everything wiped and tacked off.
First part, instant fisheyes. "Oh crap! Silicone!" 🙀 Yup, the cloth wipes have silicone in them. Now I've got a pot of activated paint and the clock is ticking.
Grabbed the lacquer thinner and gun cleaner squeeze bottle and started hosing down parts. So far, so good.
Then the paint starts wrinkling and lifting on one bulkhead (re-spray). "Crap!" The other parts hang in there. Okay, that part is not happening, but have plenty of others to paint. (probably should have used prepsol vs lacquer thinner, but I was not in my right mind!)
Re-wipe down, tack off, let's go.
Half way into the first coat, I notice paint is running down the gun grip. "Huh?"
Back into the prep area to see what's going on. The PPS liner was pushed down on one side and not snapped into the lid. Okay, more wasted paint, but sort that out.
Wouldn't be a paint session if I didn't go through at least four pairs of gloves.
Finish the pass. Second coat is uneventful, except for some runs.
Cloth wipes go in the burn barrel.
I need a beer.....no, make that a bourbon, neat....
Sounds like the day I left the lid of the PPS cup un snapped and no ring screwed on. Flipped the gun and the whole cup of black paint splashed everywhere. We all have learning days!
 
Awesome, I wish to the creator I hadn't had any of those experiences. I exclusively use the off brand equivalent to the sontara wipes... lintless every time. I also use the wet devilbis static wipes. I avoid using a tack cloth as the possibility of beeswax creating issues is a real boogie man to me. One of the things that I haven’t seen mentioned is airflow... you need to really control the air from the gun.. not just for atomization but for dust control. I also check the surface for dust with my bare hand just before I start the shoot, i wipe the surface with a constant flow of air from the gun while wiping dust into the airflow off of the part... sounds wrong i know but I wipe my hand clean with acetone a couple times during the dust off.. if you can feel the dust it'll show up in the paint.... period.
 
Back
Top