Van's Air Force

The definitive Van's Aircraft support community! Buying, building or flying an RV? Join our exclusive family of mentors and enthusiasts!

Nose wheel brake out force keeps getting lower

flytopg

Member
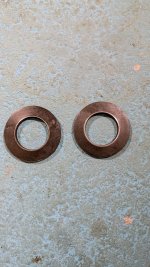
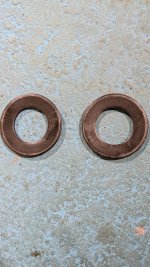
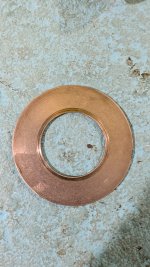
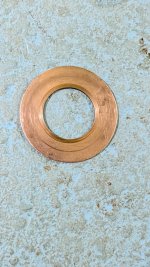
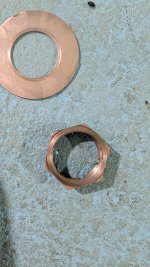
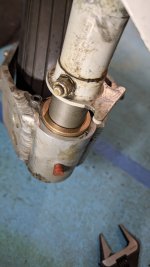
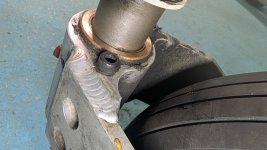
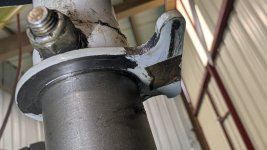
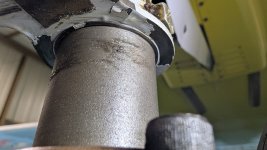
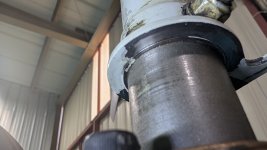
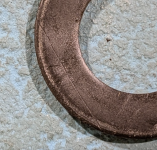
On recent landings I encountered nose shimmy so I took the wheel fairings off and adjusted the brake out force to be ~26lbs (it was about 10lbs). I also made sure the Belleville washers were installed correctly. That worked for a small time but the shimmy reappeared after 5-10 landings. Lifted the nose again and remeasured the brake out force to be ~13lbs. Greased the front axle and tightened the axle nut again (~29lbs). 10 landings later the shimmy came back and a non calibrated check on the nose wheel indicated considerably less than 26lbs of brake out force.The axle nut is obviously not moving (cotter pin) so the only thing I can think off are the Belleville washers. I ordered new ones but could there be any other reason for the brake out force getting lower?
 
How are you measuring the forces? When i had a cotter pin there was too much slop - the nut would turn with the fork. So it got loose as i pulled the fork one way and got tighter as i went the other way. It was a 10 lb difference when measuring in both directions. The ultimate fix was a #6 flat head screw instead of the cotter pin. Fully locked the nut in place.
 
How are you measuring the forces? When i had a cotter pin there was too much slop - the nut would turn with the fork. So it got loose as i pulled the fork one way and got tighter as i went the other way. It was a 10 lb difference when measuring in both directions. The ultimate fix was a #6 flat head screw instead of the cotter pin. Fully locked the nut in place.
With a luggage scale as close to the nose wheel axle as I could (<.5in) . I don't think the nut is moving. I'll torque stripe it to make sure.
 
Those washers take a "set" eventually. This reduces the need to continuously adjust the nut tension. If you decide to get new washers keep this in mind. When I install new washers I go a little tighter than recommended because the breakout Force will come down. Also as lr posted the cotter pin will allow some movement of the nut, not much but keep it in mind. Brake pads are cheap and easy to replace, better than having a shimmy.
 
With a luggage scale as close to the nose wheel axle as I could (<.5in) . I don't think the nut is moving. I'll torque stripe it to make sure.
Measure the force in both directions. You will be able to see that nut move if that is your issue. It was very obvious in my case. If that is not it, I would consider taking it apart for an inspoection. There are 2 large flanged brass bushings in there that could be wearing away from an installation issue. While many of us need to do this a few times over the years, It is HIGHLY uncommon for it to loosen up over a few flights. That would imply something unnatural is happening in there. If not the builder, compare washer stack up with the plans. Have seen the washers installed incorrectly before.
 
Last edited:
Another good idea that was shared on this forum a while back is to use arbor shims to keep your breakout force of the correct level without drilling new holes in your gear. So if it gets a little bit loose use a thin shim to get it back where you want it in the same cotter pin hole. A set of arbor shims with the correct diameter is available on Amazon for around 40 bucks.
 
I never did count on the zerk to get grease to where it is needed. I just drop the fork (one nut) clean things up and re grease with STA-Lube boat trailer bearing grease.
Move the raised nose wheel to each side stop as you pump 5 pumps of grease in. You don’t need any more than that.
 
@flytopg -- The Belleville washers act like a spring to maintain a constant pre-load on a bolt. It's possible that the washers are suffering from embedment relaxation and thus the pre-load on the axle. As Larry suggested, look at the bronze bushing and inspect for wear as well as the contact circumference of the Belleville washers themselves.

Screenshot 2025-11-13 at 7.55.01 AM.png

When you get the new ones you might want to add a bit of grease between the them, and the contact surfaces of the axle flange, and AN960-2016

 
After the brake out force diminished to about 13lbs again I installed new Belleville washers. Here are various pics of the flange & fork surfaces as well as nut, steel washer and Belleville washers. Unfortunately I didn't take a picture of the lower fork surface where the Belleville washers meet the fork.

There is an odd streak on the inside of the right Belleville washer but I don't know if that has any significance. I hope someone with more knowledge than me can spot a smoking gun here :)
 

Attachments

  • PXL_20251113_211918938.jpg
    PXL_20251113_211918938.jpg
    1.9 MB · Views: 86
  • PXL_20251113_211937599.jpg
    PXL_20251113_211937599.jpg
    2 MB · Views: 81
  • PXL_20251113_211942130.jpg
    PXL_20251113_211942130.jpg
    1.3 MB · Views: 65
  • PXL_20251113_211950363.jpg
    PXL_20251113_211950363.jpg
    1.4 MB · Views: 57
  • PXL_20251113_212022977.jpg
    PXL_20251113_212022977.jpg
    1.4 MB · Views: 73
  • PXL_20251113_212032813.jpg
    PXL_20251113_212032813.jpg
    1 MB · Views: 77
  • PXL_20251113_212037395.jpg
    PXL_20251113_212037395.jpg
    1.3 MB · Views: 79
  • PXL_20251113_212052429.jpg
    PXL_20251113_212052429.jpg
    1.1 MB · Views: 78
  • PXL_20251113_212123676.jpg
    PXL_20251113_212123676.jpg
    1.4 MB · Views: 76
  • PXL_20251113_212231306.jpg
    PXL_20251113_212231306.jpg
    1,008.4 KB · Views: 81
You were not supposed to leave the paint on the stop bracket surface that rides on the bushing and it was also supposed to be greased. See that there is still some paint there? Each time more paint flakes off it reduces the washer compressive force and the friction level. Your smoking gun. Need to clean that up and get it back to smooth from any uneven wear. From the pic, it looks like the large flat washer has a channel worn into it from contact with the belleville. Need to replace and determine why it happened. Likely due to no grease. Could also just be a pic artifact and is just a wear signature.

When you reassemble, grease all of those parts in the picture, including the large shaft and all bushing surfaces. Looks like there was no grease in there at all - a major no no. Maybe you just cleaned it for the pics.
 
Last edited:
You were not supposed to leave the paint on the stop bracket surface that rides on the bushing and it was also supposed to be greased. See that there is still some paint there? Each time more paint flakes off it reduces the washer compressive force and the friction level. Your smoking gun. Need to clean that up and get it back to smooth from any uneven wear. From the pic, it looks like the large flat washer has a channel worn into it from contact with the belleville. Need to replace and determine why it happened. Likely due to no grease. Could also just be a pic artifact and is just a wear signature.

When you reassemble, grease all of those parts in the picture, including the large shaft and all bushing surfaces. Looks like there was no grease in there at all - a major no no. Maybe you just cleaned it for the pics.

Yes, I cleaned everything before taking the pics as everything was covered in grease.

I'll replace the washer.

I'm not the builder but when I look up the flange on the Vans store it says it's powder coated. I don't know if that was the case as well in 2016 when the aircraft was built. Do folks strip the paint of the lower surface before installing it?
 
Limited nosewheel familiarity here, but appears the loaded bearing surface between the stop flange and fork bushing is a very narrow raised ridge, likely the end of the tube when the stop was fabricated. The raised portion of the stop seems to be cutting down into the brass bushing on the top of the fork. The very small bearing area generally means a high wear rate. Sure seems like the bearing area should be the large flat on the underside of the stop, the area with partial paint.

ScreenHunter_3020 Nov. 14 07.26.jpgScreenHunter_3021 Nov. 14 07.26.jpg
 
Limited nosewheel familiarity here, but appears the loaded bearing surface between the stop flange and fork bushing is a very narrow raised ridge, likely the end of the tube when the stop was fabricated. The raised portion of the stop seems to be cutting down into the brass bushing on the top of the fork. The very small bearing area generally means a high wear rate. Sure seems like the bearing area should be the large flat on the underside of the stop, the area with partial paint.

View attachment 102108View attachment 102109
Good catch Dan!; I missed that. It's been a while but almost certain that piece is supposed to be flat, not stepped. It would/should be designed for a large contact patch to match the bushing flange. Wondering if it was a mfg flaw or something related to the installation caused it. That definately would have caused the observed behavior.

OP: You can through that on a mill and get it flat, if you have access.
 
You were not supposed to leave the paint on the stop bracket surface that rides on the bushing and it was also supposed to be greased. See that there is still some paint there? Each time more paint flakes off it reduces the washer compressive force and the friction level. Your smoking gun. Need to clean that up and get it back to smooth from any uneven wear. From the pic, it looks like the large flat washer has a channel worn into it from contact with the belleville. Need to replace and determine why it happened. Likely due to no grease. Could also just be a pic artifact and is just a wear signature.

When you reassemble, grease all of those parts in the picture, including the large shaft and all bushing surfaces. Looks like there was no grease in there at all - a major no no. Maybe you just cleaned it for the pics.
^^ This ^^

Paint, Powder Coating especially, etc. really does a number on yields.

Not knowing any better, I left the power coating on the gear leg towers at the through-bolt attach point; you can guess the rest. PC "failed" (aged, cracked, squished) , torque was lost, gear leg would wiggle/twist in the socket. Now I remove all powder coating on bearing/attachment surfaces.
Out of curiosity, how do you remove the powder coating without damaging the underlying surface?
 
If you zoom in on one of those Belleville washers you also see a weird artifact :
 

Attachments

  • Screenshot 2025-11-14 at 8.22.06 AM.png
    Screenshot 2025-11-14 at 8.22.06 AM.png
    3.6 MB · Views: 47
If you zoom in on one of those Belleville washers you also see a weird artifact :
all but certain that was from pre-installation and is not causing any issues. Dan found your smoking gun; Way too small of a surface contact patch. Because of that, it is wearing away WAY too rapidly and loosing compression.
 
Out of curiosity, how do you remove the powder coating without damaging the underlying surface?
just scrape it off with a pocket knife, razor blade or scraper. Its steel, pretty hard to damage. Little scratches will hurt nothing in this application.
 
Out of curiosity, how do you remove the powder coating without damaging the underlying surface?
150 - 220g abrasive paper in a 3M Roloc rotary tool, or razor blade/scraper. The substrate is typically 4130 steel -- pretty tough stuff..
 
I talked to Vans builder support and they agreed with Dan's post (#15) above. They told me to true the lower surface of the WD-1031 flange to achieve a proper contact area between the fork bronze bushing and the flange and then re-inspect the surfaces at 20h, 50h, 100h until things settle in.
 
Limited nosewheel familiarity here, but appears the loaded bearing surface between the stop flange and fork bushing is a very narrow raised ridge, likely the end of the tube when the stop was fabricated. The raised portion of the stop seems to be cutting down into the brass bushing on the top of the fork. The very small bearing area generally means a high wear rate. Sure seems like the bearing area should be the large flat on the underside of the stop, the area with partial paint.

View attachment 102108View attachment 102109
That is exactly what my earlier post was about. Yes, it is a manufacturing defect in the steel weldment that is easily corrected with a hand file.
 
Final update to close out this thread. I installed the new flange after making sure the contact area was totally flat and 20h later I can report no shimmy and a stable brake out force. Thanks for all your help!
 

Attachments

  • PXL_20251120_210146046.jpg
    PXL_20251120_210146046.jpg
    1,012.6 KB · Views: 41
I've posted this several times over the decades... lapping flats on the belleville washers also increases the bearing areas of the washers so that they aren't sharp edges. Particularly true on the upper end which bears on the bronze. I've never had to reset the breakout on mine in 1900 hours.

1768399522972.png
 
Final update to close out this thread. I installed the new flange after making sure the contact area was totally flat and 20h later I can report no shimmy and a stable brake out force. Thanks for all your help!
These update/follow-up/close-out posts on maintenance issues are pure gold. Many thanks!
 
Back
Top