I noticed that the Van's store is now stating that the new RV-10 flap motor (ES-FA-PA-270-12-5) is also used for the -14 and -14A. Has anybody received this flap motor in their fuselage kit? About 6 months ago I received my B/O'd flap motor, but it was the older type without the position sensor. The kit instructions (sections 32 and 34) don't appear to have changed to reflect the new flap motor.

Van's Air Force
You are using an out of date browser. It may not display this or other websites correctly.
You should upgrade or use an alternative browser.
You should upgrade or use an alternative browser.
New flap motor
- Thread starter stigaro
- Start date

I noticed that the Van's store is now stating that the new RV-10 flap motor (ES-FA-PA-270-12-5) is also used for the -14 and -14A. Has anybody received this flap motor in their fuselage kit? About 6 months ago I received my B/O'd flap motor, but it was the older type without the position sensor. The kit instructions (sections 32 and 34) don't appear to have changed to reflect the new flap motor.
Good catch. Did you happen to contact Van's to find out when they are going to update the service documentation to install the new motor and sell a motor install kit for the 14 like they do for the 10? If so, what was their response? ie, they have a OP-64: RV-10 FLAP MOTOR RETROFIT file so expect they will do similar for the 14.
I noticed that the Van's store is now stating that the new RV-10 flap motor (ES-FA-PA-270-12-5) is also used for the -14 and -14A. Has anybody received this flap motor in their fuselage kit? About 6 months ago I received my B/O'd flap motor, but it was the older type without the position sensor. The kit instructions (sections 32 and 34) don't appear to have changed to reflect the new flap motor.
I’ve been told by Van’s there is an OP-65 due out with amended flap bracket and flap cover parts to support the new motor. I’m right at that point now - and im holding off from modifying them iaw the ph aviation instructions hoping it will come out soon.
Good catch. Did you happen to contact Van's to find out when they are going to update the service documentation to install the new motor and sell a motor install kit for the 14 like they do for the 10? If so, what was their response? ie, they have a OP-64: RV-10 FLAP MOTOR RETROFIT file so expect they will do similar for the 14.
I did reach out to Van's and received a response that says they are working on the documentation and additional parts. The new motor will require a new mounting bracket and motor cover. It will be a few more months as the Engineering team is dealing with other issues. I think we can assume what those are ...
czechsix
Well Known Member
The new motor will require a new mounting bracket and motor cover.
Interesting that a new motor cover is required. The instructions for the PH Aviation flap motor shows how to modify the brackets for the -14 but makes no mention of modifying the cover. Wonder if Van's is using a different motor than the one offered by PH Aviation, or different mounting geometry that drives the reqt for a new cover?
I did reach out to Van's and received a response that says they are working on the documentation and additional parts. The new motor will require a new mounting bracket and motor cover. It will be a few more months as the Engineering team is dealing with other issues. I think we can assume what those are ...
I asked about the new new flap motor at the Van's booth, and they said it was already shipping in new RV14 fuselage kits. I should be getting mine in a few weeks, we'll see what's in it.
We went PH because Vans just isn't in stock. PH is a nice unit and the conversion was not hard.
I don’t know anything about the new flap motor from Van’s, but I did the initial PH flap motor install in my RV-14 and would recommend it to anyone building a 14. The installation was easy despite having to develop it myself, and the first time I ever cut a piece of metal that wasn’t a barbed wire fence on the ranch was this airplane kit. I just hit 200 hours on my plane and have never had a problem with the flap motor. The sole quirk is that I had to back off slightly from the maximum extension of the flaps to keep the VP-X happy.
I’m excited to see what Van’s is doing to improve the kit. The RV-14 doesn’t leave much to be desired but they still find ways to make it better. (Not better enough for me to build another one just yet, though.") )
)
I’m excited to see what Van’s is doing to improve the kit. The RV-14 doesn’t leave much to be desired but they still find ways to make it better. (Not better enough for me to build another one just yet, though.
)On a whim, a few months ago I bought the new -10 flap motor as I knew it was coming for the -14 soon. Well, it appears to be on the store now.: https://store.vansaircraft.com/14-flap-motor-retrofit-kit.html
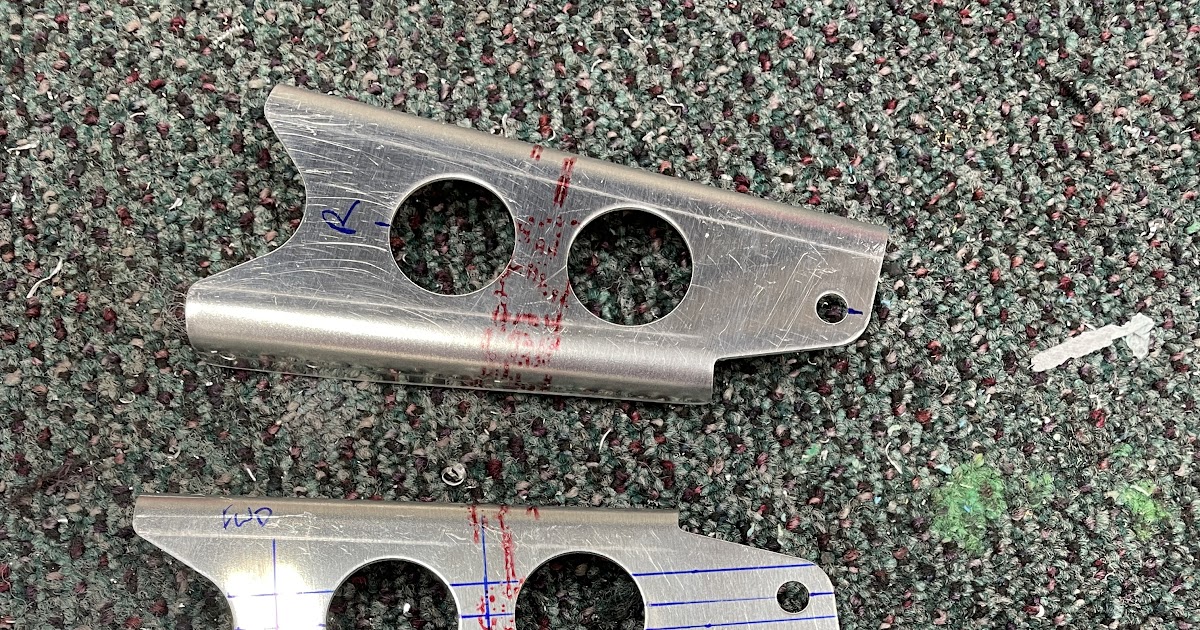
It looks like there are new mounting brackets as well as new sides and a new front. I'm not sure why these are required as I modified my existing racket for the new motor and it seems like the sides and cover still fit OK. I essentially followed the PH flap motor modification instructions.
It looks like there are new mounting brackets as well as new sides and a new front. I'm not sure why these are required as I modified my existing racket for the new motor and it seems like the sides and cover still fit OK. I essentially followed the PH flap motor modification instructions.
I have 3 years and over 200 hours flying my RV-14 with the PH flap motor and the stock Van's flap motor cover. I haven't run into any problems yet.On a whim, a few months ago I bought the new -10 flap motor as I knew it was coming for the -14 soon. Well, it appears to be on the store now.: https://store.vansaircraft.com/14-flap-motor-retrofit-kit.html
It looks like there are new mounting brackets as well as new sides and a new front. I'm not sure why these are required as I modified my existing racket for the new motor and it seems like the sides and cover still fit OK. I essentially followed the PH flap motor modification instructions.
Yes, I got this new flap motor in my -14A fuselage kit last week.I noticed that the Van's store is now stating that the new RV-10 flap motor (ES-FA-PA-270-12-5) is also used for the -14 and -14A. Has anybody received this flap motor in their fuselage kit?
Interesting. But too bad for me. I had to build my own mount for the motor just a couple weeks ago. I essentially used the PH Aviation modifications but used aluminum bar in place of the angle on the previous mounts. They told me not to expect the new design any time soon. Good to see them moving forward still.Yes, I got this new flap motor in my -14A fuselage kit last week.
Same here! I sat on it for months when they said “watch this space” then finally bit the bullet and copied the PH idea.Interesting. But too bad for me. I had to build my own mount for the motor just a couple weeks ago. I essentially used the PH Aviation modifications but used aluminum bar in place of the angle on the previous mounts. They told me not to expect the new design any time soon. Good to see them moving forward still.
Typical!
Does anyone have a copy of OP-65 available? I can’t see it on the -14 download area.
Had an email back from Van’s overnight - apparently it’s on the store, but the instructions (OP65) have not yet been released. HmmmWell, it appears to be on the store now.: https://store.vansaircraft.com/14-flap-motor-retrofit-kit.html
That's interesting. And yet they are shipping the new motor with kits. And the build instructions haven't been updated either....Had an email back from Van’s overnight - apparently it’s on the store, but the instructions (OP65) have not yet been released. Hmmm
I feel reasonably comfortable with what I have built, but I'd still like to know what Van's has engineered. Like what's with the one nutplate in the retro kit?
Did you get revised instructions as well? I believe it's in Chapter 32 and Chapter 34.Yes, I got this new flap motor in my -14A fuselage kit last week.
Exactly! I’m sure the way we’ve done it is fine - but I’d like to see how the experts did it.I feel reasonably comfortable with what I have built, but I'd still like to know what Van's has engineered. Like what's with the one nutplate in the retro kit?
32-07: Flap Motor Brackets - Modification
A Build Log detailing the build of a Vans RV-14
 tasrv14.blogspot.com
The date of my plans on the pages where the flap motor is mentioned (32-07, 34-04 and 34-05) is 7/19/23. Pages 34-04 and 34-05 refer to the new flap motor part number.Did you get revised instructions as well? I believe it's in Chapter 32 and Chapter 34.
OK thanks. I wonder if they limit the online plans available to us to the parts we have received? Would you be able to send a photo of a couple pages relevant to the new motor brackets and covers?The date of my plans on the pages where the flap motor is mentioned (32-07, 34-04 and 34-05) is 7/19/23. Pages 34-04 and 34-05 refer to the new flap motor part number.
I'm not sure if these are the pages you're looking for but here ya go...Would you be able to send a photo of a couple pages relevant to the new motor brackets and covers?
Attachments
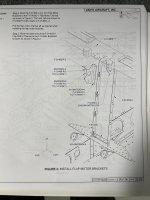
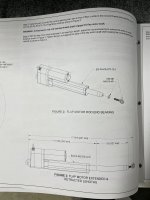
That's perfect, thanks Brian.I'm not sure if these are the pages you're looking for but here ya go...
Ah ha! So they’ve used new shorter brackets to move the hole further up, flipped the orientation of the brackets and used spacers to take up the extra space.I'm not sure if these are the pages you're looking for but here ya go...
I’m relieved as I reckon the PH method is just as good as that.
Do you happen to have a photo of page 42-04 showing the flap motor cover?

Sorry but the last page I have is 37-08Do you happen to have a photo of page 42-04 showing the flap motor cover?
It looks like the new mounts are moved further than 1.5”, thereby making the new extended length 17 3/16”. I followed the PH instructions and moved my mount hole in 1.5”. So I’m matching the extended length of the old motor (15 1/4”) and adding the 1.5” to make the extended length 16 3/4”. I also fond I had to run a 1/4-28 tap through the new bearing thread to get the bearing to fit. I used a MM-4 bearing instead of the CM-4M as that’s all I could find locally. The MM-4 is tighter tolerance, but I think should be fine here. I also had to cut off about 1/4” to get it to fit the motor shaft, otherwise it was bottoming out.
BTW - anyone know the difference between an Aurora Bearing CM-4 and a CM-4M? The Aurora catalog doesn’t list the -4M anywhere, but this is the one Vans sells.
BTW - anyone know the difference between an Aurora Bearing CM-4 and a CM-4M? The Aurora catalog doesn’t list the -4M anywhere, but this is the one Vans sells.
Last edited:
Rv-14A. The Phat instructions are for new builds for those who havent installed the original or previous motor. Has anyone done a retro fit (drilling out rivets Ect?) Also, Does the new OP-65 instructions from Vans include instructions on removing the old mounts?
Thanks
Thanks
They just posted OP-65: https://www.vansaircraft.com/service-information-and-revisions/op-65/ (and revisions to a bunch of chapters for the new flap motor).
The new cover is definitely a different shape at the top, new:

old:

The new cover is definitely a different shape at the top, new:
old:
Thanks for this. I think that Vans made the new motor length the same for the 10 &14 (17 3/16”), and in doing so, had to move the mounting location up further than 1.5” in order to keep the flap arm positions the same. As a result, it looks like there may have been some interference between the new flap motor and the old cover. Hence the need for the new cover. With the PH instructions, those of us who are using the new motor with the old cover have a different motor length (16 3/4” extended) but the covers fit OK.
If anyone needs a RV10 flap motor - I have one for less than the cost of the retrofit kit.
https://vansairforce.net/threads/rv10-flap-motor.223949/ - $475
https://vansairforce.net/threads/rv10-flap-motor.223949/ - $475
When I incorrectly set mine to 17 3/16 there really wasn’t much rod end engaged! It’s a lot stronger now at 16 3/4. The rod end is wound almost to the bottom.Thanks for this. I think that Vans made the new motor length the same for the 10 &14 (17 3/16”), and in doing so, had to move the mounting location up further than 1.5” in order to keep the flap arm positions the same.
Has anybody figured out the wiring for this new flap motor? I couldn't find anything on the manufacturers website (Progressiveautomations.com) and it's not in the plans. I'm at the point where the plans call for extending the shaft to its maximum length. I don't know how to do that without knowing which wires are involved. I don't want to use trial and error and ruin the motor.
There are 5 wires:
White
Yellow
Blue
Red
Brown
There are 5 wires:
White
Yellow
Blue
Red
Brown
Last edited:
Any idea where that information is???Look at the RV-10 flap motor wiring. That’s what the mothership told me.

OP 64-04. RV-10Any idea where that information is???

Thank you!!!!!!!
Thanks!OP 64-04. RV-10View attachment 61543
OK, I'm more of an idiot than I thought. Even with the wiring diagrams so nicely provided by @1949MGTC and @TASEsq , I still can't get my flap motor to move. I've got a new 9v battery. Can somebody tell me which wires I need to connect to the battery? Any help would really be appreciated. I've been trying all afternoon to get the motor to move.
What color are your 5 leads? I used PH's so mine are probably not the same.OK, I'm more of an idiot than I thought. Even with the wiring diagrams so nicely provided by @1949MGTC and @TASEsq , I still can't get my flap motor to move. I've got a new 9v battery. Can somebody tell me which wires I need to connect to the battery? Any help would really be appreciated. I've been trying all afternoon to get the motor to move.
Not white or yellow (Probably) are 2 a heavier gauge? I've seen red used as position and/or power probably blue and brown are power but go with the heavier gauge wires.White
Yellow
Blue
Red
Brown
Last edited:
Brown and Blue are a little heavier gauge....are 2 a heavier guage?
Last edited:
I believe it’s brown and blue. Reverse the wires on the battery and the motor goes the other way. I’m not sure a 9V battery will be sufficient for this motor though. I used a 12V battery.Brown and Blue are a little heavier gauge.
I touched both the brown and then the blue wires to a 12v battery and nothing happened. This is my first wiring experience with my build. I think I'm doomed...I believe it’s brown and blue. Reverse the wires on the battery and the motor goes the other way. I’m not sure a 9V battery will be sufficient for this motor though. I used a 12V battery.
I’d suggest using something like alligator clips to ensure the wires are touching and held on the appropriate battery terminals. But if you don’t have those, just make sure the wires aren’t touching each other, just the battery terminals. And make sure that they are both held on the terminals at the same time. If no movement, motor could at full retract limit. Just reverse the blue and brown wires on the terminals and motor should extend. You’ll get it.I touched both the brown and then the blue wires to a 12v battery and nothing happened. This is my first wiring experience with my build. I think I'm doomed...
OK, it finally worked! After wasting half the day on this, I'm sure glad I'm paying SteinAir to do my panel. I wish I could have them do 100% of my wiring.You’ll get it.
Thank you for taking the time to help me!
Nah, now you’re the expert now. How many times did you watch it go in and out? I can’t get enough of watching silly things like that work as they should. Just wait until it’s installed and the flap actuator moves! You’ll want to wire up the entire panel yourself.OK, it finally worked! After wasting half the day on this, I'm sure glad I'm paying SteinAir to do my panel. I wish I could have them do 100% of my wiring.
Thank you for taking the time to help me!
What was the issue??OK, it finally worked! After wasting half the day on this, I'm sure glad I'm paying SteinAir to do my panel. I wish I could have them do 100% of my wiring.
Thank you for taking the time to help me!
So satisfying!
The issue is I have no idea what I'm doing. Even with the wiring diagram I wasn't able to figure out I needed to connect the blue wire to one post of the battery and the brown wire to the other. I told you I'm doomed.What was the issue??
And yes, watching the motor move is very satisfying - especially when you finally get it to move after working on it for half the day.
