
Van's Air Force
You are using an out of date browser. It may not display this or other websites correctly.
You should upgrade or use an alternative browser.
You should upgrade or use an alternative browser.
Modifying the 2019 Cowling for the EXP119 exhaust
- Thread starter MIG1963
- Start date


I did not. I did this before the EXP version came out and thought I still required that much outflow from the lower cowl.
Sorry, yes I did seal the tunnel up with the cowl flap that is included with the EXP cowl. Ordered it separately. I thought you were talking about closing the bottom cowl up between the two pipes. I didn’t do that and I wish I had.
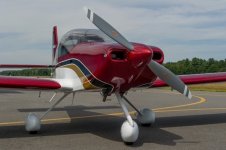
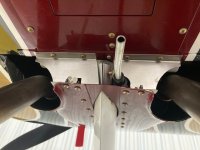
I modified the original style lower cowling to accommodate a dual Vettermans exhaust. I did a little fiberglass work to add a little bit of a tunnel for the pipes. I also closed out a portion of the opening between the exhaust pipes. I did add the cowl flap to close out the tunnel. The cowl flap makes the bottom of the plane look a lot nicer, but I rarely use it.
Attachments
I modified the original style lower cowling to accommodate a dual Vettermans exhaust. I did a little fiberglass work to add a little bit of a tunnel for the pipes. I also closed out a portion of the opening between the exhaust pipes. I did add the cowl flap to close out the tunnel. The cowl flap makes the bottom of the plane look a lot nicer, but I rarely use it.
Larry,
Very interesting how you closed up the back of your cowling. Looks pretty easy to do. Do you have any info on temps and speed differences from before to after it was closed up? I'm surprised you don't have to use your cooling flap. I don't either but assumed it was because I had to0 much exit air already. My area between the two pipes is still open.
Larry,
Very interesting how you closed up the back of your cowling. Looks pretty easy to do.
...but draggy.
Dan H,
Can you explain. This type of drag is totally out of my wheelhouse so I'm not disagreeing with you. The Exp cowl is closed up in that area however it is sloped in the area between the pipes. This is one of the biggest differences between the EXP and the non-exp that I can see. I assumed closing that up would help??
Can you explain. This type of drag is totally out of my wheelhouse so I'm not disagreeing with you. The Exp cowl is closed up in that area however it is sloped in the area between the pipes. This is one of the biggest differences between the EXP and the non-exp that I can see. I assumed closing that up would help??
Last edited:
My CHT’s always run in the high 200’s to low 300’s so I never open the cowl flap. I closed out the area between the pipes in an effort to get the CHT’s a little higher. I had more success by reducing the height of the air dams in front of cylinders 1&3. I have not gone back and removed the close out plates to see if the CHT’s are affected. My airspeeds seem to be consistent with other RV-14’s so I don’t think they create that much drag. Sometime I’ll gather some CHT airspeed data without them.Larry,
Very interesting how you closed up the back of your cowling. Looks pretty easy to do. Do you have any info on temps and speed differences from before to after it was closed up? I'm surprised you don't have to use your cooling flap. I don't either but assumed it was because I had to0 much exit air already. My area between the two pipes is still open.
Dan H,
Can you explain. This type of drag is totally out of my wheelhouse so I'm not disagreeing with you. The Exp cowl is closed up in that area however it is sloped in the area between the pipes. This is one of the biggest differences between the EXP and the non-exp that I can see. I assumed closing that up would help??
General statement, but as babes in the game of drag reduction, we tend to look at the front of objects, and wrongly ignore the aft end. The real results are found in putting the air back together, rather than how we penetrated it. The blocking plate Larry illustrated results in a flat aft end, almost always a choice to be avoided.
Here on VAF we are blessed with folks with doctorates and 40 years of practical experience, so it would be silly for me to opine in depth. I'm just a redneck with books. Here's a classic which should be on everyone's hard drive, Hoerner's Fluid-Dynamic Drag. I've put it here for download. You'll find data for 2D and 3D shapes of every description, including most of a chapter on base drag.
Below I've picked a single illustration specific to this question. We all know the drag coefficients of a nice airfoil will be low. Here the same airfoil is turned around, making the aft end more blunt; it begins to form a wake, and the drag goes up. The normal and backwards airfoils are then directly compared to a sharp wedge with a flat base. Despite being a perfectly pointy frontal shape, drag is more than 12x that of the normal airfoil due to the blunt base.
Here in the Land of TLAR, you might bisect the shapes so you only have the lower surface, and consider it to be the bottom of a cowl. The nice airfoil would be the area of a 119 cowl between the exhaust outlets. The backwards example would be something like a standard outlet with the addition of an aft body fairing like Larry Vetterman has shown. The wedge would be something like a standard coal shovel outlet, but understand a big difference between the standard open outlet and the closed flat wall. The standard has roughly 20~ 30 cubic feet of air flowing into the bluff area (per second), while the closed outlet has none. The flow reduces the the drag. If we accelerate the flow to higher than freestream, it would be thrust.

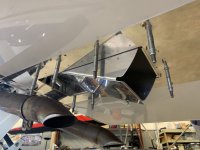
Here’s another effort at using Vetterman exhaust with an early 390 (non-EXP119) - Vetterman exhaust originally for a Superior XP400, now on the TB 390. Cowl pics are before adding the tunnel cooling flap (under-construction photo). I experienced a very modest speed improvement with the cooling flap (somewhere between 0 and 3 knots - not much better than measurement error, so maybe wishful thinking) and about 20° increase in CHTs.
My original goal installing the tunnel cooling flap was speed/efficiency. However, that morphed into increasing CHTs as a therapeutic for a sticking #2 exhaust valve.
My original goal installing the tunnel cooling flap was speed/efficiency. However, that morphed into increasing CHTs as a therapeutic for a sticking #2 exhaust valve.
Attachments

Watch what happens to the yarn just aft of the cowl flap trailing edge (just in front of the pipe) when fully open and partially closed (at 13 seconds). Flow is slow just aft of the open slot, so the yarn is showing a vortex with some flow reversal. A partial close reduced the vortex, at least partially because flow velocity was increased into the area behind the slot. A fully open slot with a blocking plate would have zero exit velocity and likely a fully developed flow reversal.
This was a first iteration of the fancy exit door. It would not close all the way because internal cowl pressure was bowing the bottom of the cowl outward, the reason for a check at 180 knots. Internal stiffeners reduced that to near zero. I also reworked the linkage just a bit so it did not open as far, which reduced the speed delta between open and closed. Note that when open, half the open area is recessed into the cowl, reducing the frontal area for the same exit area if it was all in the aft door slot.
This was a first iteration of the fancy exit door. It would not close all the way because internal cowl pressure was bowing the bottom of the cowl outward, the reason for a check at 180 knots. Internal stiffeners reduced that to near zero. I also reworked the linkage just a bit so it did not open as far, which reduced the speed delta between open and closed. Note that when open, half the open area is recessed into the cowl, reducing the frontal area for the same exit area if it was all in the aft door slot.
I’m pleased to see this discussion on non-EXP configurations with dual exhaust taking shape. Previously, I asked about the advantages and disadvantages of non-EXP versus EXP setups, as I plan to use SDS EFI. After learning that achieving a clean dual exhaust look is possible with the non-EXP configuration, I’ve decided to move in that direction.
I’ve already completed the installation of the EXP lower cowl attach brackets and installed the nut plates in the tunnel for the cooling flap. It appears these will integrate well with the modified cowl, and I intend to install the cooling flap for use as needed. The photos and insights shared by others who have pursued this approach have been extremely helpful.
Glenn, Larry, Keith, and dmattul thank you for your responses and info.
If anyone else has taken this route, I would greatly appreciate any additional pictures or tips you can share.
I’ve already completed the installation of the EXP lower cowl attach brackets and installed the nut plates in the tunnel for the cooling flap. It appears these will integrate well with the modified cowl, and I intend to install the cooling flap for use as needed. The photos and insights shared by others who have pursued this approach have been extremely helpful.
One more possible addition for you - I opted for an electric actuator for the tunnel cooling flap (eliminates a cable and a FW penetration)
Tunnel Cooling Flap - electric
In another thread on EXP-119 equipped 14s, a question was asked about converting the Tunnel Cooling Flap to electric operation. I mentioned in another thread that I had done this and got multiple PMs inquiring, so I am posting for the general audience. My engine is an IO-390 (Thunderbolt...
vansairforce.net
czechsix
Well Known Member
Keith, do you find you ever need to open the tunnel cooling flap? With the non-EXP cowl, you've probably got more cooling exit area even with the tunnel completely closed up than you do in an EXP cowl with the cooling flap open, so you might not ever need to open it in your setup?Here’s another effort at using Vetterman exhaust with an early 390 (non-EXP119) - Vetterman exhaust originally for a Superior XP400, now on the TB 390. Cowl pics are before adding the tunnel cooling flap (under-construction photo). I experienced a very modest speed improvement with the cooling flap (somewhere between 0 and 3 knots - not much better than measurement error, so maybe wishful thinking) and about 20° increase in CHTs.
My original goal installing the tunnel cooling flap was speed/efficiency. However, that morphed into increasing CHTs as a therapeutic for a sticking #2 exhaust valve.
I rarely open the tunnel cooling flap. I have used it in the TX summer during long climbs, or when taking off with a heat soaked engine (fuel stop), or cruise at lower altitude in hot conditions (due to high oil temp). Open, it knocks off temps relatively quickly. In low altitude cruise, I can open it 1/2" (estimated) and manage high oil temp.Keith, do you find you ever need to open the tunnel cooling flap? With the non-EXP cowl, you've probably got more cooling exit area even with the tunnel completely closed up than you do in an EXP cowl with the cooling flap open, so you might not ever need to open it in your setup?
