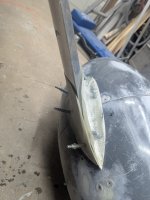
I have just finished 48-11 Step 1 where I added some layers of fiberglass on top of the lower gear leg intersection fairing. I'm not happy at all with the trailing edge once it has cured and I have it cleco'd in place (see attached photos). In one photo I clamped the trailing edge just to see how it would look if it was closer together. Note that I have trimmed the flange that rests against the wheel pant but I have not trimmed the trailing edge or upper edge of the intersection fairing yet.
My first question: how far up the gear leg fairing should the intersection fairing go -- any ideas on how much to trim off the top of this?
For my second question, I'm looking for opinions on how to proceed from here because the instructions are frankly not very descriptive. I have a few ideas:
My first question: how far up the gear leg fairing should the intersection fairing go -- any ideas on how much to trim off the top of this?
For my second question, I'm looking for opinions on how to proceed from here because the instructions are frankly not very descriptive. I have a few ideas:
- It seems pretty common to split this part in two pieces and permanently epoxy each half to each half of the wheel pant. This would not only solve this problem because I could permanently attach the trailing edge but it would make it easier to remove the wheel pants. I already have doors that will allow me to check and fill the tires so I only expect to remove the wheel pants annually. It still wouldn't hurt if the wheel pants were easier to remove, though.
- Alternatively, looking ahead it seems they specify safety wire on the trailing edge of the upper intersection fairing. I could use safety wire on this trailing edge as well.
- I could go with the RV-14 method of using epoxy to secure a nut inside that area so that I could screw the trailing edge tightly together.