
Van's Air Force
You are using an out of date browser. It may not display this or other websites correctly.
You should upgrade or use an alternative browser.
You should upgrade or use an alternative browser.
Looking for electrical/ avionics mounting ideas in rear fuselage
- Thread starter danlh
- Start date


I installed the Vans OP-48 AHRS bracket (VA-260). With a piece of angle on each side you can mount a transponder and/or remote com. Unfortunately, it looks as though it may be unavailable on their website but it might be worth asking.

Another option would be the strobe and ELT brackets F-10112-L and -R which could support a txpr or com.

Another option would be the strobe and ELT brackets F-10112-L and -R which could support a txpr or com.
I made trays that go between the tunnel and fuselage sides; lots of room.
Dan,
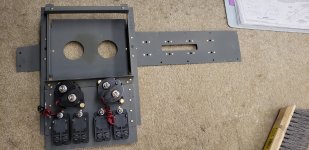
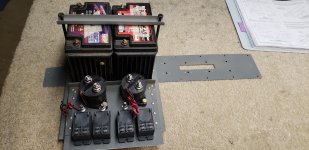
I modified the standard battery mount to accommodate two PC-625 batteries (I’d guess these are about the same footprint as your EarthX). I used some 0.063” sheet from the trim kit to make a side tray for both master solenoids and the four, 30amp relays that provide separate feeds to the panel. Some bending of aluminum to shape is required.
Also mounted in the area is the ELT on the starboard side and the ADS-b receiver on the port side. Both of those are mounted on 0.032” aluminum trays with the ends bent to make a Z shape. These tray “feet” are pro-sealed to the bottom fuselage skin and the trays have nut plates for the component mounting.
I mount my remote Comm #2 and remote XPDR on the bulkhead forward of the panel (a lot of room to mount such stuff). I suggest mounting them aft as you discuss to be much more work for wire runs and such.
I’m located at Dogwood Airpark (VA42) if you want to hop over to see the new project.
Carl
Attachments
DM sent.Dan,
I modified the standard battery mount to accommodate two PC-625 batteries (I’d guess these are about the same footprint as your EarthX). I used some 0.063” sheet from the trim kit to make a side tray for both master solenoids and the four, 30amp relays that provide separate feeds to the panel. Some bending of aluminum to shape is required.
Also mounted in the area is the ELT on the starboard side and the ADS-b receiver on the port side. Both of those are mounted on 0.032” aluminum trays with the ends bent to make a Z shape. These tray “feet” are pro-sealed to the bottom fuselage skin and the trays have nut plates for the component mounting.
I mount my remote Comm #2 and remote XPDR on the bulkhead forward of the panel (a lot of room to mount such stuff). I suggest mounting them aft as you discuss to be much more work for wire runs and such.
I’m located at Dogwood Airpark (VA42) if you want to hop over to see the new project.
Carl
Have you thought about usefull load? I put my remote txpnder under the panel center stack. I purposely loaded as much equipment weight as fwd as possible. I can go all the way to 2800 with a lot of baggage and still not hit the aft cg. Downside is i need 35 lbs of ballast when solo. A trade off I happily accept.
Thanks Larry. I’ll definitely give that some thought. Do you have any pictures of your avionics installation?Have you thought about usefull load? I put my remote txpnder under the panel center stack. I purposely loaded as much equipment weight as fwd as possible. I can go all the way to 2800 with a lot of baggage and still not hit the aft cg. Downside is i need 35 lbs of ballast when solo. A trade off I happily accept.
Sorry, but I don't. Not trying to push you one way or another. Only encouraging you to consider W&B early on. Obviously convenient to install things back there, but it carries some downsides, especially if you are also considering AC or O2 back there. Some folks just don't think about these things then later realize they can't get to gross weight due to being aft on CG. If you plan to carry 4 people on trips with baggage, you want to do some playing around with the envelope at this stage.Thanks Larry. I’ll definitely give that some thought. Do you have any pictures of your avionics installation?
Very true.Sorry, but I don't. Not trying to push you one way or another. Only encouraging you to consider W&B early on. Obviously convenient to install things back there, but it carries some downsides, especially if you are also considering AC or O2 back there. Some folks just don't think about these things then later realize they can't get to gross weight due to being aft on CG. If you plan to carry 4 people on trips with baggage, you want to do some playing around with the envelope at this stage.
I would rather have to carry some ballast solo than hit aft cg prior to gross weight...
I know you are building the -10. When I was doing my -7 I mounted all my remote units to 4 plates that attach (sandwich) on each side of the fore/aft supports between the firewall and sub-panel.
Remembering that these connectors have tiny screws to keep the connectors firmly attached to their happy homes and working upside down under the dash is a giant PITA.
These plates and the support have a 1/4” quick release pin to hold them up in the correct position/elevation to install the mounting hardware.
The plates are secured together via bolts & nut-plates on half of each pair. Some of the bolts goth through the fore/aft support and all the hardware squeezes each half of the pair firmly together.
Each of the plates ended up shaped a little different depending on what was mounted on it, and what I needed to have clearance for, and keeping in mind how the wire connectors would attach to that unit.
If necessary, I can remove 4 bolts and drop a pair of plates to facilitate any maintenance without disconnecting any of the wiring, and my quick release pin can stab them in place while fiddling around with remounting them.
Rockyfatcat-- sounds interesting and service friendly! Do you have any pictures?
I found a couple pictures on my phone. I hope this helps. After I kinda figured out what went where, I first worked with a template made from cardboard. With that figured out I got some sheetmetal and bent up the edges for rigidity where I could.Rockyfatcat-- sounds interesting and service friendly! Do you have any pictures?
As always, some adjustments had to be made. If you look at the first 2 pictures I clearanced around where it would have interfered with the angle iron on the firewall.
I was thinking this keeps these bits and the wiring as close to Everything else and helps keeps the CG as far forward as I can.
It was my goal to keep the connectors accessible, and maintain clearances when I couldn’t keep the connector pointed straight down.


Attachments
Technically, you can set that gross weight at whatever you want. Is it a good idea to exceed the recommended? That is left up to the builder. There are many other factors to consider than just "will it carry the extra weight"...How many 10 builders increased their Gross Weight over the 2,700 #'s specified by Vans and what additional mods or calculations did you perform to feel comfortable doing this?
If you do increase it, you are supposed to test weights and CGs in phase 1.
The other question would be who has set the gross weight at 2700 and exceeded it in phase 2 flying? I'll bet you don't get many, if any replies...
1. 2700 lbs for me. With a little care in loading, I’ve carried 2700 lbs and stayed within cg.*
2. I built a small shelf in the back, side to side, up high. Shoulder belt cables go under the shelf. No issues with the magnetometers there. Remote Trig TT22 is forward of the panel (try to keep cg forward). I do carry 20 lbs of water in the back when flying solo.
* Hopefully everyone knows that near aft cg, the cg moves further aft as you burn gas.
chris1seto
Active Member
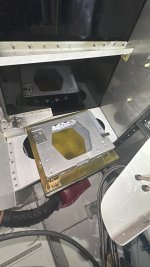
This is my finished tailcone area. (minus a little bit of cable management left undone right up at the baggage floor bulkhead)
My battery is up front, over top of the pax pedals. The GTX345 xponder is mounted on the right sidewall. It can be slid out of the rack without hitting anything, but also that entire mounting plate is secured to the sidewall mount brackets with nutplates, so it's easy to take the whole thing off too.
There is a somewhat elaborate tray which is mounted to the bellcrank/battery deck and sidewall stringer. The tray was sunken (as opposed to going straight out from the deck to the stringer) to impede access as little as possible into the tailcone area. Probably overkill, but it turned out really nice.
