What's new
Van's Air Force

Don't miss anything! Register now for full access to the definitive RV support community.

Laser Cut Parts List updated; Service Letter SL-00091 published

greghughespdx

Well Known Member
Advertiser
Laser Cut Parts List updated; Service Letter SL-00091 published

Van's Aircraft has published an updated Laser Cut Parts List (R6), which reflects further analysis on parts manufacturing dates and reclassifies certain parts.

Part classifications have been developed through an analysis of the airworthiness and service life of these parts. A summary of this investigation, "Laser-Cut Parts Engineering Evaluation," is available on the Van’s Aircraft website.

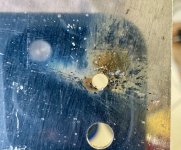
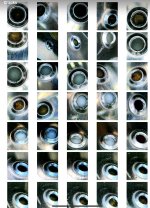
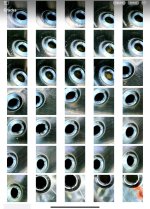
  • As of R6 of this document the "First Date in Inventory" has been updated to a highly conservative date that represents the first point in time that a Laser-cutting vendor was directed to make that specific part number. This date is before parts made it to the shelf. With certainty, for any given part number, a kit packed before this date contains a punched version of that part. After this date there is a possibility that a part is laser cut.
  • A handful of parts were removed from the list because after further analysis, it was determined that those parts were not delivered as laser-cut.
  • The list has been re-sorted and is now displayed as earliest to latest date.
  • For kits assembled as quickbuild kits or to the quickbuild stage, or beyond, Van's is evaluating and will be providing alternate means of repair where disassembly is impractical or overly burdensome.

Service Letter SL-00091 has been published. It refers the reader to the updated Laser-Cut Parts List as well as the Laser-Cut Parts Engineering Evaluation document, and addresses the use and inspection of these parts.

In addition, the team at Van's Aircraft is completing customer specific laser cut parts lists for each individual kit based on the date each kit was crated (and when the quickbuild kit was assembled). These will be communicated directly to individual customers in the near future. Van’s will communicate additional information about the laser cut parts replacement program when these customer-specific lists are delivered.
 
Is it possible to get clarification on why part status changed since the last update. Was additional testing done on top of the previous testing that further qualified these parts for use?
 
Is it possible to get clarification on why part status changed since the last update. Was additional testing done on top of the previous testing that further qualified these parts for use?

For my build, there is some clarification in the notes column for parts that were reclassified.
 
Future changes to the LCP affected parts list?

Greg, thank you for keeping us advised of the updates!

Would it be at all possible to put an asterisk or "change bar" on the master spreadsheet every time Vans changes an LCP line item going forward? I think revision 5 was released in conjunction with the parts portal going live. I imagine the present method probably leads many of us to re-audit our entire parts lists every time there is a revision change, even if the particular kit is not affected further by the update.
 
Is Van's still having parts produced using Laser Cut for holes, instead of punched parts?

No, other than a few parts that have been laser cut since they originated (a small number of parts where there is clearly no issue, such as baffle walls in the FWF kit, a couple of flat panels, and similar).
 
Is it possible to get clarification on why part status changed since the last update. Was additional testing done on top of the previous testing that further qualified these parts for use?

When a part classification changes, it is because additional engineering testing/evaluation was completed which took the part from the previous status to a lower status. Note that all part statuses are assigned with a significantly conservative margin. When a part classification changes, it is always a result of significant engineering review.
 
We have posted a revised SB-00091 REV 1, in which we have added information to more specifically describe the purpose and scope of the service document. That revision is available on the Van's Aircraft website at the link in the original post.​
 
Last edited:
Information is power. It still does not make it go away, but identifying the parts is key step....

Question can a builder not inspect holes with magnification and bright light and tell if part has punched holes or laser cut holes?
 
Can you provide some guidance for what crack size and frequency is acceptable Greg? I have many parts with 90+ percent of the holes cracked. If I’ve missed this guidance, please point me in the right direction.

Thanks
 
Can you provide some guidance for what crack size and frequency is acceptable Greg? I have many parts with 90+ percent of the holes cracked. If I’ve missed this guidance, please point me in the right direction.

Thanks


I was a aircraft structural engineer in a previous life (first Career). I worked for Boeing as a direct and contact engineer for Airbus, British Aerospace, Lockheed, P&W and several airlines. In my opinion cracks are not acceptable. Period. It's just a standard.

With that said CRACKS happen. Fixes include, stop drill crack top (normally not a permanent repair), cut crack out and put in repair, filler/doubler, and #1 most preferred and accepted is replace the cracked part.

Can a crack exist and be OK? I would say no, unless it is inspectable and you inspect it often.

The ISSUE is wide area cracking. ONE CRACK all on it's own can be ok with above mentioned inspections. HOWEVER if you have a lot of cracks all near each other they can "coalesce" quickly, making one big crack. This is the Aloha Airline B737 issue decades ago. Lots of little cracks, each on it's own not a big deal. Lots of these little cracks all in a row in a lap spice not good. The difference between B737 and a Van's RV, the Boeing has a pressurized fuselage.

I hope Van's just replaces parts. For those who have riveted LCP's together or bought a QB with these parts, that is a hard thing to deal with. It would require drilling rivets. I hate to say it, salvage what you can and scrap the rest.
 
Last edited:
I was a aircraft structural engineer in a previous life (first Career). I worked for Boeing as a direct and contact engineer for Airbus, British Aerospace, Lockheed, P&W and several airlines. In my opinion cracks are not acceptable. Period. It's just a standard.

With that said CRACKS happen. Fixes include, stop drill crack top (normally not a permanent repair), cut crack out and put in repair, filler/doubler, and #1 most preferred and accepted is replace the cracked part.

Can a crack exist and be OK? I would say no, unless it is inspectable and you inspect it often.

The ISSUE is wide area cracking. ONE CRACK all on it's own can be ok with above mentioned inspections. HOWEVER if you have a lot of cracks all near each other they can "coalesce" quickly, making one big crack. This is the Aloha Airline B737 issue decades ago. Lots of little cracks, each on it's own not a big deal. Lots of these little cracks all in a row in a lap spice not good. The difference between B737 and a Van's RV, the Boeing has a pressurized fuselage.

I hope Van's just replaces parts. For those who have riveted LCP's together or bought a QB with these parts, that is a hard thing to deal with. It would require drilling rivets. I hate to say it, salvage what you can and scrap the rest.

I don't always agree with you George, but I'm with you 100% on this.
 
Last edited:
funny

"... The difference between B737 and a Van's RV, the Boeing has a pressurized fuselage..."

That's a hilarious statement...
 
I don't always agree with you George, but I'm with you 100% on this.

Agreed. There's a lot that George says that makes me raise an eyebrow, but he's on the mark with this one. Cracks happen - but we don't intentionally install them.
 
I was a aircraft structural engineer in a previous life (first Career). I worked for Boeing as a direct and contact engineer for Airbus, British Aerospace, Lockheed, P&W and several airlines. In my opinion cracks are not acceptable. Period. It's just a standard.

With that said CRACKS happen. Fixes include, stop drill crack top (normally not a permanent repair), cut crack out and put in repair, filler/doubler, and #1 most preferred and accepted is replace the cracked part.

Can a crack exist and be OK? I would say no, unless it is inspectable and you inspect it often.

The ISSUE is wide area cracking. ONE CRACK all on it's own can be ok with above mentioned inspections. HOWEVER if you have a lot of cracks all near each other they can "coalesce" quickly, making one big crack. This is the Aloha Airline B737 issue decades ago. Lots of little cracks, each on it's own not a big deal. Lots of these little cracks all in a row in a lap spice not good. The difference between B737 and a Van's RV, the Boeing has a pressurized fuselage.

I hope Van's just replaces parts. For those who have riveted LCP's together or bought a QB with these parts, that is a hard thing to deal with. It would require drilling rivets. I hate to say it, salvage what you can and scrap the rest.

I absolutely agree with you here. I do reliability engineering (Mechanical engineering by degree) for an aerospace company and have seen firsthand the effects of crack propagation. One thing that I do feel Van's has not really addressed is vibration and its effect on crack propagation. Vibration-induced fatigue failures are most common around areas of material that are more brittle (heat-affected zone?!) where the material has lost its elasticity. While I agree with Van's assessment that the planes are not going to fall out of the sky, I also believe that these affected aircraft are going to be a bit of a headache for maintenance. Any crack needs to be tracked and watched for future propagation. With so many parts and the potential for cracks, this in itself is going to be a huge nightmare.
 
I hope Van's just replaces parts. For those who have riveted LCP's together or bought a QB with these parts, that is a hard thing to deal with. It would require drilling rivets. I hate to say it, salvage what you can and scrap the rest.

I struggle with this one.

Would I install a part with known cracks? No, of course not. Would I rip apart a QB fuselage, for example, because there may be a couple of baggage ribs that might be LCP? Im not sure I would.

It's a real judgement call. I think part of the issue is that we don't know exactly what parts are LCP in any given QB kit. Hopefully Vans can change that in the coming days.
 
When will the status of F-1005 be resolved?

We can't tell for sure if our F-1005 (RV-10) is laser or not. No cracks (it is installed) but we don't want to join the tail cone to the fuselage until we determine if this has to be replaced.

thanks
 
We can't tell for sure if our F-1005 (RV-10) is laser or not. No cracks (it is installed) but we don't want to join the tail cone to the fuselage until we determine if this has to be replaced.

thanks

Do you remember or not if there was blue vinyl on the part?
Blue vinyl is a sure sign of CNC punched parts.
At the EAA forum it was noted the laser cutting process is inhibited by the blue vinyl.

As I built I removed the Vans parts sticker from the item and inserted it into the plans page. The date code helped me validate non-LCP parts.

Without that info I would RnR. - dl

Unfortunately we did not prep the parts. Synergy did the quick build so it was already on the fuselage when we got it.
 
And Synergy goes straight to dimple they don’t drill 40 first. On kits with undersize holes I would think this would exacerbate the LCP notch
 
And Synergy goes straight to dimple they don’t drill 40 first. On kits with undersize holes I would think this would exacerbate the LCP notch

A lot of RV-10 parts are final sized now, so not sure this would matter. Synergy uses special dimple dies when they dimple undersized #40 holes.
 
That part, F-1005 is not dimpled.

I feel the focus should not ignore non-dimpled holes. Non-dimpled holes will still have a brittle area caused by the HAZ. Dimples get overly emphasized because the cracks occur instantly after dimpling.

Many of the parts on the red list are high stress elements that have previously had cracking issues on their non-dimpled holes.
 
Weird I have some RV10 Fuselage parts that are definitely laser burnt with notches/no blue.....but they do not appear on the master list at all.
 
Disassembled Too Quickly

I had disassembled the VS 1003 rear spar assembly (spar caps, doubler, rudder hinges) on my -10 emp based on the "recommend replacement" from the original parts list. Looking at the latest list it appears the VS-1003 is one of the parts that's been removed from the list because it was actually not laser cut. I strongly suspected this because my close inspection I could find no cracks or other evidence of laser cut holes. Unfortunately by trying to get ahead of the game i got behind.
 
Yes, that is possible. The parts identification guide that we published/updated in September provides some guidance in that area.​

If we have thoroughly deburred all edges, including the lightening holes, is it still possible to determine by visual inspection if the parts have been laser cut? I was in the habit of removing all rough edges prior to installing a part. Additionally, once a hole has been final drilled/riveted, can it still be inspected for evidence of laser cutting?
 
If we have thoroughly deburred all edges, including the lightening holes, is it still possible to determine by visual inspection if the parts have been laser cut? I was in the habit of removing all rough edges prior to installing a part. Additionally, once a hole has been final drilled/riveted, can it still be inspected for evidence of laser cutting?

It starts to get very tricky. If a part has been fully edge prepped and every hole has had material removed, it’s pretty much impossible.

If the dimpled part is riveted, remove a rivet and look for the crack. My experience is most dimpled holes crack, if not from the dumpling process, certainly the stress of setting the rivet will. I see roughly a 75% crack rate in dimpled #40 holes as it pertains to mis-manufactured laser cut parts.
 
Is Van still doing laser cut parts? I hope not. There is just too much chance for a small "stress concentration".

What if they laser the hole undersize requiring builder drill to final size and deburr? I know that is more work but I built an early RV kit without pre-punched holes.

I noticed Van posted Video a month ago about drilling out rivets. Clearly that would be part of the solution for getting the parts out of the structure.

https://youtu.be/FpkmGbYOCOk?si=GpPgag5ZQq5aS_jM
 
Last edited:
Is this part laser cut (or is a good laser?)

We have an installed F-1005 (center bulkhead) on our plane (the only red laser part in our kit based on the latest list). We drilled out one rivet and don't see a notch. Inspection of a lightning hole and the bigger hole in the center seems to show punch marks but far from an expert in this determination. Any thoughts?
 

Attachments

  • rivet hole.jpg
    rivet hole.jpg
    266.1 KB · Views: 115
  • lightning hole.jpg
    lightning hole.jpg
    230 KB · Views: 114
  • citout.jpg
    citout.jpg
    420.1 KB · Views: 114
Have you primed it?

If not, look for burn marks or splatter. Something that looks like these pictures.
You will notice in one of the pictures the hole has a peak or ridge in it, look for that too.
 

Attachments

  • IMG_4601.jpg
    IMG_4601.jpg
    624.1 KB · Views: 83
  • IMG_4600.jpg
    IMG_4600.jpg
    499.1 KB · Views: 75
Last edited:
We have an installed F-1005 (center bulkhead) on our plane (the only red laser part in our kit based on the latest list). We drilled out one rivet and don't see a notch. Inspection of a lightning hole and the bigger hole in the center seems to show punch marks but far from an expert in this determination. Any thoughts?

Punched holes will all have a smooth almost rolled over edge on the entry point and a slight ridge all the way around the exit point. You can feel this with your finger and see it under the right lighting conditions. LCP's wont have this characteristic.
 
Have you primed it?

If not, look for burn marks or splatter. Something that looks like these pictures.
You will notice ion not of the pictures the whole has a peak or ridge in it, look for that too.
Not all LCP have splatter; some only have a cut at the start/end point.
 
Is Van still doing laser cut parts? I hope not. There is just too much chance for a small "stress concentration".

What if they laser the hole undersize requiring builder drill to final size and deburr? I know that is more work but I built an early RV kit without pre-punched holes.

Good question, but I suspect the answer is no. Remember the whole point of prepunching was for "location", then using a cleco in the hole(s) to pull the parts together. In order for the laser-cut hole to be large enough to accept a cleco, I suspect the HAZ will overlap the area that gets removed during the subsequent match-drill work.
 
Last edited:
We have an installed F-1005 (center bulkhead) on our plane (the only red laser part in our kit based on the latest list). We drilled out one rivet and don't see a notch. Inspection of a lightning hole and the bigger hole in the center seems to show punch marks but far from an expert in this determination. Any thoughts?

Can't tell for sure from those pictures, you need to drill out a dimpled rivet and inspect that hole.

The edges (I take it from your photos that you consider edge and surface prep an optional extra) look more like laser-cut than punched to me.
 
Is Van still doing laser cut parts? I hope not. There is just too much chance for a small "stress concentration".

What if they laser the hole undersize requiring builder drill to final size and deburr? I know that is more work but I built an early RV kit without pre-punched holes.

Laser-cut holes still crack, even if lasered undersize and drilled/reamed out to final size by the builder before deburring and dimpling.

You need magnification to see it, but the crack rate is ~90% on ALL dimpled laser-cut holes. Regardless of whether they are 'good' or 'bad' parts according to Van's, and regardless of whether they are lasered final size or not.
 
Data

Laser-cut holes still crack, even if lasered undersize and drilled/reamed out to final size by the builder before deburring and dimpling.

You need magnification to see it, but the crack rate is ~90% on ALL dimpled laser-cut holes. Regardless of whether they are 'good' or 'bad' parts according to Van's, and regardless of whether they are lasered final size or not.

When you make a global statement like that, you need to have data to back it up. I would be curious to see the engineering data supporting that claim.
 
Can't tell for sure from those pictures, you need to drill out a dimpled rivet and inspect that hole.

The edges (I take it from your photos that you consider edge and surface prep an optional extra) look more like laser-cut than punched to me.

That part has no dimples.
 
When you make a global statement like that, you need to have data to back it up. I would be curious to see the engineering data supporting that claim.

Data might be nice, but I prefer to see the physical evidence in front of my eyes and that's what I've done. I'm also not sure what you mean about 'engineering data' in the context of whether a hole is cracked or not - if you can see a crack then it's cracked, and no engineering analysis is necessary to support the simple assertion that it is cracked.

I have a big pile of LCPs here. Some 'good' and some 'bad' according to Van's, but mostly 'good'. In any laser-cut #42 hole you can run a #40 reamer through, deburr and then dimple, and nearly all of them crack. You may need magnification to see it depending on how sharp your close-up vision is.

Many builders report similar and I've not yet seen any builders on here reporting that none of their LCPs crack, or that it's just the odd hole here and there. I have no reason to suspect that the parts I've received are in any way unique, and Van's has not produced any 'engineering data' on the frequency of cracks or which sorts of holes crack.

What have you observed?
 
Last edited:
Removing HAZ on undersized holes

Laser-cut holes still crack, even if lasered undersize and drilled/reamed out to final size by the builder before deburring and dimpling.

Since this whole thing started I’ve pid very close attention to my match drilling. What I am seeing is that when match drilling most of the time the drill or reamer does not hit the exact center of the pre-made hole. This then results in a a very squished figure-8 hole where part of the original edge is outside of the new hole and this stays as made by Vans.
This is easy to observe when using a thin coat of colored primer, green in my case. I often saw green remaining on part of the hole edge after match drilling even when I tried really hard to line up the holes perfectly.
The factory holes are really close to final size leaving only a few thousands of tolerance for the holes lining up perfectly.
Maybe reaming the holes in the ribs and skin to size individually would remove the complete hole edge on both parts but that doesn’t seem to fit the idea of “match drilling”. I might give that a try in the future.

Long story short, I wouldn’t rely on match drilling removing more than 50-70% of the HAZ/laser cut edge when doing classic match drilling.

-Lars, RV-9 wings in progress
 
That part has no dimples.

Then the fact that they are red-listing a part with no dimpled holes should tell you something, i.e. that they don't believe the problems with LCPs are limited to cracked dimples.

It isn't just holes. All LCPs will, logically, have a HAZ around the edge and in all lightening / clearance holes. Now you may not get cracks there during assembly because (unlike with dimpling) you don't perform operations on them that would cause them to crack, but the metal has still been hardened and become more brittle. Whether sufficiently so to make a difference to anything is another question.
 
Since this whole thing started I’ve pid very close attention to my match drilling. What I am seeing is that when match drilling most of the time the drill or reamer does not hit the exact center of the pre-made hole. This then results in a a very squished figure-8 hole where part of the original edge is outside of the new hole and this stays as made by Vans.
This is easy to observe when using a thin coat of colored primer, green in my case. I often saw green remaining on part of the hole edge after match drilling even when I tried really hard to line up the holes perfectly.
The factory holes are really close to final size leaving only a few thousands of tolerance for the holes lining up perfectly.
Maybe reaming the holes in the ribs and skin to size individually would remove the complete hole edge on both parts but that doesn’t seem to fit the idea of “match drilling”. I might give that a try in the future.

Long story short, I wouldn’t rely on match drilling removing more than 50-70% of the HAZ/laser cut edge when doing classic match drilling.

-Lars, RV-9 wings in progress

Indeed. Match drilling/reaming is rarely dead centre on both holes because one is taking up the manufacturing tolerances to make the parts fit each other. I think the difference between #42 and #40 is about 4-5 thou.

You can minimise the phenomenon you describe by using skin pins instead of clecos. They fill the hole better and thus centre the two holes better. It also helps to be disciplined in keeping more pins in more locations while drilling/reaming.

Most of my experimentation on LCPs has been reaming them on their own, for the very reasons you describe. If that doesn't remove the HAZ completely, then match-reaming with the associated slight offset certainly will not.
 
Skin Pins

You can minimise the phenomenon you describe by using skin pins instead of clecos. They fill the hole better and thus centre the two holes better. It also helps to be disciplined in keeping more pins in more locations while drilling/reaming.

I tried using a punch in the hole next to the one I drilled to help alignment but that wasn’t perfectly successful. Do you have a link to the skin pins you are referring to?

Thanks
Lars
 
When you make a global statement like that, you need to have data to back it up. I would be curious to see the engineering data supporting that claim.

We have something better than a letter. Photo evidence. I encourage more people to provide photos. It makes it harder to ignore.
 

Attachments

  • IMG_0578.jpg
    IMG_0578.jpg
    471.9 KB · Views: 261
  • IMG_0577.jpg
    IMG_0577.jpg
    411.6 KB · Views: 167
Thanks

Pan American Tool carries them, but call them Knurled Cleco Fasteners. They do the same thing and work the same way. They are, or at least were when I bought them a number of years ago, very good quality.

Thanks for the link. I’ll add them to my Christmas list.
 
Back
Top