Van's Air Force

The definitive Van's Aircraft support community! Buying, building or flying an RV? Join our exclusive family of mentors and enthusiasts!

Landing light connector

121mhz

I'm New Here
I'm wondering how everyone else solved this issue. I know I can choose any order for the pins as long as it matches both the female and male side, but I was wondering if there was any consistent answer on how you all were solving this. I searched the forums and contacted Van's Builder support last week but haven't heard back and wanted to keep going with my work.

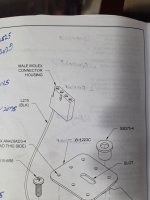
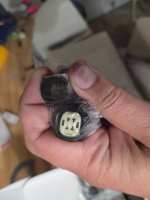
The core problem is that the landing light delivered from AeroLed is no longer being sent with a molex connector (4x1 pin configuration) as showing in the build diagrams. It's now got a square 2x2 connector. I can change the configuration and document the pins on my build sheet, but I was wondering what everyone else did when they ran into the same problem.
 

Attachments

  • 20251111_181424.jpg
    20251111_181424.jpg
    1 MB · Views: 36
  • 20251111_181428.jpg
    20251111_181428.jpg
    1.1 MB · Views: 36
  • 20251111_181515.jpg
    20251111_181515.jpg
    1.3 MB · Views: 38
Yep delt with this. Be sure and go to AeroLed's website and watch plug assembly video. Very helpful. As for pinouts, I just followed the wiring diagram so molex pin 1 went into the Amphenol connector pin 1, etc. You do need to adjust the hole in the fiberglass mount to more of a rounded rectangle. Dremel tool made short work of it. The new plug is moisture resistant and superior to the Molex. Obviously must replace pins on provided wiring harness.
 
Yep delt with this. Be sure and go to AeroLed's website and watch plug assembly video. Very helpful. As for pinouts, I just followed the wiring diagram so molex pin 1 went into the Amphenol connector pin 1, etc. You do need to adjust the hole in the fiberglass mount to more of a rounded rectangle. Dremel tool made short work of it. The new plug is moisture resistant and superior to the Molex. Obviously must replace pins on provided wiring harness.
I presume you mean this:


Sigh. I'm getting old. I hate that I need to watch 4 minutes and 51 seconds for what used to be a single page sheet of paper that I can reference.
 
My advise is to get a proper set of crimpers like these from Steinair and DO NOT use a pair of needle nose pilers like they show in the video!

I can't believe a manufacturer of these fine LED lights would put out a video showing this improper procedure.

View attachment 101923
I actually could not get those exact crimpers to work on the pins first time through. The ears appear to be too long on the connector and when used on a "virgin" pin I got a lot of Z shaped bends that did not crimp the wire. My solution was to follow the video and start the the crimp with needle nose pliers then finish it off with the crimper. I agree the video method struck me as being a bit wonky and concur with Tony that those pins need a real crimp, thus my hybrid method. I also could not find just the pins to buy separately without buy a large quantity so ended up just buying a couple of complete plug kits from AeroLed, the penalty for my learning curve.
 
The ears appear to be too long on the connector and when used on a "virgin" pin
On one Stein video, he trims the excess ear length with a side cutter, and then bends the ears in somewhat by hand. Then he uses the crimpers. (If I’m understanding you correctly). It may be a Stein Molex connector video.
 
I used the Molex connectors as supplied. However, these are not waterproof. If I were building again I would use waterproof automotive connectors instead, such as the Deutsch DTM series.
 
Back
Top