What's new
Van's Air Force

Don't miss anything! Register now for full access to the definitive RV support community.

I've "finished" the empennage - attach control surfaces now or wait?

bertschb

Well Known Member
Friend
I've finished all I can with my empennage. The only thing left is the empennage fairing which I can't work on because it's included in the Finish kit which I don't have yet. I have the horizontal stabilizer and elevators temporarily attached to the rear fuselage (hardware isn't torqued). I'm hesitant to attach the VS and rudder because I have a hunch I'll be asked to remove them later. Plus, I only want to use the attach hardware once. And finally, it's easier for me to roll the rear empennage around without the VS and rudder attached.

Soooooo, for those of you with finished airplanes - did you permanently attach the HS, elevators, VS and rudder for the empennage before starting the fuselage and wings?
 
The short answer is no. You will only need to take them off again.

But, if you have time to kill you can temporarily mount the tail feathers to work the fiberglass bits. If you have a lot of time to kill go ahead and fill in the end ribs with glass. This adds a nice “finished“ look but nothing else. You can tell people this is a speed mod to get another five knots out of the plane - I’ll keep your secret.

Carl
 
But, if you have time to kill you can temporarily mount the tail feathers to work the fiberglass bits.
Thanks for the reply Carl

I completed all the fairings but I did not fill in the end ribs. Kind of burned out working with fiberglass. An extra five knots huh???? I already picked up three by using the optional flush screws for the inspection covers :)
 
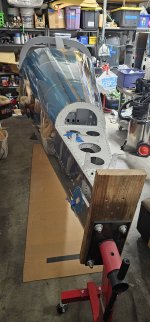
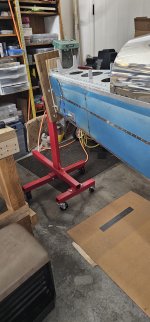
I mounted the body on 2 harbor freight engine mounts to make a rotisserie. Soooooooo much easier to do tasks. Lost count of how many times it's been on it's side, upside-down back to right side up, some times multiple times a day. Having the tail feathers on would make it really hard. Riveting the big join was way easier this way.
 

Attachments

  • 20240206_184953.jpg
    20240206_184953.jpg
    1.4 MB · Views: 58
  • 20240206_185008.jpg
    20240206_185008.jpg
    1.3 MB · Views: 58
I mounted the body on 2 harbor freight engine mounts to make a rotisserie.
Dang! I forgot all about the Harbor Freight rotisserie technique. I had planned to do that so I'll be removing the HS and elevators tomorrow as I start my fuselage build.
 
I mounted the body on 2 harbor freight engine mounts to make a rotisserie. Soooooooo much easier to do tasks. Lost count of how many times it's been on it's side, upside-down back to right side up, some times multiple times a day. Having the tail feathers on would make it really hard. Riveting the big join was way easier this way.
Did you mount the tail cone on the rotisserie or after joining to the fuselage?
 
The outboard rib of the HS on each end (adjacent to the elevator counterweight) is sometimes glassed in. As stated, it's mainly for appearances to give that a clean look. If you're racing and looking for every single reduction in drag that you can find, that may yield an incremental increase.

One caveat: some of the RVs have a service bulletin where you have to drill in through that HS end rib and do borescope inspections of the outboard elevator hinge attach point. Not sure if that applies to yours or not, but glassing that area in would make that inspection a little more cumbersome.
 
One caveat: some of the RVs have a service bulletin where you have to drill in through that HS end rib and do borescope inspections of the outboard elevator hinge attach point. Not sure if that applies to yours or not, but glassing that area in would make that inspection a little more cumbersome.
Not really. The borescope does not care about slight change in access hole dimensions.

Carl
 
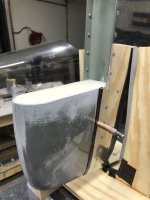
It looks like this when glassed in. I figured at least 20kts :) Didn't take much time. Looks 'finished'.
HS Tip Fiber Layup.jpg
 
Back
Top