What's new
Van's Air Force

Don't miss anything! Register now for full access to the definitive RV support community.

Is this slosh?

rcsilvmac

Well Known Member
I have over 200 hours on my RV-6A that I purchased 4 years ago. If you inspect my gas tanks by looking in the fuel filler hole, they look pristine, with some sealer around the edges of the ribs and braces. I knew enough to be wary of tank sloshing but my inspections showed no signs of sloshing.

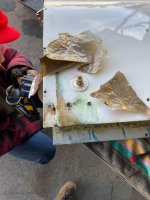
This weekend I removed my tanks (again) since I have a few persistent leaks. Upon inspection it was clear it was coming from the fuel tank sender cover. Whew...I am not looking forward to cutting 5" holes in my tank...

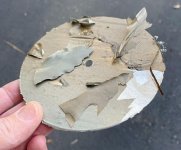
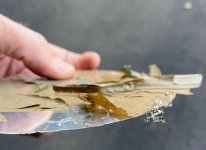
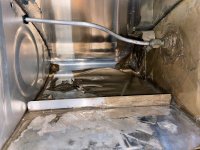
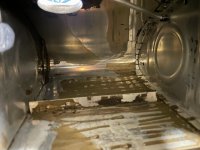
We remove the fuel sender cover and when I look in the tank, I see something that looks and feels like brown paper. This paper is flapping around and has some stringers starting to develop. See the pictures.

My question - is this slosh? Why would it not be visible on the inside compartment of the tank (where fuel filler is)? Would there be a reason the builder would have sloshed just the outside compartment?

Of course I need to remove all this - so I am moving forward on cutting access holes. Will research forum on best method to get this out of my tanks.

Thanks
 

Attachments

  • IMG_5523.jpg
    IMG_5523.jpg
    424.9 KB · Views: 708
tank slosh

Your question has many answers.

It is more than likely a slosh of a sort cause who would put a brown paper bag in the tanks.
More than likely whom ever owned the plane before you, seen the loose slosh in the inboard section and removed it so it wouldn't show when they sold the plane. Tricky little devil.
Now you get to open up the backs of the sections and dig, remove the excess.
Get a tank repair kit from Vans and go for it.
New senders don't cost that much, so maybe replace them also.
There are threads on this forum about removal and clean up.
Have fun.
Maybe you will even solve the leak problem at the same time.
My three cents worth Art
 
Don’t know what that material is other than bad news.. Slosh material that I’ve removed from a set of tanks was more like a rubbery paint material. Another set of tanks had stiff resin material in them.
Looks like what ever that material is, it will have to come out. I’d sugggest you clean out the first bay, open an access hole to the next bay & progressively open the third bay etc. till you get all that material out of all affected areas.
Not a great activity for anybody’s holiday season for sure!
 
Cutting holes

I have the repair kit on the way and plan on working my way into the tanks. I can't believe how fortunate I have been to not have any clogging issues. I drain before every flight and have never seen any debris in my fuel.

I will let everyone know what I find.
 
During the period of time of the late 80s to early 90s that slosh use in the tank was recommended in the construction manual, a product from Randolph was being recommended. Once cured it was a hard whitish colored material. At that time the construction manual recommended its use only by hand brushing a layer over the sealant on all ribs before installing the rear baffle, and then around the perimeter of the rear baffle. So the instructions specified to add some into the tank through the still uninstalled tank access cover with the tank positioned leading edge up. Then you were to rock the tank so that the slosh ran around the perimeter edges of the rear baffle to put a coating over that joint since it has always been the one that is most problematic for builders to have leak free. Afterwords you were to remove all of the excess/material that was left in the inboard bay of the tank. So if the instructions were followed precisely, all you would see in a slashed tank when looking through the fuel filler opening would be some white color right along the bottom corner and up the aft corner of the outboard rib. It seems that the Randolph/compound has always done a good job of adhering well to tank sealant. The big problem has been that it did not adhere well at all, to just bare aluminum. Particularly if it was still shiny and not scuffed on the surface.
 
Looks like a few mis-drilled holes in the front support as well.
Never seen any slosh like that before.
 
THAT is not slosh..... It IS the reason Van's went to blue colored film to protect sheets of aluminum.

There were some quick build tanks built in 1998 that the (then clear) film, was NOT removed.
 
Cutting the holes in the rear baffel and then repairing them is not a big deal. You did 50% of the work removing the tank. That material does not look like slosh, but it my be a home-made equivelant attempt.

Some tools I would sudgest to make the job easier:

Cut the rar 1/2 0ff of this tool to cut perfict holes in the rear of the cells without risking a fly cutter catching: https://www.mscdirect.com/browse/tn...UBcuzJKaZl8jokLdywQaAnqBEALw_wcB&gclsrc=aw.ds

Try one of these dremmel extensions for cleaning up the surfaces to be sealed inside the tanks:
https://www.walmart.com/ip/42inch-1...ible-Shaft-For-Dremel-Power-Rotary/1900927986

These go in the dremmel extension: https://www.safcodental.com/catalog...hatho-miniature-scotch-brite-polishing-wheels

This light placed inside the tank and used in conjunction with an inspection mirror makes it sooo much easier to see what you are doing than an external light or a beam light: https://www.homedepot.com/p/Milwaukee-300-Lumens-LED-Magnetic-Flood-Light-2108/306261360
 
During the period of time of the late 80s to early 90s that slosh use in the tank was recommended in the construction manual, a product from Randolph was being recommended. Once cured it was a hard whitish colored material. At that time the construction manual recommended its use only by hand brushing a layer over the sealant on all ribs before installing the rear baffle, and then around the perimeter of the rear baffle. So the instructions specified to add some into the tank through the still uninstalled tank access cover with the tank positioned leading edge up. Then you were to rock the tank so that the slosh ran around the perimeter edges of the rear baffle to put a coating over that joint since it has always been the one that is most problematic for builders to have leak free. Afterwords you were to remove all of the excess/material that was left in the inboard bay of the tank. So if the instructions were followed precisely, all you would see in a slashed tank when looking through the fuel filler opening would be some white color right along the bottom corner and up the aft corner of the outboard rib. It seems that the Randolph/compound has always done a good job of adhering well to tank sealant. The big problem has been that it did not adhere well at all, to just bare aluminum. Particularly if it was still shiny and not scuffed on the surface.

Scott is reporting what I remember while building. Working in the Aerospace Industry, I knew that scuffing was required if ProSeal or slosh was going to stick.

There was a YELLOW slosh that was also available but the YELLOW slosh could NOT be put over the WHITE slosh. The YELLOW slosh was NOT ethanol resistant but the WHITE was suppose to be ok with auto fuel.
 
Looks like a few mis-drilled holes in the front support as well.
Never seen any slosh like that before.

Here is the Service Bulletin about clear sheeting left in the tank:

https://www.vansaircraft.com/service-information-and-revisions/sb-04-2-1/

Yes, the front support really needs some attention. There is a service letter about how to modify the support system with a slot and platenut to reduce the likelihood of ripping out that part of the tank if the wing is involved in a leading edge collision (off-airport arrival).

I would replace the support while you have access to that bay and modify it per the service letter.

Edit: I thought the forward mount mod was a service bulletin from Vans but I can't find it on their site or in my docs:

https://www.vansaircraft.com/service-information-and-revisions/?aircraft=rv-6&doctype=all&sort=date

AH-HAH! Found it.....1st issue of the 1998 RVator (I just dated myself...):
 

Attachments

  • tank-fuse-bracket.jpg
    tank-fuse-bracket.jpg
    394.6 KB · Views: 308
Last edited:
It's hard to say what it is by the appearance alone. There will be some more clues from inspecting inside and whether it extends over the polysulfide seam sealer.
My tanks also had a problem (soft sealer) that required opening up to clean them out. I used a fly cutter and cordless drill to make the hole in each bay, about 30 mins per hole on very slow speed. I subsequently took the rear baffle completely off to get better access to clean everything out because it was too difficult trying to work through the holes.
It's a fair bit of work and not a fun job but it just has to be done.
 

Attachments

  • 20221122_131904.jpg
    20221122_131904.jpg
    242.8 KB · Views: 162
Last edited:
Here is the Service Bulletin about clear sheeting left in the tank:

https://www.vansaircraft.com/service-information-and-revisions/sb-04-2-1/

Yes, the front support really needs some attention. There is a service letter about how to modify the support system with a slot and platenut to reduce the likelihood of ripping out that part of the tank if the wing is involved in a leading edge collision (off-airport arrival).

I would replace the support while you have access to that bay and modify it per the service letter.

Edit: I thought the forward mount mod was a service bulletin from Vans but I can't find it on their site or in my docs:

https://www.vansaircraft.com/service-information-and-revisions/?aircraft=rv-6&doctype=all&sort=date

AH-HAH! Found it.....1st issue of the 1998 RVator (I just dated myself...):

That same issue also reported 1814 completed RV's.......
 
THAT is not slosh..... It IS the reason Van's went to blue colored film to protect sheets of aluminum.

There were some quick build tanks built in 1998 that the (then clear) film, was NOT removed.

If that’s the case, film not removed, it will also, most likely, be under the ribs.
 
Looks like original covering

I cut open my first bay hole. The material looks like the original protectant material. In some places it is coming loose, in others it is very well attached (at the moment).

I tried to remove it with a wire brush on a Dremel, to no avail, or at least not easily.

Is there a good way to remove this material? If is glued down tight, do I still need to get down to bare aluminum?

Suggestions?
 

Attachments

  • IMG_5536.jpg
    IMG_5536.jpg
    376 KB · Views: 127
  • IMG_5538.jpg
    IMG_5538.jpg
    214 KB · Views: 102
Tanks

Personally if I was faced with this problem I would build new tanks.

Just my 2p worth

Hope you get it resolved

Rob
 
Remedy

I don't like saying this but I think you're between a rock and a hard place!

The material, whatever it is, will need to be fully removed due to the risk of loose debris blocking the fuel pickup tube at some point.

In order to get access to the inside of the rear baffle it will need to be removed from the tank, which involves drilling out the rivets. It can be done! In the meantime, you could try some heavy duty paint stripper on the removed disc piece to see if it's feasible to loosen or dissolve the coating.

New tanks may be an option, but if your kit is from before the time that Vans pre-punched the skins then it is going to be challenging to fit the new tanks to the wing. The mounting screw holes would have been manually laid out and match drilled by the builder and will need to be duplicated on the new tanks, somehow.

All of this is true. I think sometimes the easy solution is to bite the bullet and do the job right on the first effort. IMO, the easy solution is to remove the rear baffle and use a plastic scraper to remove all of whatever you're seeing in the tanks. You could even use razor blades if you rounded the corners and took care not to dig in with the blade.
 
Definitely take the rear baffle off. Working through 5” holes is almost impossible.
I would be temped to build new tanks if your plane is prepunched. If not you can send them to Weeps No More and have them really clean and resealed. Shipping would be high.
 
Eating the elephant

I am going to remove the material from existing tanks. The plane was built in 1995 (corrected), I don't think new tanks are an elegant option.

Vans recommended Polygone to possibly help loosen the material. I am ordering that and will work on each baffle at a time to get it cleaned, and then reseal with Proseal.

Will provide update here after I make some progress - probably early next year.

Thanks for advice!
 
Last edited:
When you get these tanks open, please show us some pictures of the problem. The metal in my 1991 RV-6 kit had no film on them.
Real curious one here.
Thanks Art
 
I am going to remove the material from existing tanks. The plane was built in 1985, I don't think new tanks are an elegant option.

Vans recommended Polygone to possibly help loosen the material. I am ordering that and will work on each baffle at a time to get it cleaned, and then reseal with Proseal.

Will provide update here after I make some progress - probably early next year.

Thanks for advice!

I assume you mean built in 1995? 1985 would have been before kits were even available.

If the airplane was completed in 1995 it is highly unlikely the substance found in the tanks is protective vinyl. That is about the time it was just being introduced into the production processes at Van's.
 
1995

Apologize, plane was "1994-1995" for the kit. Sorry!

Here are a few pics inside the right and left bay of the first tank I cut into. I had already pulled out some sheets that were peeling away.
 

Attachments

  • IMG_5539.jpg
    IMG_5539.jpg
    337.6 KB · Views: 225
  • IMG_5541.jpg
    IMG_5541.jpg
    269.6 KB · Views: 180
That’s when I bought my kit and while I remember removing the plastic film from most parts I can not remember if the tank skins had it.
Regardless, if it is the protective film and the film was not removed under the ribs I would be concerned about that joint holding its seal or integrity long term. It would be a shame for you to put a lot of work into the tanks just to have them start to weep down the line.
I’m no expert, or fortune teller, just offering a point for you to consider. It should be relatively easy to check to see if the film is under the ribs with the tank opened up.
 
a pressure washer can be useful in these cases. Get an edge going and it will strip it right off. A right angle head would be the ticket.
 
Based on the latest pictures, that looks like slosh because it extends over where the AN fitting goes through the rib and also over the angle stiffeners, so almost certainly not the protective clear sheeting.

If you use Polygone it will dissolve the polysulfide sealant that is under the slosh, which may not be a good thing. I also don't know if Polygone will dissolve the actual slosh, possibly not.

I cleaned out my tanks of degenerated gooey Proseal using paint thinners containing a high percentage of toluene and it did not damage the Proseal that was still sound. MEK will potentially also dissolve the slosh remnants that remain after peeling off.

Some tips for removing the back baffle:
The access holes will help when separating the internal ribs from the baffle.
The paint on the skin will need to be stripped off in order to drill out the rows of flush rivets.
A thin blade paint scraper can be inserted and worked in the joint to break the sealer.
Some builders have mentioned using a length of thin safety wire as a garotte to cut through the sealer.
 

Attachments

  • 20221125_155812.jpg
    20221125_155812.jpg
    268.8 KB · Views: 163
  • 20221127_100952.jpg
    20221127_100952.jpg
    305.4 KB · Views: 145
Last edited:
This is a scary thread! Hope you figure out and share what this stuff is and how it got in there.
 
What is this stuff? Besides Scary....

This is a scary thread! Hope you figure out and share what this stuff is and how it got in there.

I bought the first kits of my RV-4 in 1992 and there was no protective film on anything. No holes drilled either.....:p
 
making progress

I was able to remove about 95% of the coating with a plastic scraper and lots of fingernails. There is still some on one surface that will require a little more coaxing. I plan to try Goo Gone and/or MEK first. I have ordered some Polygone, but it won't arrive for a few weeks.

Vans support felt it was slosh. I tend to agree since I do see some of the material around sealant, so it wasn't on the original aluminum sheet.

The amazing thing is this plane has been flying for 27 years. I always take a fuel sample before every flight and never noticed anything. I also always look inside the tanks before I gas it up and never had anything floating. Both fuel pickup screens were clean, although one had a small amount of stuff around it that could have been a piece that came off into the fuel.

I am taking the week off to be with family and will resume attacking this in early Jan.

Thanks again for all the suggestions!
 
I assume you mean built in 1995? 1985 would have been before kits were even available.

If the airplane was completed in 1995 it is highly unlikely the substance found in the tanks is protective vinyl. That is about the time it was just being introduced into the production processes at Van's.

You were very close.....

rv6.JPG
 
Second tank is clean

I opened up the first hole in the second tank and there was no slosh inside this tank. I used a camera to look into the rest of the tank and each bay was clean, except the sealant used on the seams. This means that one tank had some sort of sealant added. I have removed the vast majority of this material, but there is one spot that wouldn't come off with fingernails. I tried Goo Gone but that didn't work. Next, I will try some thinner material. I will let everyone know what works.
 
I've just been down this road with my 1988 kit RV-6. The Goof Off worked. If the Goof Off dissolves it I'd suspect it must be slosh. The stuff out of my tanks was kind of thin and paper like when it dried out. I used a electric pressure washer as Mike W. suggest. It helped quite a bit.
Think of it as a character building exercise.
Good luck
Skip
NC
 
You were very close.....

View attachment 35611

Seems like I was right on the money:rolleyes:

But the web site page you linked to is actually only partially correct...

The RV-6 was introduced first. In 1986.

The RV-6A prototype was introduced in 1988 and as far as I am aware, there was never any hint released prior to that time that indicated that there would even ever be tri gear model.

I first saw it at its first major public appearance at Oshkosh 1988. I began building one 3 months later.

My fault for trusting Van's website without confirming.... I know **** well that the A came way after the 6 was introduced...:(

You are correct.....:eek:
 
Back
Top