Van's Air Force
You are using an out of date browser. It may not display this or other websites correctly.
You should upgrade or use an alternative browser.
You should upgrade or use an alternative browser.
Installing engine isolators order sequence
- Thread starter Webb
- Start date

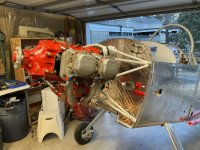
It is to install the top two isolators first, followed by the bottom two (as recommended by the Van's construction manual) for Dynafocal engine mounts.I have heard there is an install order that makes mounting the engine easier. I am stilling looking for the answer but no joy at this time. If this is correct, please advise.
It took me 1/2 day to hang the engine, working on my own. It helped to have an engine crane, drift pins and dental mirror to help align the bolt holes. The final isolator needed to pulled sideways into alignment with a loop of rope and a 6' timber lever.
The cotter pins are tricky to install and the bolts can be torqued from the head side only. I needed to grind down the outside of a ring spanner to get it to fit on the nut.
NB the isolators need to go in the correct orientation so the compression part takes the load, which is different for the top versus the bottom mounts. The details are on the plans.
Top two first is the only significant "order of operations" issue.I have heard there is an install order that makes mounting the engine easier. I am stilling looking for the answer but no joy at this time. If this is correct, please advise.
I Installed my engine alone in about 40 minutes. It was during covid and I did not have access to any help. Got creative. I taped rubber mounts on motor mount. I used a mirror to make sure holes lined up before trying to insert bolts. Started at the top and tightened bolts slightly. Raised or lowered engine as necessary. I used pipe insulation to protect engine and mount.


I found this helpful. You will need to grind down the crescent wrench slightly to slide it between the pushrod tube and the end of the bolt on the upper left islolater (especially after the bolt has been tightened!). The closed end of the crescent wrench is the best side to use to hold the nuts while you tighten the bolt from the head side.
Attachments
The 2 top ones went in nice and easy just like the ones in Tony’s video. Number 3 took a little coaxing and in it went. Number 4 required me to call a friend.
Afterwards, we discussed what he normally does which is bottom first because you have a lot more room at the top to work in. That being said, I already had 3 in so when he got there, it was a non event for him. Big event for me.
Again, thank you for the help.
Afterwards, we discussed what he normally does which is bottom first because you have a lot more room at the top to work in. That being said, I already had 3 in so when he got there, it was a non event for him. Big event for me.
Again, thank you for the help.
Attachments