What's new
Van's Air Force

Don't miss anything! Register now for full access to the definitive RV support community.

Ideas - Slide out radio stack - Hw to ?

n4322b

Active Member
I'm scratching my brain for ideas to build a slide in/out radio stack with garmin boxes. Being able to withdraw the stack and then disconnect the d-subs, rather than having to reach up behind the dash, is the objective of course.

Avoiding drilling the ribs for each tray is another preference and instead, to mount the trays in a subframe with less / no fixings to the main structure. Akin to the dynon chassis for their screens in some respects.

But as there's very little clearance either side of the stack against the ribs as it is, perhaps the subframe sitting on a horizontal captive rail would be rigid enough ? With a GTN650 at the bottom of the stack that would give the back end support too.

Ian
 
I guess I'm not understanding the benefit to having the entire stack slide out. The individual boxes already do that in their respective trays?
 
Last edited:
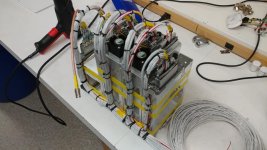
I think the OP means the whole rack slides out, not the component. Some stacks are practically impossible to work on (think re-pinning etc..) since the rack is so deep and there is no working room. Some folks will run all the wires from the Dsub or edge card connector back from the connector end towards the panel front along one side. This creates the equivalent of a long service loop although the tray screws and any support structure attachment must be removed for that to work. Here is a photo showing a very organized version of this concept shamelessly stolen from the Garmin Avionics Enthusiast page from Ted Saylor:
 

Attachments

  • Garmin Service Loop.jpg
    Garmin Service Loop.jpg
    58.2 KB · Views: 244
I think the OP means the whole rack slides out, not the component. Some stacks are practically impossible to work on (think re-pinning etc..) since the rack is so deep and there is no working room. Some folks will run all the wires from the Dsub or edge card connector back from the connector end towards the panel front along one side. This creates the equivalent of a long service loop although the tray screws and any support structure attachment must be removed for that to work. Here is a photo showing a very organized version of this concept shamelessly stolen from the Garmin Avionics Enthusiast page from Ted Saylor:

Hi Jim

Yes that's a neat install but as you say the wiring doesn't come with the unit when it's withdrawn from the tray.

Yes I'm expecting some re-pinning and to do so, being a large frame, I'd rather be doing that right way up in the daylight rather than upside down and cramped.

The additional benefit of not drilling the ribs will I hope benefit later owners who may want to change the avionics fit.

Ian
 
T-channel

I used T-channel for my avionics installation. The channel is mounted vertically with captured square nuts. This allows for an infinite number of height installations within the radio stack. Once the radio mounting screws are started into the captured nuts I can slide the radio up or down where I want it. Then I tighten the screws to hold it in place.

Perhaps you could modify your radio installation location to allow for horizontal T-channel. It would certainly expand the width of the radio(s) installation but it might work.

http://www.mykitlog.com/users/display_log.php?user=sdahrens&project=248&category=9948&log=231424&row=12

Not my idea I copied someone else's work that was posted here on VAF.
 
On the panel I worked for and RV-14A I was disappointed with how Van’s locks in the panel install. Making it removable as an assembly requires some innovation.

The RV-10, 8, 8A and 6 panels I worked were built so they come out as an assembly with only a few minutes of work. This makes life a lot easier and meets the design goal of “never on your back with your head under the panel”. For the RV-14 I don’t see a path to do this unless the radio stack portion of the panel is not a supported by the per plan ribs. Perhaps hard mounting the trays to the front plate, then adding a detachable support at the back of the stack to the next bulkhead is viable.

I wonder if any aftermarket panels address this problem.

Carl
 
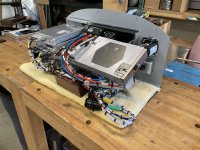
Cut opening in the panel for the stack you want to pull out. Make a sub panel that is held in place on top of the other panel by screws and. A large CPC connector and a long service loop will allow you to pull that sub panel out and quickly disconnect the wiring and you can the work on the sub panel on the bench.

I did this for my center section on the 8. It also allows you to easily work on the back side of other panel components.
 

Attachments

  • IMG_0725.jpg
    IMG_0725.jpg
    504.7 KB · Views: 205
  • IMG_5856.jpg
    IMG_5856.jpg
    462.3 KB · Views: 141
One of the nice "features" of the Garmin stack design is that once the radio boxes are removed from their respective racks, the back plates can be separated from the racks. the "D" shell connectors can then be accessed and rewired as necessary. Not fun, but doable.
 
I used T-channel for my avionics installation. The channel is mounted vertically with captured square nuts. This allows for an infinite number of height installations within the radio stack. Once the radio mounting screws are started into the captured nuts I can slide the radio up or down where I want it. Then I tighten the screws to hold it in place.

Perhaps you could modify your radio installation location to allow for horizontal T-channel. It would certainly expand the width of the radio(s) installation but it might work.

http://www.mykitlog.com/users/display_log.php?user=sdahrens&project=248&category=9948&log=231424&row=12

Not my idea I copied someone else's work that was posted here on VAF.

Hi Scott,

Yes I saw those channels and I like the idea som much that I considered them for my 7. I can't see how to make them work vertically as theres too little clearance against the ribs on a 14 and it doesn't allow me to withdraw the stack as one. But yes they might work horizontally.
Ian
 
On the panel I worked for and RV-14A I was disappointed with how Van’s locks in the panel install. Making it removable as an assembly requires some innovation.

The RV-10, 8, 8A and 6 panels I worked were built so they come out as an assembly with only a few minutes of work. This makes life a lot easier and meets the design goal of “never on your back with your head under the panel”. For the RV-14 I don’t see a path to do this unless the radio stack portion of the panel is not a supported by the per plan ribs. Perhaps hard mounting the trays to the front plate, then adding a detachable support at the back of the stack to the next bulkhead is viable.

I wonder if any aftermarket panels address this problem.

Carl

Theres more thought gone into the 14 that the 7 tipper for the avionics stack so no issue there. Maybe I'm being too ambitious.

The captive nuts system that is mentioned above is neat, doesn't solve the stack removal directly, but is also too wide for the clearance between the ribs on a 14. The idea may well work horizontally though I need a slidable, or detachable in one move from underneath, solution

I'm moving my thoughts towards a rigid bottom plate suspended and fixed between front and back panels with the stack built onto it with thinner vertical straps and thin angle brackets to the front plate which vans has neatly arranged as a detachable section.

Thanks to all for the suggestions so far though !
 
Back
Top