Recently picked up a 6 project and I'm going through it, trying to find everything that appears to need to be fixed before I go further.
I've been e-mailing Vans on this with regard to the best way they'd recommend a repair. They don't seem to think the longeron needs to be replaced and this can be worked through, so that's a great thing, but it was suggested I run it by this group, so here it is...
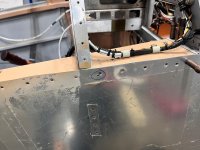
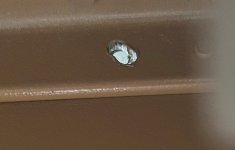
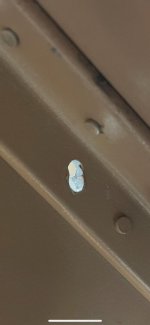
I'm really not sure what happened here and it is completely not representative of the rest of the build, but something got squirrely here.
This is the upper longeron, just in front of the instrument panel "bulkhead." Long time operator, first time builder and I don't have the plans set yet to call out specific part numbers. This is where the upper skin that covers the avionics bay will be riveted.
It looks like I should, I believe, be able to maintain MED on them. I checked the distance as best I could with a dial caliper and I'm showing ~0.20" from the edge of the hole to the edge of the longeron, that should give me better than ~0.20" from the center of the hole.
Vans has thus far suggested possibly an "oops rivet" with a "rivet washer" or small doubler tab might be a good idea.
But, I thought I'd run it by you guys..
I've been e-mailing Vans on this with regard to the best way they'd recommend a repair. They don't seem to think the longeron needs to be replaced and this can be worked through, so that's a great thing, but it was suggested I run it by this group, so here it is...
I'm really not sure what happened here and it is completely not representative of the rest of the build, but something got squirrely here.
This is the upper longeron, just in front of the instrument panel "bulkhead." Long time operator, first time builder and I don't have the plans set yet to call out specific part numbers. This is where the upper skin that covers the avionics bay will be riveted.
It looks like I should, I believe, be able to maintain MED on them. I checked the distance as best I could with a dial caliper and I'm showing ~0.20" from the edge of the hole to the edge of the longeron, that should give me better than ~0.20" from the center of the hole.
Vans has thus far suggested possibly an "oops rivet" with a "rivet washer" or small doubler tab might be a good idea.
But, I thought I'd run it by you guys..