Thanks Bruce for letting me visit. I like how you ran the the wire bundle straight out the bottom of the stick and along the connecting rod between the two sticks then to the Sub D connectors. Appreciate the help and have a happy New Years! If anyone has pictures they would like to post feel free. As lorne has said its a topic that goes on and on but many builders are just getting to that stage or at least around the corner from it. They also know there is a tunnel somewhere in their life of the RV build that WILL HAVE A LIGHT IN IT! So I say to the finished builders lets keep this forum question alive for all the new comers.
Ron in Oregon RV9A
Thanks, Ron, it was great seeing you when you stopped by!
For anyone interested, here's what I showed Ron. This is how I did mine. I haven't flown it yet, but I'm confident that this will carry me safely for many years.
First, I experimented just running the wire bundle out the bottom of the stick to see if there was room enough without binding or chafing problems. The Tosten grips I'm using have a 10-wire bundle coming down the stick. I encased the bundle in some heat-shrink tubing. I also grabbed my aileron pushrod and inserted the rod-end bearing in place, to make sure that with both bearings in place, I still had the clearance I was looking for. This pic was taken with my inspection mirror sitting on the floor of the fuselage, looking up at the bottom of the stick. Clearance is no problem, there's plenty of wiggle room.
Here's another shot, taken on the bench. By this time, I encased the wire bundle in some snake-skin and more heat-shrink tubing:
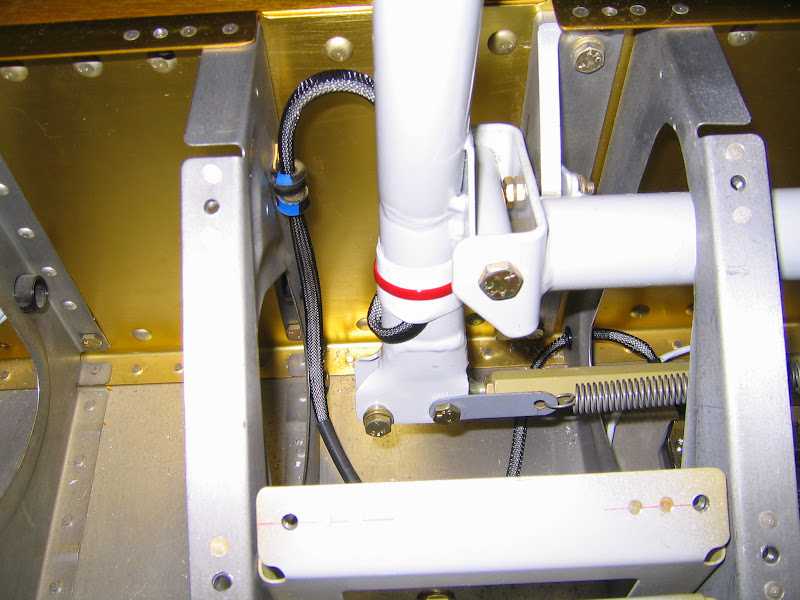
There's a lot of movement going on at the bottom of the stick as you fly the plane. I thought about it a lot, and realized that perhaps the best way to minimize friction and potential chafing would be to secure the wire bundle here and relocate the "movement zone" over to the side. So I secured the wire bundle to the connecting rod between the two sticks with some 3/4" heat shrink tubing. I put the stick through all possible motions it will encounter, and the wire bundle barely moves at the bottom of the stick in this position. So far, so good!

Here's a shot of my setup after doing the other side. Depending on which bay you want the wire bundles to go into, you shorten or lengthen the heat-shrink needed on each side. This is how mine turned out. Also, as I thought about it, I wanted to protect the wire bundle from any possible cracking or splitting of the heat shrink tubing, over time. So I secured each end with some white wire-tie lacing for added strength. Overkill, perhaps. But I feel confident about it never failing. Also, by this time, I added some spiral wrap on the zone of most movement, and I crimped on some pins and installed a d-sub connector.
Here's the complete setup, ready to install back in the fuselage.
The two d-sub connectors plug into this board that I bought on eBay. I fastened it to the seat rib, then a single wire bundle goes forward from here up behind the panel to complete all the wiring. So both sticks are fully functional. The passenger stick is easily removable by simply pushing a spring button and pulling it out. I imbedded d-sub connectors in the passenger stick which plug and unplug as you put the stick in or take it out.
All the movement of the stick translates into these wire bundles moving side-to-side in the bay you route the wire bundles into. The snake-skin, heat-shrink, and spiral wrap will protect the wire bundle from any harm. I figure it should last thousands of hours before any wear or tear becomes noticeable.
Any questions or comments are greatly appreciated.
")