Van's Air Force

The definitive Van's Aircraft support community! Buying, building or flying an RV? Join our exclusive family of mentors and enthusiasts!

Help with oversized Snap bushing hole

RNB

Well Known Member
Sponsor
Pics and video to be attached, might help understand if I dont write clearly.

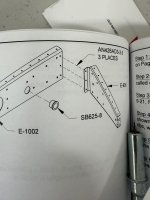
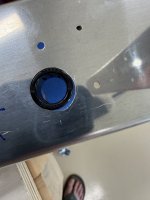
RV10 elevator build. I'm trying to install what I think is called a snap bushing. I must have oversized the hole and the bushing does not fit. What is the correct fix for this?


ARGH!
 

Attachments

  • IMG_9511.jpeg
    IMG_9511.jpeg
    1.7 MB · Views: 38
  • IMG_9510.jpeg
    IMG_9510.jpeg
    1.3 MB · Views: 37
Edge distance. Otherwise, a bigger bushing would be fine. I am not a Vans Engineer. I always measure bushings before drilling holes and even then sneak up on the correct size reamer.
 
Edge distance. Otherwise, a bigger bushing would be fine. I am not a Vans Engineer. I always measure bushings before drilling holes and even then sneak up on the correct size reamer.
And now I know...
My wife always said I'll get good by my 3rd. build.
 
What are you using to drill the hole? It is far from round and the edges are not clean. Might need to improve your technique.
 
What are you using to drill the hole? It is far from round and the edges are not clean. Might need to improve your technique.
I probably used a air drill and a step drill bit
In the future, I’m going to use a drill press to better control my depth
I was probably holding onto the piece instead of having it clamp down which I will improve upon also
 
I’d go to the next size, 750-9, but I’d ask vans on the bigger size if it’s ok. Doesn’t look like there would be any edge distance issues from the picture of the plans.
 
First off. Get rid of those silly flip flops. We are not building a boat. ;)

Next time use a step bit in hand drill, easy and slow.
Blue tape on bit for size limit marking.
I’d just go up a size on bushing, and look for my death Crocs….
 
I probably used a air drill and a step drill bit
In the future, I’m going to use a drill press to better control my depth
I was probably holding onto the piece instead of having it clamp down which I will improve upon also
A little tip, I'm sure you know, but just in case. Figure out which ring on the step drill is the last one you want to cut then use a marker to color the next ring. When it spins, it's easy to see where you need to stop.
I agree. Always good to clamp the part in a drill press.

Also, good to invest in a few reamers. Save the unibit for tight spaces.
 
Many of us would just 3d print a custom bushing, or just glue that sucker in there with a dab of proseal. Build On!
My opinion: no need to bother Vans with this or get too wrapped up about it. You have a whole airplane to build.
It looks like you're already just about at a 750 upsize.
 
I probably used a air drill and a step drill bit
In the future, I’m going to use a drill press to better control my depth
I was probably holding onto the piece instead of having it clamp down which I will improve upon also
There are at least a couple styles of step bits that I've come across - the kind with spiral flutes and the kind with straight flutes. For me - the spiral kind were hard to control, especially on the end of an air drill. It tended to "grab" the thin material and bend it, also leaving a rough out-of-round hole. I've since gone with the battery hand drill (as others have suggested) and exclusively the straight-flute style.
 
Get familiar with the Heyco catalog - SB's are available in almost any combination of ID, OD, and panel thickness. (www.heyco.com)

As others have stated, use the right tools and techniques when drilling holes -- initial size, through up-size; Pay attention to "edge distance" (2D from hole center); maintain structural integrity, yield strength.

....and use appropriate foot wear ;)
 
Back
Top