What's new
Van's Air Force

Don't miss anything! Register now for full access to the definitive RV support community.

H2AD Baffles

Lionclaw

Well Known Member
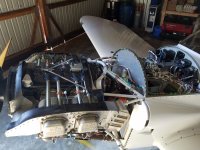
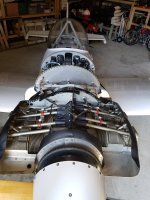
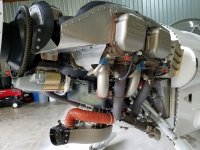
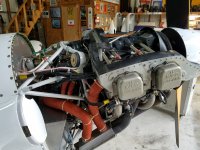
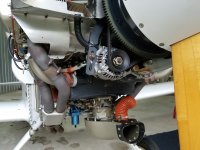
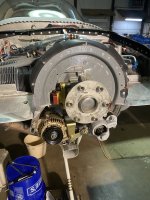
I'm working on the baffles on my o320-h2ad powered 9a. So far I've been pretty happy with how they fit considering the engine is quite a bit different.

I do have a few issues though:

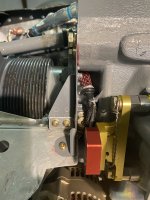
1. I had to add a joggle around the filler tube. Will there be any issues putting the rubber on top at the joggle? Any problems with the oil door opening right on top of the baffle?

2. The baffles don't fit the contour of the engine very well. Would making small filler pieces of aluminum and riveting them on be ok? How close should the metal come to the engine? Fill small gaps with high temp RTV?

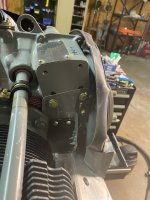
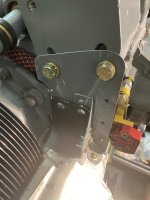
3. The edges of the upper engine mounts are pushing in on the baffles slightly. Should I add a double here, or strips of nylon to prevent damage?

All pics here: http://picasaweb.google.com/pilotandy/RV9AH2ADBaffles#

Any help is greatly appreciated!

017.JPG
 
Hi Andy

Arh...those baffling baffles...I remember the same issues when I fitted the H2AD to my RV6 project. I did it a little different.

1. I did not have a joggle around the oil filler neck. I completely remade that right rear piece so that it was flat and would butt right up against the rear of #3 cylinder.That allowed this piece to lay in front of the engine Boss/casing that is shown in your pic #6&7. I also had to shorten the #3 cylinder end/top plate and bend a 90deg. flange on it to attach to the rear plate. The reason for this is two fold,this fixed the oil door baffle seal problem and also allowed the oil cooler to be mounted on the flat surface right up against the cylinder so it would be clear of the engine mount. The oil filter adapter has the hose fittings facing the right side of the engine so mounting it on the right made sense(same as the c172). I also made a doubler for the end plate and a .061 plate for the cooler opening. Have you given some thought to the oil cooler size and location? I tried the firewall setup from vans with the standard 0320 cooler fitted and run with 3'' scat. This proved totally inadequate so I changed to the larger positec type for the 200hp engine and moved it to the right baffle and oil temp now runs at 185/200 in all weather. I found out latter that the C172n that these engines come from is standard with a SW 599 cooler. The small bracket that you show in pic#3 gets remade from some .061 angle and is fashioned to be riveted on and pick up that open 1/4 hole in the middle of the pic. Also keep in mind that the cutout in the top cowl for the oil door only has to be about half the size as that specified by Vans because the filler neck ends up being about 3/4" below the top cowl and you don't have to reach around inside to top up with oil like the other engine models. If the opening is small enough you should be able to run the baffle seal material in front of the opening.

2. Your fit to the engine contour is ok and as you say a little high temp RTV and they should be fine. The left forward section of baffle will not fit at all so I just riveted a section on to accommodate the different crankcase shape.

3. I had the same issue with the left upper engine mount. I modified that piece so it laid forward a bit and would lay flat against the engine mount boss were the bolt comes through. That left piece is a very tight fit, I also had to notch a section to go around the lower part of the cylinder flange and have to remove the Lord mount nut and bolt enough to remove that part of the baffling. I fitted a 2" scat flange to that piece so I could run air to the cabin heat muff.

I hope you can follow what I mean. I could pull the top cowl and take some pictures for you if you wish?
It took me many hours to figure some of this stuff out at the time so I know what you are going through!!
Wait to you get to the front half!!

Regards
Graham
RV6 H2AD 200hrs
 
Last edited:
Thanks for the tips Graham. The front is indeed interesting! I'm going to have to reinforce some of the areas where I carved a bunch of material away. Did you go around the mount (I'm assuming governor mount?) on the front like this?

003.JPG
 
Thanks for the tips Graham. The front is indeed interesting! I'm going to have to reinforce some of the areas where I carved a bunch of material away. Did you go around the mount (I'm assuming governor mount?) on the front like this?

003.JPG

No, you can't go around the governor mount like that. The governor mount as well as the fuel pump are already to high for the top cowl to fit and require cutouts and "bumps" to be glassed on to allow the top cowl to come down to meet the bottom. The only way is to mount that front piece more forward. I made mine in two halves and made brackets that picked up on the bolts/threaded holes in the crankcase parting flange, governor pad & fuel pump to hold it on.

Anyway, they say "a picture is worth a thousand words" so I went to the hanger and took some for you today. Click here http://picasaweb.google.com.au/airtractor8/H2ADBaffles?feat=directlink
Pic #11 shows you what I mean about the gov. pad. There's also some pics of the "bumps" and a shot of the underside cowl showing the mods to the inlet ramps to make it all work .

I hope this stuff helps you out. Its just the way I did it,I'm sure there is others in here that may have done it differently but no ones talking!!

Keep us informed on your progress and feel free to ask more questions. Don't forget to post a few pics of the finished product!

Cheers & Beers
Graham
 
Last edited:
Thanks Graham! Those pictures are great. I had completely forgotten about the top cowl when I was making that piece. I'll be doing that center piece tomorrow, and it looks like I'll be going in front.
 
Hey Andy, I have a question for you. I notice that your cylinders have a green painted stripe between the pushrod tubes indicating that they have been bored to .010" oversize. Were you able to purchase 9:1 compression pistons in .010" oversize for the H2AD or did you have to go with .010 over in 8.5:1 pistons common to many of other 0320's? I know that at one point Superior were making .010 pistons for the H2AD but no one knows about that over here. I haven't been able to find them anywhere, all I hear is "never heard of them"!! Can you tell me if they are still available and where did you buy them from? Also what approximate cost did your cylinder overhaul run to with piston,valves and boring etc.?

Regards
Graham
 
Last edited:
Sorry I missed your last post Graham. I'm working on routing fuel/oil lines and I came back to look at your photos.

I took my cylinders to a local shop and had them overhauled. OH total was $2k. Tag shows parts replaced were valve keys, exhaust guide, ring set, exhaust valve, and piston for each.

The tag doesn't have the part number for the pistons. I'll have to take a look inside and see what they are. I do remember the guy had some trouble getting the pistons. The first ones his supplier got him were wrong, and it took him a few extra weeks to get everything sorted.
 
I bought my engine for $2300 on ebay, and I got lucky that it was in such great shape. It was at 2100hrs, no prop strike, and logs included.

I have about $8k in the engine right now including accessories. All parts were sent out for OH. Crankcase, crank, cam, rods, gears, cylinders. Everything came back yellow tagged, new limits on crank. I got an overhauled carb, mags, and fuel pump from ACS.

If my time didn't cost anything (I don't usually factor it in so long as I'm learning something) this would seem like a great way to go for someone like me, who doesn't have a huge pile of money to play with. If money was plentiful I would probably go with the new Lyc from vans or a clone engine from a reputable builder.

I'm a bit too timid for prop-strike engines, so if it's the $7k mid-time prop strike engine I would probably stay away.
 
Andy, Thanks for the advise, I appreciate you sharing your story on the engine. I was looking at the one with the prop-strike, however, there are a number of that model on Barnstormer. I don't have the money right now to purchase the engine, but it is time to order my finish kit, so I need to have a plan. Thanks for your help.

Jim
 
No problem. If you want to leave the option for an H2AD engine open, be sure to specify the H2AD engine mount when you order your finish kit. I believe it will fit any other dynafocal I engine, the only difference being the bar across the top is curved to allow room for the H2AD crankcase.
 
Andy,
Where did you get the baffling that you used? Did you get the kit from Van's or another way? I am putting a H2AD on the front of a 9A. The BAF-320 parts didn't impress me as being an easy fit.
 
Graham,
I was wondering where you got your baffling for your H2AD. Did you get the BAF-320 kit from Van's or a different source? I am putting a H2AD on the front of a 9A and struggling some to say the least. Thanks.
 
Andy,
Where did you get the baffling that you used? Did you get the kit from Van's or another way? I am putting a H2AD on the front of a 9A. The BAF-320 parts didn't impress me as being an easy fit.

I used the vans baffle kit. I'll take some more pictures next time I go down to the hangar. Overall it wasn't too big of a deal converting it for use on the h2ad engine. I was really surprised how many of the bolt holes lined up. Places where there were problems: around the engine mount bolts, around the oil filler tube, the attach bolt near jug #3, and the vertical dam around the front. In addition I'm still going to have to go and rivet pieces in to match the contour of this engine.
 
How is the h2ad different from other models?

The h2ad has an integral accessory case, removeable engine mount blocks, barrel lifters, front mounted fuel pump, un-machined front mounted governor pad, stamped rockers, more cylinder head oil flow, a single mag gear driving a dual mag, and a sump that makes an un-modified throttle bracket impossible to fit.

It certainly has installation issues, but they aren't impossible to overcome. It seems like the h2ad cores have been selling for ~$2-3k lately, which makes them attractive. I'd certainly recommend anyone thinking about buying one do some serious research first.
 
Graham,
I was wondering where you got your baffling for your H2AD. Did you get the BAF-320 kit from Van's or a different source? I am putting a H2AD on the front of a 9A and struggling some to say the least. Thanks.

I started with the 0320 baffle kit from Vans. The cylinder end plates fit up as standard and the bolt pattern is the same as other 0320's. Most of the other parts and brackets do fit with some re-work. It just takes more thought, time, cutting and filling to make it all work. I think the baffle kit is a very good place to start from even though it requires a lot of re-work. Andy's and my pictures should give you some good ideas as to whats involved.

Cheers
 
Sale at VANS!

Stopped in at VANS to pick up a part and asked about the baggage tie downs, Page 64 in their 2009 catalog. Their listed at $33 bucks apiece but NOW only $16 each! The rating is 4000 lbs on the package for the tie downs. By the way the last two times I was there I saw THEE MAN DICK, walk the steps upstairs ( not sure whats up there)2 steps at a time!!! Thats Vans for you always trying to save TIME because TIME is money. If you ever get to go back into warehouse its like Fort Knox, you just want to rub-up against all those RV parts! The people are always wonderful too! Ron in Oregon
 
I too found the Van's kit a good start too. Joggled it in front of oil filler tube too. The rest fabricated like others mentioned and I like the soft red silicone baffle material to seal the cowl. Yours looking good..(as others)

FWIW ...I saw on your photo the upper cowl piano hinge & celeco's for fiberglass cowl section to firewall installation. I think you will need 2 doors, to access the hinge pins and the oil filler ???.... or one very large door to get your arm in there to pull hinge pins? And I believe folks have talked on having big doors and noticable raised effect at high speeds like flexing & air gaps? I am old, memory is same....LOL ...but I did reinforce even the small door and surrounding area well... epoxied in with alum & rivets...

To avoid the 2 door route (wisdom from others I pass along) .... I did a small oil door directly over filler. Then I used cam locks for the top row...as per these photos.....The normal piano hinge down the top to bottom...and the entire bottom fiberglass nose part....

I have never broken a piano hinge section, nor broke or found a cam locks up during preflights or after.. they stay put...my top lid comes on/off easily for service and fast. Many of our local RVrs wished they did this too...

MVC-002S.jpg


MVC-011S.jpg
 
Last edited:
The camlocks look like a great idea. I deviated from the plans a bit when I cut my hinges. Because the oil door will be closer to centerline, I made the two hinge sections almost even. The last time I had the cowl fitted I noticed a bit of pillowing where there wasn't any hinge. I was thinking of going with the small 1.5"x3" access door for the hinge pins, and it could have a joggle to hold the cowl even with the forward top skin.

The camlocks seem like an elegant alternative though, and I'm not fully committed (riveted) to the hinges yet. I'll have to do some research.

I posted some new photos in my baffles gallery the other day with annotations. Hopefully someone will find the pics useful. Graham's album was a huge help. I'm pretty much copying his fuel line routing.
 
H2AD

Hi Andy,

I have and H2AD in my 9A which I have been flying for 682 hours now. I can send you some pics of my installation when I get back home if you like? I am out of town and limited as to the internet right now. I can give you a call also (might be easier). I have no concerns with my installation. Sure it was some work to fit the baffles etc, but the engine has performed well. Mine was a factory overhaul with 780 hours on it at time of purchase. ($5,000)

Regards,
 
I have reviewed this post and unfortunately all of the links to any reference pictures no longer work. I am hoping that someone would be able to post some photos of the H2AD baffles that sit at the front of the engine just behind the ring gear. I have all of the other baffles installed but I’m chasing down a high temperature issue on Cylinder #3. Hoping the additional forward baffles will help the issue. Thanks in advance for any assistance.
 
I have reviewed this post and unfortunately all of the links to any reference pictures no longer work. I am hoping that someone would be able to post some photos of the H2AD baffles that sit at the front of the engine just behind the ring gear. I have all of the other baffles installed but I’m chasing down a high temperature issue on Cylinder #3. Hoping the additional forward baffles will help the issue. Thanks in advance for any assistance.
I have an H2AD in my-4. I fabricated all my own baffles without using any of the VANS kits. Pretty easy, and I started by building the entire thing from beer boxes (perfect cardboard). I then transfered to metal. I have pictures when they were naked without the seals and stuff if you need. I did have to relocate the oil door, as the H2 dipstick is in a different spot.
 

Attachments

  • 20190710_163845.jpg
    20190710_163845.jpg
    3.4 MB · Views: 10
  • 20190710_163805.jpg
    20190710_163805.jpg
    1.6 MB · Views: 9
  • 20180612_193550.jpg
    20180612_193550.jpg
    3.4 MB · Views: 9
  • 20180612_193607.jpg
    20180612_193607.jpg
    3.5 MB · Views: 11
  • 20180612_193856.jpg
    20180612_193856.jpg
    3.4 MB · Views: 11
Back
Top