What's new
Van's Air Force

Don't miss anything! Register now for full access to the definitive RV support community.

Got burned on page 25-03 (fuselage bearing bracket assemblies)

bertschb

Well Known Member
Friend
On the first day of my empennage build last October I made a mistake on the first page (I started on the HS). It was a VERY depressing way to start my build but I learned from it. I learned to read each step slowly at least FIVE times before you do anything. I've since read about several other people who made the exact same mistake so that made me feel slightly less inept. Just slightly.

Fast forward to today - the first day of my fuselage build and I made a mistake on the second page. This is the part where you countersink a bunch of holes of various sizes into the left and right bearing bracket assemblies. I swear I stared at the plans for 30 minutes trying to understand what to do before I did anything. Read the steps way more than 5 times and still screwed up. I read the part where you double flush rivet the #40 holes and that got my mind stuck on double flush riveting so I ended up countersinking all the holes on all four brackets. Dang!

Thankfully I only need to replace two inexpensive parts (F-01450-L and R) that weren't even primed yet. I guess I'm kind of surprised this is only the second time I've had to replace parts but I know it will NOT be the last. What scares me the most is making a mistake on something buried deep in a fully assembled structure. I know it's coming....

I read it five times too. And I taped over holes where I wasn't gonna be doing it so I didn't make a mistake. I think I was still somehow moments away from messing it up once :)
 
Taping over holes is a great way to minimize errors. Writing directly on the airplane with magic marker is another. Use arrows if needed to point out what size rivet goes in what holes, etc. This is really important when there is a change of rivet sizes in a row of rivets, etc. Having this information right in front of your face on the airplane makes it a lot easier than looking at the plans and then heading over to the airplane trying to remember what goes where.

Another aid is to "prebuild" every page in your head before you ever approach the plane. Go step ty step, see what you are going to do, be sure it makes sense and that you have the parts all there and the tools to do the job. If it doesn't, call or email someone for a clarification. Write notes on the plans and/or on the airplane as needed.

But even before you do that, get as many colors of highlighters as you can find. When you are "prebuilding" step by step, highlight every part number in the text and then use the same color to highlight that number everywhere it appears on the drawings that go with that text. That way instead of seeing the part number involved in your next step and then combing the plans to see where it goes when you are ready to build it, you simply say, "this blue part in the text goes with the blue part highlighted on the drawing." Then do it for red, orange, yellow, etc. If you run out of colors on a page with a large number of different parts, just draw a circle or box around the part number in the text and the corresponding part number in the drawing, both in the same color.
 
Taping over holes is a great way to minimize errors. ...highlight every part number in the text and then use the same color to highlight that number everywhere it appears on the drawings that go with that text.
I do both of those things. I use 1/4" blue Scotch tape to tape over holes. I also use that tape to separate sections on parts so I don't move from one section to another without thinking first. I also refer to the color coded plans that were sent to me by a friendly forum member. Finally, I refer to the Wiki plans daily before I do anything.

But, my failure in this case was not spending enough time trying to understand how the bearing bracket assemblies were used later. I did look forward in the plans but still didn't fully understand how the brackets were connected to other parts - and then moved forward with countersinking anyway. I knew better but by then I had already spent half an hour on this simple step and was tired of re-reading the plans, Wiki, etc.

Before I start working on the replacement parts I plan to gather all the parts called out later in the plans and cleco them together so I FULLY understand how the brackets are finally attached.

As I said before, I'm actually astounded that this is only my second mistake (mistake = need parts replaced) after working daily on my airplane for four months. After my first screw up on my first build day on the first page, I figured I was doomed to replacing parts every week.
 
Last edited:
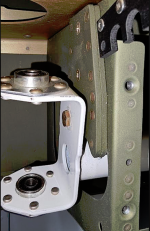
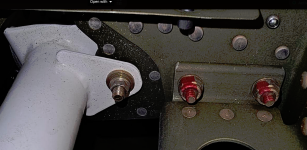
OK updated the WIKI and adding these pics for future builders. The gist of this build is everything outboard is flush with 6 total rivets inboard flush. Double flush riveting will become obvious.

1707872266238.png
1707872249640.png
 
Another couple pieces of advice on these brackets is to make sure all the holes are aligned. On some brackets, the bearing recesses on the two halves are not aligned correctly. When the bearing goes in, it will cause the rivet holes to not line up. Mine were misaligned and even though Van’s said “build on”, I wish I would have swapped them out.

The other advice is to ensure the bearing moves without any friction. It should spin freely in all directions after riveting. If there is any friction, it will affect the setup of the elevator later. Avoid getting primer in the bearing recess because this will apparently cause binding of the bearing.
 
Back
Top