Hi, I have been around for a while and now I finishing a RV4. I apologize if this has been asked before, I know its a well talked out issue. Maybe this is different? I have a 4 that was mostly built 20 years ago and the tanks look really good inside, the workmanship is clean and neat. I have filled one tank with water and now on the 2nd day of testing. My question is should I put a small amount of pressure on the tank? Maybe just some head pressure through the fuel line? 2nd question. Does the Pro Seal go bad with out fuel in it? The Pro Seal looks good and is not pealing or flaking. Am I worried about nothing. I am ready to paint the wings and I know they will never look the same if I have to take them out after painting. Thanks Curtis

Van's Air Force
You are using an out of date browser. It may not display this or other websites correctly.
You should upgrade or use an alternative browser.
You should upgrade or use an alternative browser.
Fuel Tank Concerns
- Thread starter slip rv
- Start date

BoydBirchler
Well Known Member
Pro seal isn't only used in fuel tanks; I have seen it on pressure bulkheads that was still viable after 30 years, So no, I think it does not need fuel against it to stay viable.
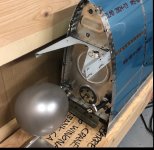
The Vans method of testing per the construction manual is to lightly pressurize the tank with air and a balloon and then spray soapy water on the outside to detect leaks. Trying to test with water instead will be less effective because water molecules are bigger than air molecules and may not detect leaks that would be detected by following the instructions and using air. Good luck with your test and I hope there are no leaks, but if there are any then it is straightforward to fix.
sansoneservices
Well Known Member
No water, light pressure and inflated balloon. 24hrs later balloon should still be inflated
Water is a crappy medium for leak test. The surface tension is too high. Lots of related threads here...... I have filled one tank with water and now on the 2nd day of testing. My question is should I put a small amount of pressure on the tank? Maybe just some head pressure through the fuel line? 2nd question....
To avoid over pressurizing the tank:
-attach balloon to fuel pickup fitting on tank.
-blow with your lips into the vent fitting and inflate the balloon.
-Slip a second ballon over the vent fitting or cap it quickly.
-If you have leaks use soapy water to find it them.
-attach balloon to fuel pickup fitting on tank.
-blow with your lips into the vent fitting and inflate the balloon.
-Slip a second ballon over the vent fitting or cap it quickly.
-If you have leaks use soapy water to find it them.
Get the water out put 100LL in them for your checks. They should be fine, I work with Proseal every day in the big jet world and have re-sealed many RV's. I built my RV4 , and my tanks went almost 15 years before I put fuel in them . 15 years of flying, no leaks. Fuel is thinner than water and will be the real test. You can do it with about 5 gallons and flip the tank in different directions, letting it sit a few hours each way...unless they are installed already.
Thanks for the reply's. And Happy Easter. I heard about the balloon trick but thought water was simple. I will do that also and use the soapy water. I am putting the wings in a rotisserie for painting today. Tanks are installed so I might add fuel while still in the rotisserie and rotate them around.
Curtis
Curtis
Best way is the Vans way modified with a manometer. Lots of posts here over the years showing how it is setup. It is so satisfying to come back the next morning and see the manometer in the same level - assuming you correct a bit for atmospheric pressure.
And Snoop is the best liquid for finding small leaks. Basically a weak glycerine solution, but these guys have it down to perfection. Cheap at your local Swagelok supplier, but can be had on amazon too: https://www.amazon.com/Snoop-Leak-8...cphy=9060261&hvtargid=pla-2281435180778&psc=1
And Snoop is the best liquid for finding small leaks. Basically a weak glycerine solution, but these guys have it down to perfection. Cheap at your local Swagelok supplier, but can be had on amazon too: https://www.amazon.com/Snoop-Leak-8...cphy=9060261&hvtargid=pla-2281435180778&psc=1
Sam Buchanan
been here awhile
I wouldn't put any sort of solvent (fuel) in the tanks prior to painting. If it leaks and ALL the solvent isn't removed you could very well have paint adhesion problems that may not show up for quite a while (months....years?). Just use the Vans air/balloon method, it is simple, very accurate and won't contaminate the tank.Thanks for the reply's. And Happy Easter. I heard about the balloon trick but thought water was simple. I will do that also and use the soapy water. I am putting the wings in a rotisserie for painting today. Tanks are installed so I might add fuel while still in the rotisserie and rotate them around.
Curtis
Use a heavy duty balloon, not a party store cheepo. Also a bit of Fuel Lube on the fittings helps seal the balloon.Hi, I have been around for a while and now I finishing a RV4. I apologize if this has been asked before, I know its a well talked out issue. Maybe this is different? I have a 4 that was mostly built 20 years ago and the tanks look really good inside, the workmanship is clean and neat. I have filled one tank with water and now on the 2nd day of testing. My question is should I put a small amount of pressure on the tank? Maybe just some head pressure through the fuel line? 2nd question. Does the Pro Seal go bad with out fuel in it? The Pro Seal looks good and is not pealing or flaking. Am I worried about nothing. I am ready to paint the wings and I know they will never look the same if I have to take them out after painting. Thanks Curtis
Attachments
Yup, the soapy water is the test, but the ballon itself can also help tell the story on possible leaks. I left my tanks pressurized with the ballons for as long as it took for them to deflate. The ballons would grow and shrink with temperature and baro pressure and I would measure the circumference of the ballon daily. naturally, the ballon itself will eventually leak thru the rubber. (If you blow one up, they always deflate in time.)
So, after the soapy water check, it took over 2 weeks for them to slowly get smaller and smaller as they leaked thru the ballon. Both tanks took about the same time to finally loose their pressure, and it just helped the insure there were no leaks other than the ballons themselves.
So, after the soapy water check, it took over 2 weeks for them to slowly get smaller and smaller as they leaked thru the ballon. Both tanks took about the same time to finally loose their pressure, and it just helped the insure there were no leaks other than the ballons themselves.
I continue to wonder why so many people continue to think the balloon is the test for whether one has leaks or not.
Please read Van’s instructions and the many, many, many, many past posts on this sight about testing fuel tanks for leaks.
Simply leaving a balloon attached to a tank and seeing air still in the balloon after a measure of time does NOT insure there are not leaks in a tank. Here is a simple test to show how barometric pressure and/or heat will affect that pressurized balloon. Seal the tank, pressurize it until the balloon has expanded. Now move that tank out into the sunshine. Watch what happens to the balloon. It will expand. If you move it back out of the sun and the ballon contracts, does that mean there is a leak in the tank?
The soapy water will definitely show leaks. One other piece of advice about finding leaks. If you find a leak after a test, seal the leak, let it cure, then test again. You may find additional leaks that did not show up during previous leak tests. The reason is, the previous leak was larger than the new one, so the new leak did not have the pressure on it necessary to show the leak because the air pressure was making its way out the other larger leak. Once that larger leak is sealed, the pressure finds the smaller leak and makes its way out of it now.
Thanks for the reply's . I completed the balloon test and soap and water with no sign of leaks. I moving on the to the next task.
I see this new SB I received on the fuel tank float? (F-385B and F-385C Fuel Senders.) Because I did not build this tank I don't know if this effects mine. I'm researching this now?
Curtis.
I see this new SB I received on the fuel tank float? (F-385B and F-385C Fuel Senders.) Because I did not build this tank I don't know if this effects mine. I'm researching this now?
Curtis.
I read the SB to mean that the float rod is bent differently if you have replaced or are installing the new floats that Vans now sell, and that they have new drawings depicting the new bends for the new senders. If you are continuing with the old senders, nothing is required.
Correct me if I am wrong.
Correct me if I am wrong.
Thanks for the info. I am using the old ones.I read the SB to mean that the float rod is bent differently if you have replaced or are installing the new floats that Vans now sell, and that they have new drawings depicting the new bends for the new senders. If you are continuing with the old senders, nothing is required.
Correct me if I am wrong.
CC
FlyingDutchman257
Active Member
You don't have to let it sit for hours. If you have a leak you will see the balloon deflate within few minutes. Of course when one does the test, you don't take the tank outside and put it in the sun or make any other dramatic changes to the test environment. Any test results will be invalidated that way.I continue to wonder why so many people continue to think the balloon is the test for whether one has leaks or not.
Please read Van’s instructions and the many, many, many, many past posts on this sight about testing fuel tanks for leaks.
Simply leaving a balloon attached to a tank and seeing air still in the balloon after a measure of time does NOT insure there are not leaks in a tank. Here is a simple test to show how barometric pressure and/or heat will affect that pressurized balloon. Seal the tank, pressurize it until the balloon has expanded. Now move that tank out into the sunshine. Watch what happens to the balloon. It will expand. If you move it back out of the sun and the ballon contracts, does that mean there is a leak in the tank?
The soapy water will definitely show leaks. One other piece of advice about finding leaks. If you find a leak after a test, seal the leak, let it cure, then test again. You may find additional leaks that did not show up during previous leak tests. The reason is, the previous leak was larger than the new one, so the new leak did not have the pressure on it necessary to show the leak because the air pressure was making its way out the other larger leak. Once that larger leak is sealed, the pressure finds the smaller leak and makes its way out of it now.
You will always find something which can be done better, but most people do not have the equipment. Leak test on tankpanels of a DeHavilland dash 8-400 is done with helium and a heliumsniffer. Works well, But do you have the equipment for it?
Even on other airliners, tanks are ok. Until the aircraft makes a positive landing or the fueltruck boosts the pressure and blows the sealant out. A wetwing will never stay 100% for decades and decades.
Going to disagree. If properly applied and not damaged through maintenance, it will outlast the airframe. My Mooney tanks had original sealant at 50 years old when I sold it. This though I admit avoiding non-paved airfields. Mooney gear are very stiff even with new discs. That stress has to be absorbed somewhere...... A wetwing will never stay 100% for decades and decades.
Per the DeSoto engineers, some B52s have original sealant that was 50 years old (over 20 years ago) and there's a LOT of flex in those wings. Proper application, quality of workmanship, etc makes a big difference.
FlyingDutchman257
Active Member
Going to disagree. If properly applied and not damaged through maintenance, it will outlast the airframe. My Mooney tanks had original sealant at 50 years old when I sold it. This though I admit avoiding non-paved airfields. Mooney gear are very stiff even with new discs. That stress has to be absorbed somewhere.
Per the DeSoto engineers, some B52s have original sealant that was 50 years old (over 20 years ago) and there's a LOT of flex in those wings. Proper application, quality of workmanship, etc makes a big difference.
Of course you disagree. A 50 year old Mooney is the benchmark we all work too. And exactly these claims pose a danger to others.
Sealants can last a long time, but certainly not forever. There are problems at present which appear to hang together with usage of G100UL fuel. Newer aromatics (xylene) being used might have an affect on older sealants. Further researc is in progress at present. Reports came from 2 Mooney owners by the way.....
What you claim is physically and chemically impossible. It belongs in the same catagory as epoxy based paints hardening out below 15 degrees C. In addition, due to health concerns, the chemical make up of sealants has changed dramatically. Both in USA and Europe.
Never said forever. You made a statement and I supplied personal anecdote and a known fleet history that strongly contradicts that.
Your paint curing/interlinking example has zero to do with polysulfide longevity.
Your aromatic additive is subjective as there's no clear direction on future no-lead aviation fuels and was never the target fuel for the Desoto engineers.
"Danger to other"? Please and BTW; the new application techniques (faying) are far superior to the original filleting apps. Nothing like a little drama on a Monday.
Edit = Maybe a true practitioner like @fixnflyguy will chime in. Whatever his vast experience reveals, I'll go with.
Best way is the Vans way modified with a manometer. Lots of posts here over the years showing how it is setup. It is so satisfying to come back the next morning and see the manometer in the same level - assuming you correct a bit for atmospheric pressure.
And Snoop is the best liquid for finding small leaks. Basically a weak glycerine solution, but these guys have it down to perfection. Cheap at your local Swagelok supplier, but can be had on amazon too: https://www.amazon.com/Snoop-Leak-8...cphy=9060261&hvtargid=pla-2281435180778&psc=1
Roger that
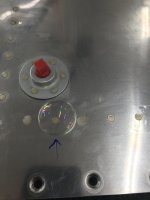
In all of VAF the most misunderstood procedure is the bubble test. You don’t want to spray bubbles on the tank. You want to put liquid on the tank and look for a tiny bubble that forms in it over minutes. To detect a leak of the size you can see with a leak detection fluid bubble test (10^-3 CC/sec ATM) in a 20 gallon tank using the Vans recommended 1 psi pressure (28 inches of water) you would have to wait 12 days to see a 0.28” change in the manometer. The best you can do is put the appropriate pressure on the tank with a balloon or manometer and hand pump and carefully look for leaks with the bubble test. The ballon is intended to be a pressure source. Even with a leak big enough to drip the ballon will change in size a tiny amount in 24 hours. I too think Snoop is the best. In the picture you can see the huge bubble on the rivet but if you look at the ones beside it the fizz on the other rivets are big leaks. The Snoop was applied with a cotton ball. The big bubble started forming immediately. The fizz on the others over the course of a minute.
Attachments
Last edited:
FlyingDutchman257
Active Member
I don't have a clue. Sheetmetalworker over 25 years (shop supervisor), worked on A380 ribfoot mods (tank work) and licenced EASA engineer on A320/A330/B737NG. Faying sealant has always been applied between surfaces (not a new technique by a long stretch of the imagination) and then B over the fasteners and and as fillet. Followed by A. Consult the Boeing or Airbus SRM if in doubt, Chapter 51 refers.Never said forever. You made a statement and I supplied personal anecdote and a known fleet history that strongly contradicts that.
Your paint curing/interlinking example has zero to do with polysulfide longevity.
Your aromatic additive is subjective as there's no clear direction on future no-lead aviation fuels and was never the target fuel for the Desoto engineers.
"Danger to other"? Please and BTW; the new application techniques (faying) are far superior to the original filleting apps. Nothing like a little drama on a Monday.
Edit = Maybe a true practitioner like @fixnflyguy will chime in. Whatever his vast experience reveals, I'll go with.
I have seen enough in my RV4 imported from USA. 25 odd years of condition inspections by several A&P's. None of them picked up on no edge distance, snowman holes, rivets practically on top of one another, etc, etc. Not a coward, but I play it safe. Anecdotal evidence doesn't cut it over specs and manuals with me, I'm afraid.
End of the discussion as far as I'm concerned. Discussions like these are the reason I rarely respond.
Maybe you misread my post when you quote it I can't tell if you are finding fault with it. I like the manometer to set the pressure in the tank more than the balloon. And I like snoop for the leak detection fluid bubble test, it's awesome. If you think that I suggest just hanging the manometer as the sole test you are mistaken. If there is a leak the Snoop will show it immediately there is no waiting for it.
In all of VAF the most misunderstood procedure is the bubble test. You don’t want to spray bubbles on the tank. You want to put liquid on the tank and look for a tiny bubble that forms over minutes. To detect a leak of the size you can see with a leak detection fluid bubble test (10^-3 CC/sec ATM) in a 20 gallon tank using the Vans recommended 1 psi pressure (28 inches of water) you would have to wait 12 days to see a 0.28” change in the manometer. The best you can do is put the appropriate pressure on the tank with a balloon or manometer and hand pump and carefully look for leaks with the bubble test.
Sorry man. Didn’t mean to disagree. Quite the opposite.Maybe you misread my post when you quote it I can't tell if you are finding fault with it. I like the manometer to set the pressure in the tank more than the balloon. And I like snoop for the leak detection fluid bubble test, it's awesome. If you think that I suggest just hanging the manometer as the sole test you are mistaken. If there is a leak the Snoop will show it immediately there is no waiting for it.
Mike
I don't have a clue. Sheetmetalworker over 25 years (shop supervisor), worked on A380 ribfoot mods (tank work) and licenced EASA engineer on A320/A330/B737NG. Faying sealant has always been applied between surfaces (not a new technique by a long stretch of the imagination) and then B over the fasteners and and as fillet. Followed by A. Consult the Boeing or Airbus SRM if in doubt, Chapter 51 refers.
I have seen enough in my RV4 imported from USA. 25 odd years of condition inspections by several A&P's. None of them picked up on no edge distance, snowman holes, rivets practically on top of one another, etc, etc. Not a coward, but I play it safe. Anecdotal evidence doesn't cut it over specs and manuals with me, I'm afraid.
End of the discussion as far as I'm concerned. Discussions like these are the reason I rarely respond.
There's a distinct difference between being intelligent and being knowledgeable. Thanks for the data point.
Despite what you've stated based upon your opinion/anecdotal observation only, Polysulfides useful life can be many decades and has been validated hundreds or thousands of times over.
Still have zero idea how any knowledgeable person can compare sealant longevity with paint cure/cross linking effectiveness at low temps.
Didn't say faying technique is new. The fillet method was the original approach, It works fine when applied correctly which was also validated over many decades. The faying technique, while new, was wisely adapted as it is far more forgiving type of application.
Why the mention of completely unrelated workmanship issues is deemed relevant to any part of this thread is a mystery. Enjoy your Monday.
Clouddancer
Well Known Member
Yes, I stepped into this trap and lost a few hours until someone here on VAF told me.While you are looking for possible fuel leakage locations under the proseal, do yourself a favor and tape over the fuel cap with packing tape to seal that part during your test.
")
