I am looking for pics from anyone that has run TS Flightline fuel lines from the valve to outside the fuselage. Specifically how it ran through those front brackets and what was used as a bushing? Thanks all.
Arnie
Arnie


How about this?I am looking for pics from anyone that has run TS Flightline fuel lines from the valve to outside the fuselage. Specifically how it ran through those front brackets and what was used as a bushing? Thanks all.
Arnie

What did you end up doing? I’m at that point now…. Does centering a larger hole (step drill) work? Can't move the hole too much given the last part of the fuel line (near the valve) is rigid.Thank you Tom
I have the straight straight ends I just received from you. I knew I would have to enlarge the holes in the brackets but with the little bracket it will cut into the hole next to it. Just looking for pics as to how the line goes through the bracket. Looks like I could enlarge the hole incorporating the smaller hole on bottom. I'll think about it. Thanks for your response.
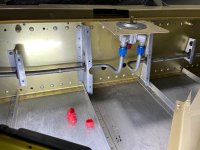
View attachment 71836


Because this was a retrofit to the plane after I bought it, I contemplated the best way to enlarge the hole. I considered removing the brackets, but I would have had to pull all the wiring and tubing that ran through them - a monumental task. In the end, I decided to do it with a dremel end mill by hand, because using a step drill would have been impossible due to the landing gear weldment being in the way. I did the best I could, but that end mill really likes to bounce around in the hole. The holes turned out awful-looking and way out of round, but they were functional.What did you end up doing? I’m at that point now…. Does centering a larger hole (step drill) work? Can't move the hole too much given the last part of the fuel line (near the valve) is rigid.


Doing the outboard brackets isnt hard---just unscrew them from the spar, then hold them, I use a unibit to enlarge the hole. On the inboard ones, use some downward and forward pressure to effectively 'move' the hole as youre enlarging it. Again, not as hard as it looks.Here's how it looks now.... kinda. After these were taken, I spent quite a bit of time making sure nothing was rubbing.
View attachment 89267
View attachment 89274
View attachment 89275
View attachment 89268View attachment 89269View attachment 89270View attachment 89271View attachment 89272View attachment 89273
It's easy during the build for sure. Upgrading the lines on a flying plane - not so much. You can't "just uncrew them from the spar" because there is a bundle of wires and brake line tubing going through the holes that would need to be removed before you could remove the brackets. That's a massive project that would take at least 80 hours, because you'd have to de-pin a bunch of connectors, pull apart the instrument panel, open up all the covers and panels for the tunnel, unbundle the instrument panel wiring harness, etc. Then you'd have another monumental task of terminating all those wires back to their connectors, breakers, etc. You'd have to bend all new brake lines, flare the ends, re-fill and bleed the brake lines, etc. Way too much work on a flying plane.Doing the outboard brackets isnt hard---just unscrew them from the spar, then hold them, I use a unibit to enlarge the hole. On the inboard ones, use some downward and forward pressure to effectively 'move' the hole as youre enlarging it. Again, not as hard as it looks.
Tom
You don't have to disconnect all those lines - you just need enough relative movement, with the bracket "unscrewed from the spar" to get access to the bracket with a drill and unibit. There is no requirement for the actual drilling to take place on your workbench.It's easy during the build for sure. Upgrading the lines on a flying plane - not so much. You can't "just uncrew them from the spar" because there is a bundle of wires and brake line tubing going through the holes that would need to be removed before you could remove the brackets. That's a massive project that would take at least 80 hours, because you'd have to de-pin a bunch of connectors, pull apart the instrument panel, open up all the covers and panels for the tunnel, unbundle the instrument panel wiring harness, etc. Then you'd have another monumental task of terminating all those wires back to their connectors, breakers, etc. You'd have to bend all new brake lines, flare the ends, re-fill and bleed the brake lines, etc. Way too much work on a flying plane.
Greg is correct---I was kinda referring to an initial install, but even a retrofit is fairly easy if you plan it.You don't have to disconnect all those lines - you just need enough relative movement, with the bracket "unscrewed from the spar" to get access to the bracket with a drill and unibit. There is no requirement for the actual drilling to take place on your workbench.
Mmmmm, I'm not sure. I have aluminum brake lines running through mine. Even if the wire bundle had slack in it, the brake lines don't, so it just wasn't a good option for me.You don't have to disconnect all those lines - you just need enough relative movement, with the bracket "unscrewed from the spar" to get access to the bracket with a drill and unibit. There is no requirement for the actual drilling to take place on your workbench.