Van's Air Force
You are using an out of date browser. It may not display this or other websites correctly.
You should upgrade or use an alternative browser.
You should upgrade or use an alternative browser.
Fuel leak.
- Thread starter flybye
- Start date


Any means to address this apart from removing the tank, cutting a hole and sealing from the inside?
You could try patching it from the outside, but you must remove the tank so you might as well do it right (reseal the leak on the inside).
Pull the tank
I would pull the tank and give a thorough review in that area. I believe you will find some proseal in that area very soft & gooey. I had a spot on my inboard end (AN fitting) that was leaking last year. The proseal in that area got soft where exposed to fuel & air. Cleaned up and re-seal was easy on mine since I didn’t have to cut into the tank. Still had to pull the tank to access the rear area where the fuel seeped.
Good luck in the correction.
D Weisgerber
Well Known Member
Vans sells a repair kit, it is a round aluminum patch and some closed end pulled rivets. I think Vans has something published about how to. I would look on their site.
PaulvS
Well Known Member
Has Vans published a procedure for cutting into the tank and resealing? I've seen posts from others who've done this but I'd like to know the best practice for collecting swarf. A vacuum is obviously out of the question.
If you lay the tank on a flat surface and use a fly cutter then most but not all of the swarf will fall outside. The tank will need to be completely clear of fuel before starting work on it, so it is fine to use a vacuum cleaner to suck up the bits.
I am not sure if Vans has a procedure on how to cut and fix the tanks, I couldn't find one, but it is not complicated, just messy.
Attachments
Last edited:
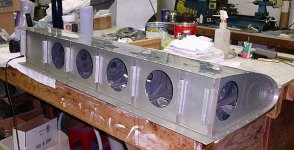
Looks like the rear baffle seal is leaking. Personally I would pull the rear baffle and reinstall to prevent future leaks, though this is much harder (need heat and make pulling tools). When you pull the tank, you will see how wide spead the problem is. If limited to that area, the repair can be done through a hole in the rear baffle. Remove old sealant, clean and scuff before applying new sealant. I WOULD NOT try sealing from the outside. Someone once brought me a tank with a half pint of proseal all over the outside of the tank and it was still leaking.
Last edited:
Not such a bad job
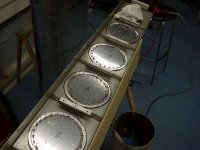
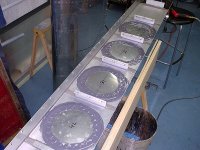
Just finishing the second hole in my tank. Still in the building process but the task is pretty easy. Like others of said go very slow with the fly cutter. It will wobble at even a slow speed,but patience is important. Once the hole is cut sealing with proseal with the dash A works. It is slight more fluid and will flow into the leak easier. The Vans kit is a round piece of aluminum with rivets.
Just finishing the second hole in my tank. Still in the building process but the task is pretty easy. Like others of said go very slow with the fly cutter. It will wobble at even a slow speed,but patience is important. Once the hole is cut sealing with proseal with the dash A works. It is slight more fluid and will flow into the leak easier. The Vans kit is a round piece of aluminum with rivets.
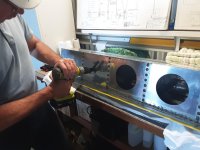
If you don't have one, buy a 1/4" drive mini air ratchet.
https://www.harborfreight.com/1-4-quarter-inch-air-ratchet-wrench-34900.html
It is super helpful removing/installing the rear Z bracket bolts thru the wing spar.
JMHO
https://www.harborfreight.com/1-4-quarter-inch-air-ratchet-wrench-34900.html
It is super helpful removing/installing the rear Z bracket bolts thru the wing spar.
JMHO
D Weisgerber
Well Known Member
I use a 3/8 drive rechargeable ratchet for the Z bracket bolts, like Cary said. It is much quicker and a lot less frustrating.