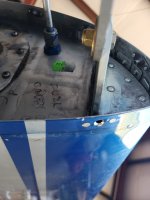
Developed a drip leak in left tank at the leading edge end rib. Hard to tell if its the T 905 bracket rivits or the rib to leading edge skin. . This is the bracket that supports the tank to the fuselage. Anyone experienced a leak in this area and had success with a fix? This is in a "pro built tank" back 2006 or maybe 7. Short of either pulling the tank or wing. What's the thinking on first prosealing the perimeter of the bracket and rivit heads in place and see if this has any results??

Van's Air Force
You are using an out of date browser. It may not display this or other websites correctly.
You should upgrade or use an alternative browser.
You should upgrade or use an alternative browser.
Fuel Leak at T 905 L
- Thread starter DennisRhodes
- Start date

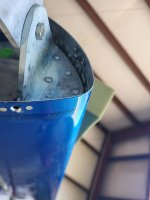
Sure seems like a lack of proseal on the end rib. My amateur built tanks have a proseal fillet around the bracket. Looks like the cork gasket may also have some leaks around some of the screws and or the gasket itself. My thinking is you have nothing to loose by trying a fillet around the bracket which could possibly save quite a bit of work.
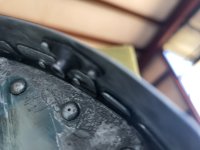
Yeah, while I'm into proseal my thinking was to also add some to the screw heads there on the access hole cover... There are some stains on that cover and maybe the end rib that just has a cork gasket and sealer but don't believe that's the "Drip " I'm looking for. Going to leave the cork gasket alone for now and see how this other leak repair goes... Thanks.
I have fixed a few of these with leaks in that area. There were pounds of proseal on the exterior from numerous attempts to stop the leak, none of which worked. If you want it to stop, you need to cut a hole in the rear baffle and repair from the inside. Not a fun job, as to do it right you have to get rid of the old, failed stuff, or at least most of it.
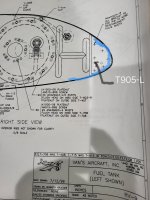
I think the AN3 bolt attaching the tank to the fuselage is not quite to plans.. I believe it’s supposed to be slotted, with the big washer on the front side, attached with a nutplate and Saftey wired. The theory is that incase of an accident, the bolt will slip though and not break open the tank.
Iirc that was a design change, but not an sb. My parts were not slotted and had to modify them.I think the AN3 bolt attaching the tank to the fuselage is not quite to plans.. I believe it’s supposed to be slotted, with the big washer on the front side, attached with a nutplate and Saftey wired. The theory is that incase of an accident, the bolt will slip though and not break open the tank.
You may curb the drip for now, but next CI you WILL be cursing at yourself because now you will actually have to do a proper repair… & clean out the external sealant you just smeared on, now contaminated. Get a Vans tank repair cover plate & follow LR172’s advice.Yeah, while I'm into proseal my thinking was to also add some to the screw heads there on the access hole cover... There are some stains on that cover and maybe the end rib that just has a cork gasket and sealer but don't believe that's the "Drip " I'm looking for. Going to leave the cork gasket alone for now and see how this other leak repair goes... Thanks.
Tip- while you have access, check ALL the sealant joints in the tank bay, scrape out any soft sealant, apply a generous layer over all accessible sealant, especially the upper & lower rear baffle seams & corners.
Tip- be generous with your sealant, smooth it out with your finger. DO NOT dab it in & leave it rough as it makes it impossible to tell if you leave cavities, & also makes it impossible to add more sealant later.
I had a leak there on a 6A. I removed the tank from the wing and removed the existing access panel to inspect the area with a mirror. It turned out the builder had not covered all the rivets on the inside of the bracket. I added proseal to cover the rivets and let it cure. The only real trick is applying the proseal having to see your work in a mirror but you can place a fairly large one (as big as will fit through the access panel) in the tank and rest it on the first rib while you work.
You really should update that tank-to-fuselage attach. With the way you have it, if the wing is hit in accident, it can rip the tank open.
I dont understand this. Is this something unique to this model or anything I should look out for in a 10?
This bracket only supports the weight of the tank. It is not otherwise structural. If the attach bracket is slotted and the wing is pushed back, as in an accident, the brackets can be pulled apart without compromising the tank. This is the procedure for all RVs with wing tanks.
skylor
Well Known Member
Iirc that was a design change, but not an sb. My parts were not slotted and had to modify them.
It might have been a change on the -6 but I'm pretty certain the slotted bracket was included in the original -9 design.
Skylor
The 10s have different attachment or lack of attachment, depending on when it's built. Older 10s have the tank attach bracket T-1005 connected to the fuselage, but the plan was revised later, no connection between the tank attach bracket and fuselage at all.I dont understand this. Is this something unique to this model or anything I should look out for in a 10?
Mel, I replaced the hardware on the Fus to tank bracket. I found the fuselage half slotted and reversed the bolt head and installed the short nutplate. Got the other side down for next C.I. appreciate you calling that to my attention. I also found the nylon nut fairly tight. May have contributed to my tank leak!??? What do you think?You really should update that tank-to-fuselage attach. With the way you have it, if the wing is hit in accident, it can rip the tank open.


Last edited:
Fairly common leak area, and if you have the tank end fuel pick-up cut out, it's easy witht the tank off. I have successfully sealed up this area on an RV-8 with the tank on, but results vary and it could leak again. I've done a bunch of resealing and no 2 are the same. An on wing fix may get you to the next down time for deeper reseal. BTW, I do this in the heavy jet overhaul world, and they all leak too.Developed a drip leak in left tank at the leading edge end rib. Hard to tell if its the T 905 bracket rivits or the rib to leading edge skin. . This is the bracket that supports the tank to the fuselage. Anyone experienced a leak in this area and had success with a fix? This is in a "pro built tank" back 2006 or maybe 7. Short of either pulling the tank or wing. What's the thinking on first prosealing the perimeter of the bracket and rivit heads in place and see if this has any results??
Sorry, should have been more clear. Am sure all the later models were slotted.It might have been a change on the -6 but I'm pretty certain the slotted bracket was included in the original -9 design.
Skylor
No, the 10 is correctly set up. Vans originally had a design shown in the pic above. They later realized what mel said could happen, so they changed the design from a hole to a slot. At the time they did this, only the 3,4,6 were in production. So all future models have the correct design.I dont understand this. Is this something unique to this model or anything I should look out for in a 10?
