What's new
Van's Air Force

Don't miss anything! Register now for full access to the definitive RV support community.

Free Standing Wing Jig

TimSPEED

Member
Hi everyone.
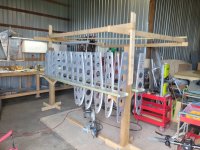
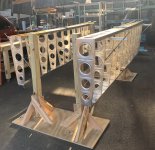
Just wondering if anyone has built a free standing wing jig. The ceiling in my workspace is very high, making it challenging to do a floor to ceiling post per the plans suggestions. And I am guessing (hoping even) that I am not the first to be in this boat?

So please if you have done this and would like to share, that's much appreciated.

Thanks
 
This is what I did and it was very sturdy. The diagonal brace on top kept everything in position. The 6x6 posts were anchored to the floor.
 

Attachments

  • Wing Jig.jpg
    Wing Jig.jpg
    223.6 KB · Views: 49
Hey, thanks very much for the share.
Also I see you have it set with a wing each side, did that work good for you? I like the idea of progressing each wing half together.
 
I made up a free-standing frame to support both wings at once, with enough space between them to work easily. Built it in place on the workshop floor to make sure everything was square.

logistics_2017-11-16_02.png

I supported the spars outside the frame, on steel angle outriggers with adjustable supports. Similar but smaller supports lower down to adjust the rear spar positions and angles.

logistics_2017-12-15_01.png

I also used the central wooden outriggers on the floor to attach threaded rods supporting the rear spars near their mid points.

rwing_2020-09.jpg

All worked well, as long as I remembered not to trip over the cross-members on the floor.
 
The one for my RV-3B is HERE and drawings for it are HERE.

I wanted at least 3 feet all around the wings and the same between them. More is a little better. It definitely helped to have them together like that.

I put a big R and a big L on each wing, on the blue vinyl, just as a reminder. That didn't hurt one bit.

Dave
 
I made up a free-standing frame to support both wings at once, with enough space between them to work easily. Built it in place on the workshop floor to make sure everything was square.

View attachment 71087

I supported the spars outside the frame, on steel angle outriggers with adjustable supports. Similar but smaller supports lower down to adjust the rear spar positions and angles.

View attachment 71088

I also used the central wooden outriggers on the floor to attach threaded rods supporting the rear spars near their mid points.

View attachment 71089

All worked well, as long as I remembered not to trip over the cross-members on the floor.
Mine was very similar, I only used one cross braces across the top and I put diagonal braces on the post at the floor level and top. Love the threaded rod in the middle, I had a short 2X4 there that I kicked out every time I turned around. I left my strings attached so I could do a quick check before starting a work session. Oh, FWIW, it's hard to find a 4X4 that won't warp, especially in a heated shop. Most of them are cut from the pith of the log which is very unstable wood.
 
I built one wing for my RV-8 in Pennsylvania. When I moved to North Carolina, I needed a "free standing" holding fixture so this is what I came up with. I used all scrap material and did not need to buy anything. The green bags on the bottom are lead shot bags used as weights when I am at the gun range.

2020-03-27 10.31.53.0340.jpg

2020-03-27 17.13.11.4670.jpg

2020-03-29 14.13.08.7200.jpg
 
I constructed mine from steel...and then bolted them to the floor using embedded inserts.

Once the wings were complete, I filled the bolt holes/covered the anchors with a polymer filler, then epoxy coated my floor.

20121024_194403.jpg
 
Last edited:
Back
Top