What's new
Van's Air Force

Don't miss anything! Register now for full access to the definitive RV support community.

FlyLed Tail Light Mounting Bracket Cracks Fairing

raabs

Well Known Member
Be aware that the tail light mounting bracket (bottom of this flyled page https://flyleds.com/products/#!/Tail-Light-kit-model/p/48165109/category=0 ) four rivets that connect it to the fairing can crack the fairing. The bracket is very useful but riveting is apparently not going to work.

I installed it today and it cracked the fiberglass fairing at three of the 4 holes. I sanded off the gelcoat to confirm if it was just gelcoat and it is the fiberglass also - cracked all the way through. Sigh. Have to figure out an alternative to mount the bracket. Maybe proseal or Click Bond adhesive it on. The bracket is underneath the led light and is a newish accessory to make it easier to mount the tail light onto the fairing.
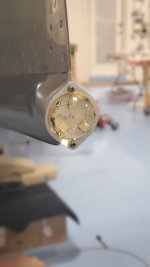
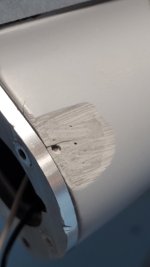
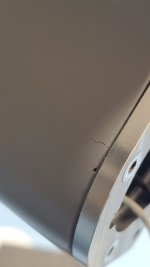
20240817_185953.jpg
20240817_190154.jpg

20240817_190209.jpg
 
I installed this on my -10 rudder build recently and one of the rivets did cause a crack and a bit of the outside fiberglass broke off. I didn't think it was a big deal -- I just mixed some micro beads and filled with epoxy. I also took the opportunity to blend the bracket in. After paint I think it will look like the bracket was built in.

There is nothing structural or critical about this piece from what I understand.
 
Itf the crack is all the way through then it may end up cracking your paint also. Micro balloons don't have much structural strength. Really need to fiberglass from the inside for the structural aspect to hold it together and then repair the visual crack on the outside.
 
Instead of pop rivets, perhaps the bracket could be attached with #6 countersink screws and some epoxy adhesive on the screw threads? The bracket would need to be clamped or held in place with tape while the epoxy hardens.
 
Perhaps a combination of bonding and mechanical attachment. For the rivets, you might try a softer rivet that doesn't develop the full clamping pressure or partially setting the provided rivets and cutting off the mandrel.
 
Last edited:
Thanks all. Seems more than one is experiencing this. The space inside the fairing for the rivets is the corner where the back wall of the fairing (base of the light and bracket) is glassed to the sides. There isn't any room for washers. #6 clickbond nutplates or really even a nut is not about to fit. A couple of the rivet holes go into the fillet between the back wall and sides.

I have installed it with the rivets and cracks and now put a big fillet of flox inside between the back and side walls that covers the rivers and cracks on inside. On the outside, I'll remove the gelcoat in the edge areas and repair the cracks.

I'm kind of thinking the click bond adhesive or similar that is paintable would be the way to go, maybe with a couple of #6 screws for indexing to keep it in place and tight while drying.

There will be some variableness on the inside fillet depending on how the fairing is laid up at mfgr but there is very little/no room for mechanical fasteners inside.

Cheers.
 
When retrofitting a uAvionix TailbeaconX to the rudder fairing on our -6, I found voids in the fibreglass/gelcoat interface.

I made a threaded retaining bracket to go inside the fairing, mixed up some epoxy/flox to reinforce the fairing and glue the retaining bracket in place.

Photos here:

https://photos.app.goo.gl/ckdLAVJ6WL5otPzs8

(To keep it slightly Flyleds related, I’m a very happy Flyleds Taildragger Max user and eagerly waiting on Paul to produce a kit that’ll replace my old high current wingtip Whelen A600 Nav light / Strobes.)

Don H
Sydney, Aus
 
Back
Top