What's new
Van's Air Force

Don't miss anything! Register now for full access to the definitive RV support community.

Flap/aileron alignment

RV7 To Go

Well Known Member
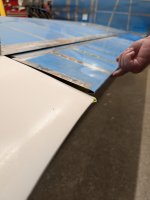
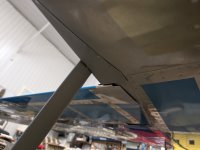
If I align the aileron with the tooling holes as shown in the dwgs the flap at the inboard overlap is about 1/2" lower than the belly skin. If I put the flap overlap up to the belly skin the aileron is not aligned to the tooling holes. Both sides are the same. Curious what all the smart people in RV-8 land think about what I should do about this. Use the tooling holes for aileron alignment and make a small fairing to seal up the flap to fuselage gap or align the flap to the fuselage and then the aileron and tip to the flap? The wing incidence is set and the rear spars drilled. Alignment was triple checked and is on the money.

Pic 1 shows the gap when the tooling holes are used for alignment. Pic 2 shows the alignment when the flap is touching the belly skin with the tip aligned to the tooling holes.

Thoughts are much appreciated.
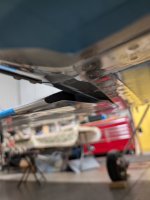
PXL_20240816_191756192.jpgPXL_20240816_191724891.jpg
 
It’s pretty common but frustrating.
 
First verify your set the wing angle of incidence correctly. Let us know.

Carl
As mentioned in my OP the incidence was triple checked and is right on as per the dwg. It was set using a block as per the dwg dimension and a 2ft bubble level with a digital level on top. It was checked from the root to the tip on both wings and all within .1 degree. The fuselage was levelled in flight and horizontally. The wing sweep was within the width of a string line using a laser level and the triangulation was within 1/8".
 
As mentioned in my OP the incidence was triple checked and is right on as per the dwg. It was set using a block as per the dwg dimension and a 2ft bubble level with a digital level on top. It was checked from the root to the tip on both wings and all within .1 degree. The fuselage was levelled in flight and horizontally. The wing sweep was within the width of a string line using a laser level and the triangulation was within 1/8".
I had similar. Checked everything five ways to Sunday using a machinist level and such. Bent up the flap overlap skin and moved on. Factory said not uncommon.
 
As mentioned in my OP the incidence was triple checked and is right on as per the dwg. It was set using a block as per the dwg dimension and a 2ft bubble level with a digital level on top. It was checked from the root to the tip on both wings and all within .1 degree. The fuselage was levelled in flight and horizontally. The wing sweep was within the width of a string line using a laser level and the triangulation was within 1/8".
Then I suggest you move beyond the tooling hole approach for rigging:
- Verify no twist in flaps or ailerons.
- Start with the flaps, get them fully up and matching (as in using straight edges along the top skin and measuring gaps on the flap trailing edge), then align the ailerons to the flaps.
- Check that aileron hinge height and aileron to top skin spacing is the same inboard and outboard, and that it is the same on both sides.

I would fly the plane to verify rigging. Once satisfied you can decide if you want to then work the wing tips so they fall in line with the ailerons. Unless way off this last step tends to be mostly cosmetic.

Carl
 
One side of my wing, the flap fitted perfectly. Another side there was about less than 1/2 inch gap. I carefully trimmed the excess flap overhang and made a fold so that it sealed with the fuselage. You can't see it when the plane is sitting on the ground. You really cannot discern the difference when the flap are extend to the full position. I could not tell a difference in flight because if the incidence of both of the wings are identical then the airplane will fly straight. I think everybody has some small gap.
 
Last edited:
I'm just a little confused...you state that that "Pic 2 shows the alignment when the flap is touching the belly skin with the tip aligned to the tooling holes." The end rib tooling hole alignment jig is typically a piece of wood that's drilled with the same hole size and centerline distance as the two tooling holes in the end ribs. You can draw two parallel lines from the OD of those two holes on the wood and extend that out to the aileron trailing edge. Those two lines should straddle the outboard trailing edge of the aileron. You could draw one line from the hole centerlines, but I found it was easier to drop bolts in the holes and lay a straightedge up against them to get the two lines. The fiberglass wingtip is not yet in place when this is done. I used two rubber-tipped spring clamps on the board to hold the aileron in place until all the pushrods were set to the proper length.

There are obviously different variations of doing this, but you need to make sure that you're using the jig(s) to get the ailerons in the correct position and not just aligning the aileron to the fiberglass wingtip. The photo would seem to show that you're using the fiberglass wingtip to ensure alignment, although your text says otherwise. The fiberglass wingtip may be cut and modified afterwards to match where the aileron trailing edges are.

I've utilized this alignment method on two different RV-7's (same basic wing as an RV-8) and neither has a heavy wing.
I used the tooling holes to align the aileron as per the manual and set the pushrod to the alignment tool. I then drilled the tip to match the aileron. This was all done without the flaps in position on both wings. I then installed the flaps and aligned them to the ailerons on both wings which is when I discovered the flap overlap to fuselage gaps which were about the same on both sides with the ailerons aligned to the tooling holes. The difference to the tip shown in pic 2 is when I raise the flap and aileron so the flap overlap is touching the fuselage and the tip remains at the tooling hole position. The flaps and ailerons are all straight.

I used the same method when I built my 7 and had no issues...the flap overlap was tight to the belly skin. I don't understand why this one is so different and am just trying to understand if the correct solution would be to match the tooling hole height and and fair the flap or raise the flap to the fuselage and modify the wingtip.
 
After checking everything out for the umpteenth time, I have decided to follow Carl's advice and set the flaps up tight, then set the ailerons to the flaps and the tips to the ailerons. After looking at how poorly the flap root fairings fit with the flaps set to the aileron it seemed the logical option. Having done some preliminary rigging I can get the required travel for the ailerons and flaps.

Thanks to all for your suggestions!
 
Here is a document that Vans produced on the subject. Four RV8’s were finished and test flown at Corona airport in the period 2020-2023. All used the tooling hole alignment technique albiet with different tooling and experience levels. All flew in trim, hands off first flight. All had flaps That hung down below the fuse to varying degrees that had to be bent up.
 
Last edited:
Some early RV-4 builders of yesteryear that I knew would make an airfoil template out of plywood. Use a 1:1 scale drawing or trace the outboard wing rib. They would cut the shape in thin plywood, then cut in half along the chord line. Place the top half over the wing, place the bottom half under the wing, about midspan of the flaps when they are up. This would guarantee the flaps were truly up (in trail) and could be adjusted if not. Then align the aileron to the flap. You are now properly rigged. Bend up the inboard flap overlap as needed and rework the wingtip trailing edge as needed for cosmetic aileron alignment. Essentially, the same idea as posted a few times above, with the addition of the airfoil "clamp" to verify flap up position as the starting point. I did this and got lucky that a laser line shot through the tooling holes aligned with the aileron trailing edge after doing the above.
 
After checking everything out for the umpteenth time, I have decided to follow Carl's advice and set the flaps up tight, then set the ailerons to the flaps and the tips to the ailerons. After looking at how poorly the flap root fairings fit with the flaps set to the aileron it seemed the logical option. Having done some preliminary rigging I can get the required travel for the ailerons and flaps.

Thanks to all for your suggestions!
Seems like you are making great progress on your RV8. It's not a surprise especially for a repeat offender :)

Report to us how the airplane flies when you finish.
 
After doing a few other things I got back to the aileron/flap alignment. What I did not like about bringing the flap overlap up to the fuselage was that the aileron counter weight then ended up below the bottom skin of the wing which would just be additional drag. I think the plane would still fly fine but it just didn't feel right to me. So I went back to lining up the aileron to the tooling holes. I cheated a bit and lined up the bottom skin of the aileron instead of the center. The counter weight didn't hang below and the flap overlap was a bit closer to the fuselage. Needs a little massaging on the overlap but better than before. No concerns with how it will fly. Done and moving on!

And yes, I installed a step. Sacrilege I know, but I am old and that's a big step up to the wing. Still needs a popper in the open hole due to no bucking bar access.

Thanks all for the feedback!

1000002767.jpg
 
Back
Top